



ARTICLE CONTENTSOn this page 8 sections
Inverter Installation Process
Performance Objectives
By the end of the lesson, students should be able to:
- correctly size inverter for a given load;
- identify safety factors for inverter sizing;
- select appropriate tools and instruments for solar PV inverter installation;
- explain the steps in installing inverters;
- install inverter correctly.
Meaning of an Inverter
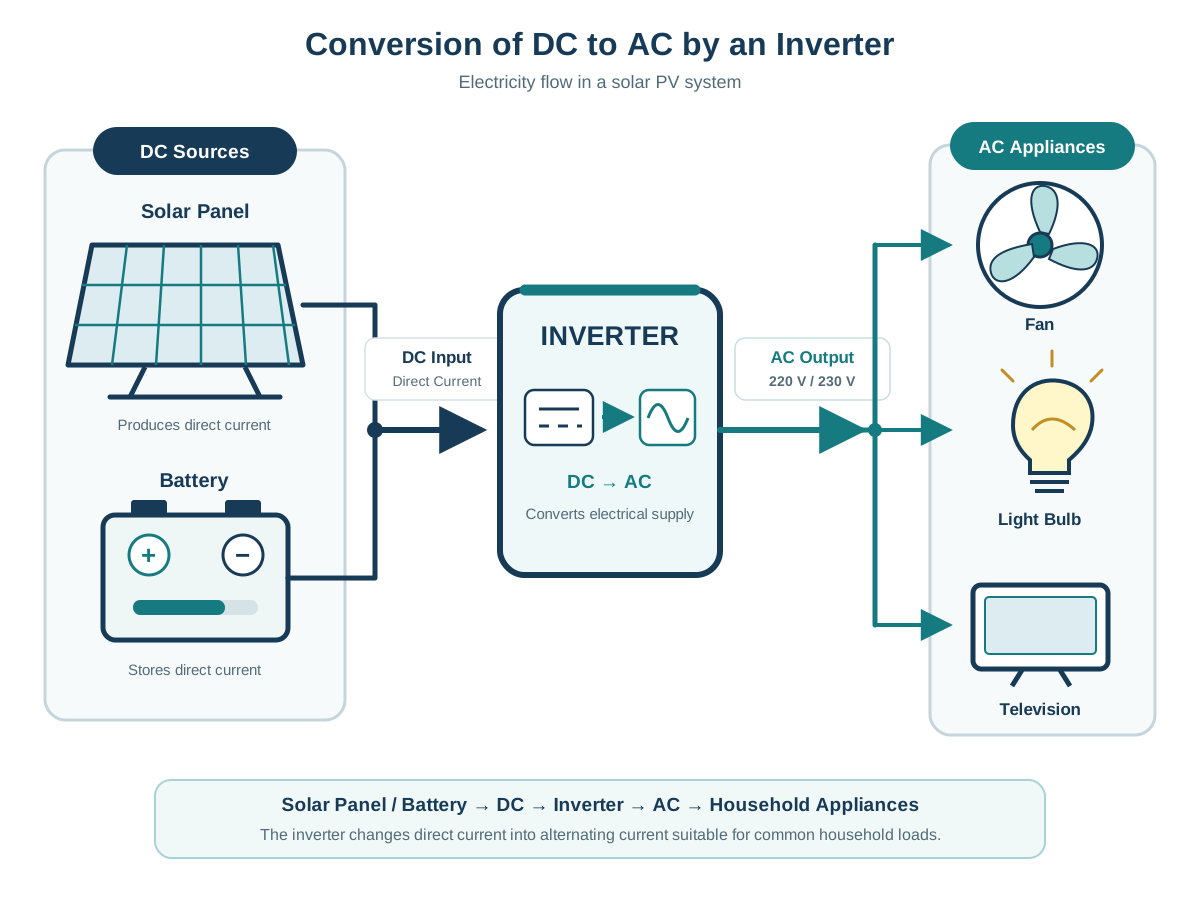
An inverter is an electrical device that converts Direct Current (DC) electricity into Alternating Current (AC) electricity.
Solar panels and batteries produce Direct Current, which flows in only one direction. However, most household appliances in Nigeria, such as televisions, fans, refrigerators and light bulbs, require Alternating Current, which reverses direction periodically. The inverter serves as the bridge that makes solar and battery power usable for these standard appliances.
Sizing an Inverter
Inverter sizing is the process of determining the power capacity of an inverter required to safely run a specific set of electrical appliances.
To size an inverter correctly, the total power consumption of all appliances that will run at the same time must be calculated. Power consumption is measured in watts (W). The inverter selected must have a continuous power rating that is equal to or greater than this total load.
Appliances generally fall into two categories based on their power demands:
- Resistive loads: These appliances require a constant amount of power to start and run. Examples include LED bulbs, televisions and computers.
- Inductive loads: These appliances contain electric motors and require a high amount of initial power, known as surge power or starting current, to get running. Examples include refrigerators, air conditioners, water pumps and electric fans.
An inverter must be able to handle both the continuous running power and the temporary surge power of the connected appliances.
Worked Example of Load Calculation
A small household in Nigeria intends to power the following appliances simultaneously using a solar PV system:
- Five LED bulbs rated at 15 watts each.
- Two standing fans rated at 75 watts each.
- One television set rated at 120 watts.
The total continuous load is calculated as follows:
$$\text{Total Load} = (\text{Number of Bulbs} \times \text{Bulb Wattage}) + (\text{Number of Fans} \times \text{Fan Wattage}) + (\text{Number of TVs} \times \text{TV Wattage})$$
$$\text{Total Load} = (5 \times 15\text{ W}) + (2 \times 75\text{ W}) + (1 \times 120\text{ W})$$
$$\text{Total Load} = 75\text{ W} + 150\text{ W} + 120\text{ W} = 345\text{ W}$$
The total continuous load for this household is 345 watts.
Safety Factors for Inverter Sizing
A safety factor is an extra capacity margin added to the calculated total load to ensure the inverter operates safely and efficiently without overloading.
In professional solar PV installations, a safety factor of 20% to 25% (represented mathematically as a multiplier of 1.20 to 1.25) is standard. This means the inverter is sized to be 20% to 25% larger than the maximum expected continuous load.
The safety factor is important for several reasons:
- Handling Surge Currents: It provides a buffer for the high starting currents of inductive loads like fans and refrigerators.
- Preventing Overload: It ensures the inverter does not shut down or sustain damage if multiple appliances are switched on at the same time.
- System Longevity: Running an inverter at its maximum capacity continuously generates excessive heat, which shortens its lifespan. A safety factor allows the inverter to operate within a cool, efficient range.
- Future Expansion: It allows the user to add small appliances in the future without needing to replace the inverter immediately.
Applying the Safety Factor to the Worked Example
Using the calculated total continuous load of 345 watts, a safety factor of 25% (1.25 multiplier) is applied to find the minimum required inverter capacity:
$$\text{Minimum Inverter Capacity} = \text{Total Load} \times \text{Safety Factor}$$
$$\text{Minimum Inverter Capacity} = 345\text{ W} \times 1.25 = 431.25\text{ W}$$
Since inverters are manufactured in standard sizes, a standard inverter rating that is equal to or higher than 431.25 watts must be selected. In this case, a 500-watt (or 0.5 kVA) inverter is the most appropriate choice available in the market.
Solar PV Inverter Installation Tools and Instruments
Installing a solar PV inverter requires specific tools and measuring instruments to ensure electrical safety, correct connections and proper system operation.
The essential hand tools for installation include:
- Insulated screwdrivers: Used to tighten terminal screws on the inverter, battery and distribution board while protecting the installer from electric shock.
- Wire strippers: Used to remove the plastic insulation from electrical cables without damaging the copper conductors inside.
- Crimping tools: Used to secure cable lugs or terminals onto the ends of heavy-gauge battery and solar cables.
- Cable cutters: Heavy-duty cutters used to cut thick copper cables to the required lengths.
- Insulated spanners and sockets: Used to tighten battery terminal bolts securely to prevent loose connections and sparking.
The essential measuring instruments include:
- Digital multimeter: Used to measure DC voltage from the battery bank and solar array, AC voltage from the inverter output, and to test circuit continuity.
- DC/AC clamp meter: Used to measure the current flowing through the cables without disconnecting them, by clamping the meter around a single conductor.
The required Personal Protective Equipment (PPE) includes:
- Insulated safety gloves: Protect the hands from electrical shocks and burns during wiring.
- Safety boots: Provide insulation from the ground and protect the feet from falling heavy objects like batteries or inverters.
- Safety goggles: Protect the eyes from accidental sparks or battery acid splashes.
Steps in Installing Inverters
The installation of a solar PV inverter must follow a systematic process to ensure safety, efficiency and compliance with electrical standards.
The installation process consists of the following steps:
- Site Selection and Preparation: The inverter must be installed in a clean, dry, well-ventilated area. It should be kept away from direct sunlight, moisture, dust and flammable materials. Adequate clearance space must be left around the inverter vents to allow heat to escape.
- Mounting the Inverter: The inverter is mounted securely on a vertical wall or a dedicated equipment rack. Because inverters can be heavy and generate heat, the mounting surface must be strong and non-flammable (such as concrete or brick).
- DC Cable Connection: The DC terminals of the inverter are connected to the battery bank. Thick, high-quality copper cables must be used to handle the high current. The positive terminal of the battery bank is connected to the positive DC terminal of the inverter (usually marked in red or with a plus sign), and the negative terminal is connected to the negative DC terminal of the inverter (usually marked in black or with a minus sign).
- AC Cable Connection: The AC output terminals of the inverter are connected to the building’s AC distribution board (consumer unit) or directly to the dedicated loads. A changeover switch is often installed to allow switching between the inverter power and the utility grid (NEPA/discom) power.
- System Grounding (Earthing): The metal chassis of the inverter is connected to the earth electrode (ground rod) using an earthing cable. This protects users from electric shock in the event of an internal insulation fault.
- Commissioning and Testing: Before switching on the system, all connections are double-checked for tightness and correct polarity. The battery voltage is measured using a multimeter to ensure it matches the inverter’s nominal DC input voltage. The inverter is then switched on, and the AC output voltage is verified before connecting any loads.
How to Install a Solar PV Inverter
This practical procedure outlines the steps for safely mounting and connecting a low-power solar PV inverter to a battery bank and a test load under teacher supervision.
The required materials and equipment are:
- One 12V or 24V off-grid inverter (with nameplate visible)
- One matching battery bank (12V or 24V deep-cycle battery)
- Set of insulated DC battery cables (red and black) with pre-crimped lugs
- Digital multimeter
- Insulated spanners and screwdrivers
- Personal Protective Equipment (safety gloves, boots and goggles)
- A simple AC test load (such as a 60W incandescent bulb in a holder with a plug)
The procedure involves the following steps:
- Put on the appropriate Personal Protective Equipment, including safety gloves and goggles, before handling any electrical components.
- Inspect the inverter nameplate to verify its nominal DC input voltage (e.g., 12V DC) and AC output voltage (e.g., 220V AC).
- Verify that the battery bank voltage matches the inverter’s nominal DC input voltage using the digital multimeter.
- Ensure the inverter’s power switch is in the “OFF” position.
- Mount the inverter securely onto the demonstration board or wall bracket using the mounting screws.
- Connect the red (positive) DC cable to the positive (+) terminal of the battery bank, then connect the other end to the positive (+) DC terminal of the inverter. Tighten the bolts firmly using an insulated spanner.
- Connect the black (negative) DC cable to the negative (-) terminal of the battery bank, then connect the other end to the negative (-) DC terminal of the inverter. Secure the connection tightly. Note: A small spark may occur when making the final connection; this is normal as the inverter’s internal capacitors charge.
- Connect the AC test load to the AC output socket of the inverter.
- Turn on the inverter power switch. Observe the indicator lights and listen for the startup beep or cooling fan.
- Use the digital multimeter (set to AC voltage mode) to measure the voltage at the inverter’s AC output to ensure it reads approximately 220V to 230V.
- Switch on the test load to verify that the inverter successfully powers the appliance.
- Turn off the test load, switch off the inverter, and safely disconnect the components in reverse order, starting with the negative DC cable.
Important safety precautions during the procedure include:
- Never reverse the polarity of the DC connections (connecting positive to negative), as this can permanently damage the inverter and cause battery hazards.
- Do not touch the bare metal of the positive and negative battery terminals simultaneously with any metal tool, as this will cause a short circuit.
- Ensure all cable connections are tight; loose connections create high resistance, which leads to heat generation and potential fire hazards.


0 comments
Open the discussion when you need it. Comments stay collapsed until requested so the initial article remains light.