


ARTICLE CONTENTSOn this page 11 sections
Magnetic Field
Performance Objectives
By the end of the lesson, students should be able to:
- explain the meaning of magnetic field
- identify and differentiate the poles of a bar magnet, and distinguish between magnetic and non-magnetic materials;
- draw magnetic force lines due to:
- a bar magnet,
- a straight current-carrying wire,
- current in a solenoid;
- explain the effect of the magnetic force on a moving electric charge;
- describe the use of a bar magnet as a simple compass to identify the earth’s magnetic north-south directions.
- make a magnet from a soft iron bar,
- make an electromagnet and explain its use in:
- electric bell,
- telephone ear piece;
Understanding Magnetic Fields
A magnetic field is the region around a magnet or a current-carrying conductor where magnetic forces can be detected.
When a magnetic material or another magnet is brought into this region, it experiences a force. This force can either attract or repel the object. The strength of the magnetic field is strongest close to the magnet and decreases with distance.
The presence and pattern of a magnetic field can be visualised using iron filings. When iron filings are sprinkled around a magnet, they arrange themselves in specific patterns that show the direction and shape of the magnetic field.
Magnetic and Non-Magnetic Materials
Materials can be classified based on how they interact with a magnetic field.
Magnetic Materials
Magnetic materials are substances that are strongly attracted by a magnet and can be magnetised themselves.
These materials contain elements like iron, nickel, and cobalt. When placed in a magnetic field, they become magnetised and are pulled towards the magnet.
Examples of magnetic materials include:
- Iron (e.g., iron nails, paper clips)
- Nickel (e.g., some coins)
- Cobalt
- Steel (an alloy of iron)
Non-Magnetic Materials
Non-magnetic materials are substances that are not attracted by a magnet and cannot be magnetised.
These materials do not contain the elements necessary to interact strongly with a magnetic field. They remain unaffected when brought near a magnet.
Examples of non-magnetic materials include:
- Wood
- Plastic
- Glass
- Copper
- Aluminium
- Rubber
Poles of a Bar Magnet
Every magnet has two ends where its magnetic strength is concentrated. These ends are called magnetic poles.
A magnet always has two poles: a North pole (N) and a South pole (S). Even if a magnet is broken into smaller pieces, each piece will still have its own North and South poles.
Identifying and Differentiating Poles
The poles of a magnet can be identified and differentiated by observing their interaction with another known magnet or a compass.
- Using another magnet:
- Bring one end of an unknown magnet close to the North pole of a known magnet.
- If the unknown end is repelled, it is a North pole.
- If the unknown end is attracted, it is a South pole.
- Repeat the process with the other end of the unknown magnet.
- Using a compass:
- A compass needle is a small magnet with a known North pole (usually coloured red or marked ‘N’).
- Bring one end of the unknown magnet close to the compass needle.
- If the compass’s North pole is repelled, the unknown end is a North pole.
- If the compass’s North pole is attracted, the unknown end is a South pole.
Laws of Magnetic Poles
The interaction between magnetic poles follows specific laws:
- Like poles repel: Two North poles will push each other away, and two South poles will also push each other away.
- Unlike poles attract: A North pole and a South pole will pull towards each other.
Magnetic Lines of Force
Magnetic lines of force, also known as magnetic field lines, are imaginary lines used to represent the direction and strength of a magnetic field.
These lines help to visualise the magnetic field around a magnet or a current-carrying conductor.
Properties of Magnetic Lines of Force
- They always emerge from the North pole and enter the South pole outside the magnet. Inside the magnet, they travel from the South pole to the North pole, forming continuous closed loops.
- The direction of the magnetic field at any point is given by the tangent to the magnetic field line at that point.
- The density of the magnetic field lines (how close they are to each other) indicates the strength of the magnetic field. Where the lines are closer, the field is stronger (e.g., near the poles).
- Magnetic field lines never intersect or cross each other. If they did, it would mean that the magnetic field has two directions at the point of intersection, which is impossible.
Drawing Magnetic Force Lines
Magnetic Field Due to a Bar Magnet
The magnetic field lines around a single bar magnet show lines emerging from the North pole and curving around to enter the South pole. The lines are densest at the poles, indicating the strongest field.
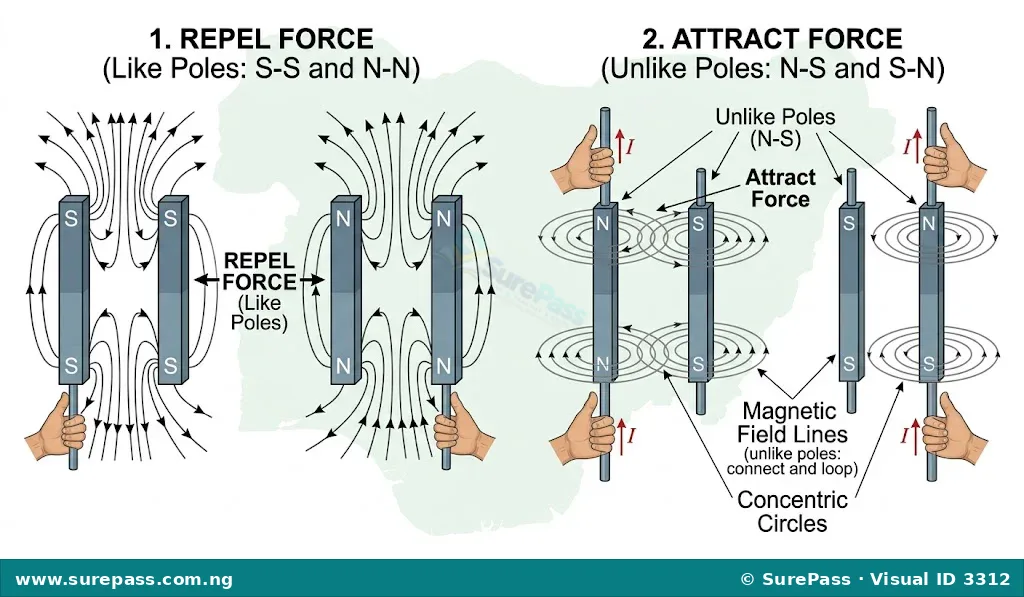
When two bar magnets are brought close to each other, their magnetic fields interact. The pattern of the field lines depends on whether like poles or unlike poles are facing each other.
Two Like Poles (e.g., North-North)
When two like poles face each other, the magnetic field lines repel. They push away from each other, creating a neutral point or region of weak field between the poles where the field lines are sparse.
Two Unlike Poles (e.g., North-South)
When two unlike poles face each other, the magnetic field lines attract. They connect directly from the North pole of one magnet to the South pole of the other, showing a strong attractive force.
Magnetic Field Due to a Straight Current-Carrying Wire
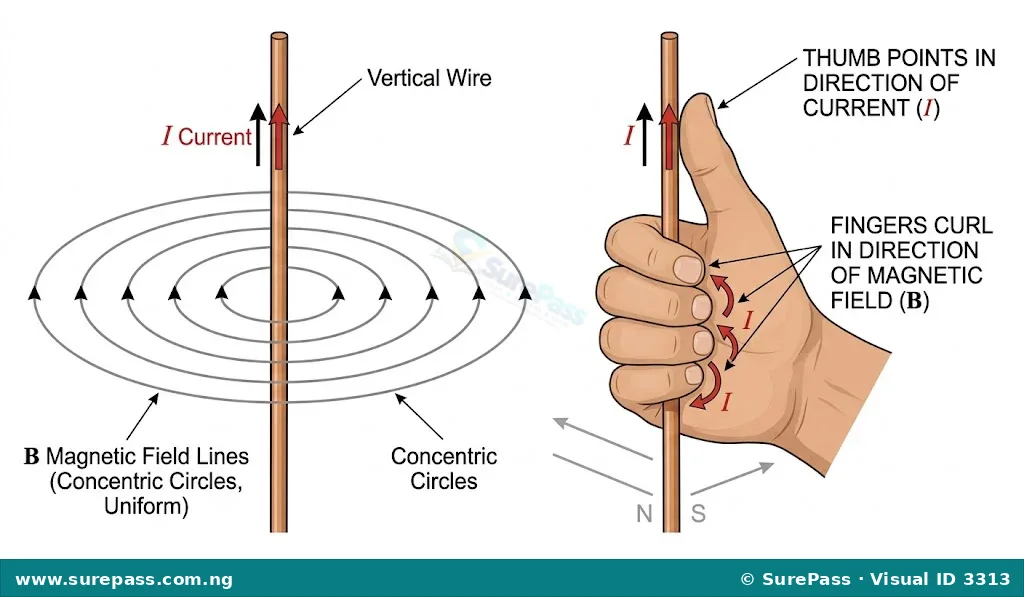
A current flowing through a straight wire produces a magnetic field around it. The magnetic field lines form concentric circles around the wire, with the wire at the centre.
The direction of these circular magnetic field lines can be determined using the Right-Hand Grip Rule (also known as Maxwell’s Corkscrew Rule).
Right-Hand Grip Rule for a Straight Wire: If you hold the current-carrying wire in your right hand with your thumb pointing in the direction of the current, your curled fingers will show the direction of the magnetic field lines.
Magnetic Field Due to Current in a Solenoid
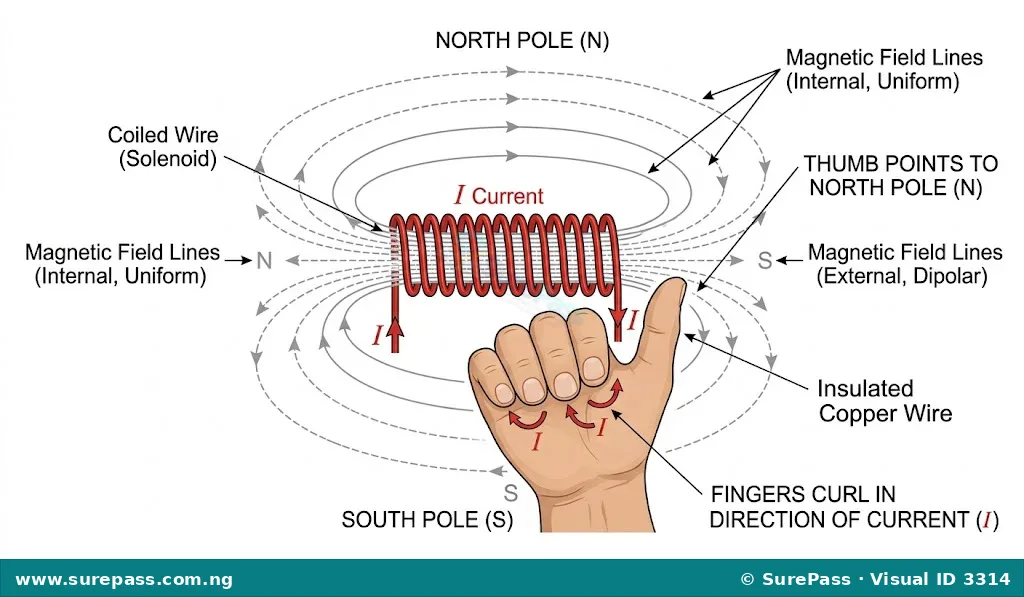
A solenoid is a coil of wire wound into a tightly packed helix. When current flows through a solenoid, it produces a magnetic field similar to that of a bar magnet.
The magnetic field lines inside the solenoid are nearly parallel and uniformly spaced, indicating a strong and uniform magnetic field. Outside the solenoid, the field lines resemble those of a bar magnet, emerging from one end (North pole) and entering the other (South pole).
The direction of the magnetic poles (North and South) of a solenoid can also be determined using the Right-Hand Grip Rule.
Right-Hand Grip Rule for a Solenoid: If you curl the fingers of your right hand in the direction of the current flowing through the coils of the solenoid, your thumb will point towards the North pole of the solenoid.
Temporary and Permanent Magnets
Magnets can be classified based on how long they retain their magnetism.
Temporary Magnets
Temporary magnets are materials that become magnetised when placed in a magnetic field or when current flows through a coil around them, but they lose their magnetism quickly once the external magnetic field or current is removed.
Soft iron is a common material used for temporary magnets. Electromagnets are also temporary magnets because their magnetism can be turned on and off by controlling the electric current.
Examples of temporary magnets include:
- Electromagnets
- Soft iron cores in relays
Permanent Magnets
Permanent magnets are materials that retain their magnetism for a long time after being magnetised.
These magnets are made from materials that are difficult to magnetise but, once magnetised, they remain magnetic indefinitely. Steel is a common material for permanent magnets, as are alloys like Alnico (Aluminium, Nickel, Cobalt).
Examples of permanent magnets include:
- Bar magnets
- Horseshoe magnets
- Refrigerator magnets
Making a Magnet from a Soft Iron Bar
A soft iron bar can be magnetised to become a temporary magnet using different methods.
1. Stroking Method (Conduction Method)
This method involves rubbing a magnetic material with a permanent magnet.
The procedure involves the following steps:
- Single Touch Method:
- Place the soft iron bar on a flat surface.
- Take a strong permanent magnet and stroke the iron bar from one end to the other in a single direction.
- Lift the permanent magnet high above the iron bar and return to the starting point.
- Repeat this stroking process about 20-30 times, always in the same direction and lifting the magnet high each time.
- Test the iron bar with small iron filings to see if it has become magnetised. The end where the stroking began will have the same polarity as the stroking pole of the permanent magnet.
- Double Touch Method:
- Place the soft iron bar on a flat surface.
- Take two strong permanent magnets. Place their opposite poles (e.g., North of one, South of the other) at the centre of the iron bar.
- Stroke both magnets simultaneously towards the opposite ends of the iron bar.
- Lift the magnets high and return them to the centre.
- Repeat this process about 20-30 times.
- Test the iron bar. The ends of the iron bar will acquire opposite polarities.
2. Electrical Method
This method uses electric current to magnetise the soft iron bar.
The procedure involves the following steps:
- Take a soft iron bar.
- Wind a coil of insulated copper wire tightly around the iron bar.
- Connect the ends of the coil to a DC current source (like a battery).
- Allow current to flow through the coil for a few minutes.
- The soft iron bar will become magnetised. Its polarity can be determined using the Right-Hand Grip Rule for a solenoid.
- When the current is switched off, the soft iron bar will quickly lose most of its magnetism, acting as a temporary magnet.
Making Simple Electromagnets
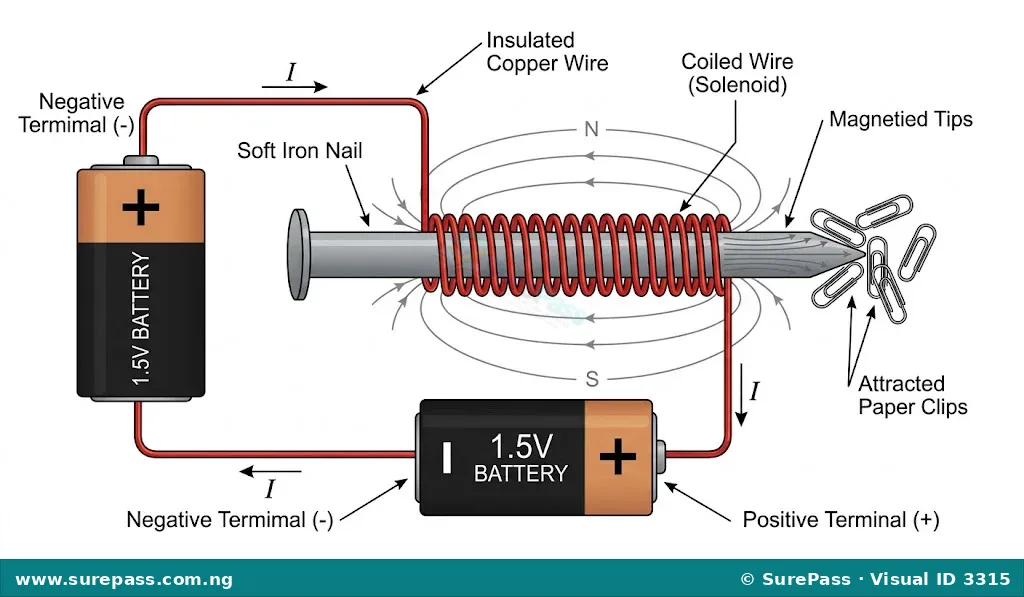
An electromagnet is a temporary magnet created by passing an electric current through a coil of wire wound around a soft iron core.
The strength of an electromagnet can be controlled by changing the current, the number of turns in the coil, or the type of core material.
Procedure for Making a Simple Electromagnet
The required materials are:
- Insulated copper wire
- A soft iron nail (or soft iron bar)
- A battery (e.g., 1.5V or 3V)
- Small magnetic objects (e.g., paper clips, iron filings)
The procedure involves the following steps:
- Take the insulated copper wire and wind it tightly around the soft iron nail. Ensure the turns are close together and cover most of the nail’s length. Leave some wire free at both ends for connections.
- Connect one free end of the copper wire to the positive terminal of the battery.
- Connect the other free end of the copper wire to the negative terminal of the battery.
- Observe the soft iron nail. It should now be magnetised.
- Test the electromagnet by bringing it close to small paper clips or iron filings. It should attract them.
- Disconnect one of the wires from the battery. The nail should immediately lose its magnetism and drop the paper clips.
Uses of Electromagnets
Electromagnets are widely used in various devices because their magnetism can be turned on and off, and their strength can be controlled.
1. Electric Bell
An electric bell uses an electromagnet to produce sound. When the circuit is closed, the electromagnet is activated, attracting a soft iron armature. This movement causes a hammer to strike a gong, producing a sound. At the same time, the circuit is broken, the electromagnet loses its magnetism, and a spring pulls the armature back, re-establishing the circuit and repeating the process.
2. Telephone Earpiece
The telephone earpiece converts electrical signals into sound waves using an electromagnet. Electrical signals from the telephone line pass through a coil, creating a varying magnetic field in an electromagnet. This varying magnetic field attracts and repels a thin, flexible iron diaphragm (a small, circular piece of iron). The vibrations of the diaphragm produce sound waves that match the original sound, allowing the listener to hear.
Earth’s Magnetic Field and Use of Compass
The Earth itself acts like a giant magnet, producing its own magnetic field that extends far into space.
This magnetic field is believed to be generated by the movement of molten iron in the Earth’s outer core. The Earth’s magnetic field has a North magnetic pole and a South magnetic pole, which are close to, but not exactly at, the geographic North and South poles.
Description of the Earth’s Magnetic Field
The Earth’s magnetic field lines generally run from the South magnetic pole to the North magnetic pole outside the Earth. A freely suspended magnet or compass needle aligns itself with these field lines.
It is important to note that the Earth’s North magnetic pole is actually a South-seeking pole (attracts the North pole of a compass), and the Earth’s South magnetic pole is a North-seeking pole (attracts the South pole of a compass). This is why the North pole of a compass needle points towards the Earth’s geographic North.
Use of a Compass
A compass is a device that contains a small, lightweight magnetised needle, usually pivoted at its centre so it can rotate freely. The North pole of the compass needle is typically marked (e.g., red or ‘N’).
When a compass is placed on a flat, non-magnetic surface, its magnetised needle aligns itself with the Earth’s magnetic field. The North pole of the compass needle points towards the Earth’s magnetic North pole (which is near the geographic North pole).
A compass is used for navigation to determine directions, especially the North-South direction.
Using a Bar Magnet as a Simple Compass
A bar magnet can be used as a simple compass to identify the Earth’s magnetic North-South directions.
The required materials are:
- A bar magnet
- A piece of thread
- A retort stand or a suitable support
The procedure involves the following steps:
- Tie the piece of thread around the middle of the bar magnet.
- Suspend the bar magnet horizontally from the retort stand so that it can swing freely without touching anything.
- Allow the magnet to settle. It will swing back and forth for a while before coming to rest.
- Once it settles, one end of the magnet will point approximately towards the geographic North, and the other end will point towards the geographic South. The end pointing North is the North pole of the magnet, and the end pointing South is the South pole.
- This demonstrates how a freely suspended magnet aligns itself with the Earth’s magnetic field, acting as a simple compass.
Effect of Magnetic Force on a Moving Electric Charge
When an electric charge moves through a magnetic field, it experiences a magnetic force.
This force is exerted by the magnetic field on the moving charge. If the charge is stationary, it does not experience a magnetic force. The direction of this magnetic force is perpendicular to both the direction of the charge’s motion (velocity) and the direction of the magnetic field.
This principle is fundamental to the operation of many devices, such as electric motors and cathode ray tubes, where charged particles are made to move or deflect by magnetic fields.



0 comments
Open the discussion when you need it. Comments stay collapsed until requested so the initial article remains light.