


ARTICLE CONTENTSOn this page 9 sections
Hardware and Software Faults in Mobile Phones
Performance Objectives
By the end of the lesson, students should be able to:
- state types of Hardware and software faults in mobile phones;
- categorize mobile phone hardware associated problems;
- categorize mobile phone software associated problems;
- fix faults on the following hardware components: mouthpiece Earpiece, memory card, power supply, charging system and battery;
- fix faults on the following software components: Operating System, CPU, RAM and ROM.
Introduction to Mobile Phone Faults
Mobile phones are important tools for communication and learning. Like any electronic device, they can sometimes develop problems. These problems are called faults. Understanding the different types of faults helps in fixing them.
Mobile phone faults can be grouped into two main types: hardware faults and software faults. Hardware refers to the physical parts of the phone, while software refers to the programs and instructions that tell the hardware what to do.
Types of Hardware and Software Faults
Mobile phones can experience problems with their physical parts or with the programs they run. Knowing the difference is the first step to repair.
The two main types of faults are:
- Hardware Faults: These are problems with the physical components of the mobile phone. This includes parts that can be touched, seen, or felt, such as the screen, battery, buttons, or speakers.
- Software Faults: These are problems with the programs, applications, or operating system of the mobile phone. These faults are not physical and cannot be touched. They relate to the instructions that make the phone work.
Mobile Phone Hardware Associated Problems
Hardware problems affect the physical parts of a mobile phone. These problems often prevent the phone from working correctly or at all.
Common hardware associated problems include:
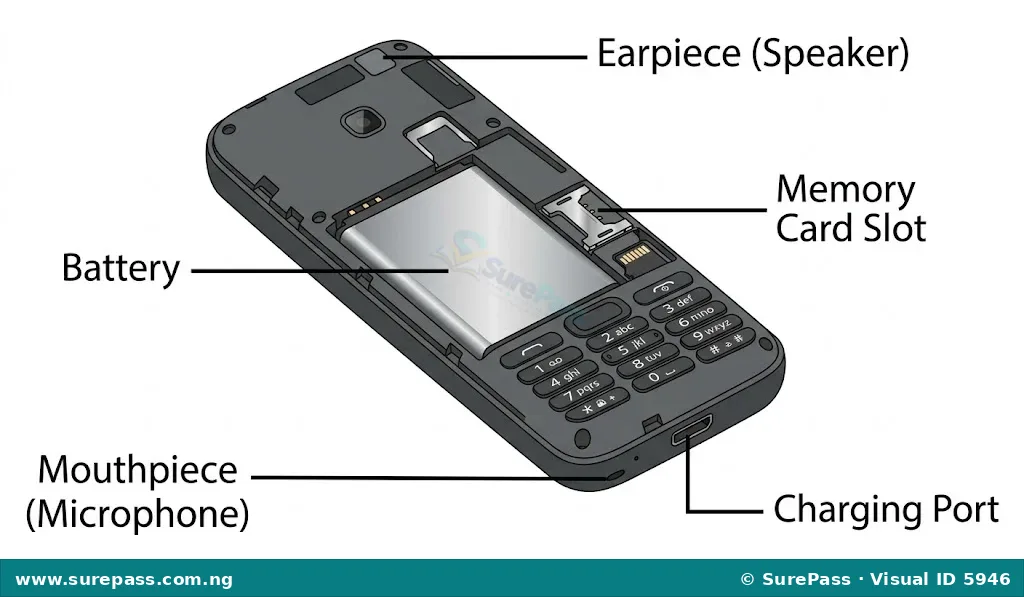
- Mouthpiece Faults: The mouthpiece, also known as the microphone, is used to capture a person’s voice during calls. A fault here means the other person cannot hear the speaker’s voice clearly or at all.
- Earpiece Faults: The earpiece, also known as the speaker for calls, allows a person to hear the other caller’s voice. If the earpiece is faulty, the caller may not hear anything or the sound may be very low or distorted.
- Memory Card Faults: A memory card is used to store extra data like pictures, videos, and documents. Problems with the memory card can prevent the phone from reading or writing data to it, or the card may not be detected at all.
- Power Supply Faults: The power supply system provides electrical power to all parts of the phone. Faults in this system can cause the phone not to turn on, to turn off unexpectedly, or to drain the battery very quickly.
- Charging System Faults: The charging system allows the phone battery to be recharged. If this system is faulty, the phone may not charge when connected to a charger, or it may charge very slowly.
- Battery Faults: The battery stores power for the phone to operate. A faulty battery may not hold a charge for long, swell up, or prevent the phone from turning on even when fully charged.
Mobile Phone Software Associated Problems
Software problems affect the programs and operating system of a mobile phone. These problems can make the phone slow, unresponsive, or cause applications to crash.
Common software associated problems include:
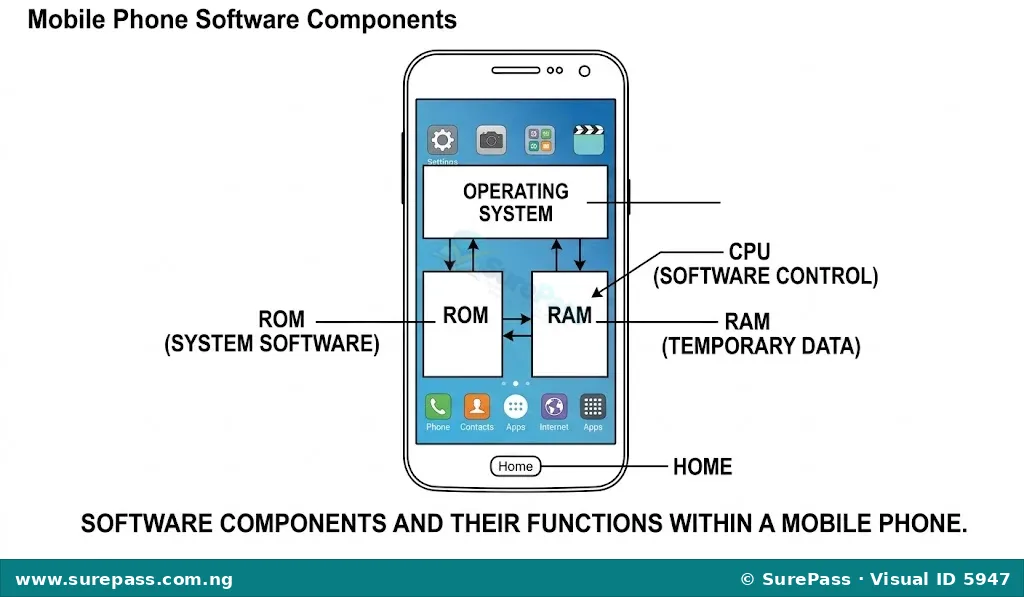
- Operating System (OS) Faults: The operating system is the main software that manages all the hardware and other software on the phone. OS faults can cause the phone to freeze, restart repeatedly, or fail to boot up completely.
- Central Processing Unit (CPU) Associated Problems: While the CPU is a hardware component, problems associated with its software control can cause issues. For example, if the software instructions for the CPU are corrupted, the phone might become very slow, overheat, or applications might not run properly.
- Random Access Memory (RAM) Associated Problems: RAM is used for temporary storage of data that the phone is actively using. Software problems related to RAM can cause applications to close unexpectedly, the phone to slow down, or the phone to freeze when many applications are open.
- Read-Only Memory (ROM) Associated Problems: ROM stores important system software that the phone needs to start up. Software faults in ROM can prevent the phone from booting up, or cause it to display error messages during startup.
Fixing Hardware Faults
Fixing hardware faults often involves carefully opening the phone, identifying the faulty part, and replacing it. This requires specific tools and careful handling.
Dismantling a Handset
Before any hardware repair, the mobile phone handset must be carefully dismantled. This involves removing the back cover, battery, and screws to access the internal components.
The procedure involves the following steps:
- Gather Tools: Collect precision screwdrivers, a plastic prying tool, and a small container for screws.
- Power Off Phone: Ensure the mobile phone is completely switched off to prevent damage.
- Remove SIM/Memory Card Tray: Use a SIM ejector tool to remove any SIM cards or memory cards.
- Remove Back Cover: Carefully use a plastic prying tool to unclip or pry open the back cover. Some phones may have screws holding the back cover.
- Remove Battery: If the battery is removable, gently lift it out. For non-removable batteries, disconnect the battery connector from the motherboard.
- Unscrew Internal Components: Use precision screwdrivers to remove all visible screws holding down the internal frame or motherboard. Keep track of where each screw came from.
- Separate Components: Gently separate the main board and other components from the phone casing.
Safety Tip: Always handle internal components with care to avoid static electricity damage. Use anti-static gloves if available.
Fixing Mouthpiece Faults
A faulty mouthpiece means others cannot hear the speaker during a call. Fixing this usually involves replacing the microphone component.
The procedure involves the following steps:
- Dismantle Handset: Follow the steps to carefully open the phone and access the motherboard.
- Locate Mouthpiece: Identify the small microphone component, usually located near the bottom of the phone.
- Remove Faulty Mouthpiece: Carefully desolder or unclip the faulty mouthpiece from the circuit board. A soldering iron may be needed for this.
- Install New Mouthpiece: Solder or clip a new, working mouthpiece into place, ensuring correct orientation.
- Reassemble Phone: Carefully put the phone back together, ensuring all screws are in place and connectors are secure.
- Test Functionality: Make a test call to check if the microphone is working correctly.
Fixing Earpiece Faults
If the earpiece is faulty, the speaker cannot hear the other person during a call. This often requires replacing the earpiece speaker.
The procedure involves the following steps:
- Dismantle Handset: Open the phone to access the internal components.
- Locate Earpiece: Find the earpiece speaker, typically located near the top of the phone, close to the front camera.
- Remove Faulty Earpiece: Gently remove the faulty earpiece. It may be held by screws, clips, or light adhesive.
- Install New Earpiece: Place a new earpiece in its position, ensuring it fits correctly and makes proper contact.
- Reassemble Phone: Put the phone back together.
- Test Functionality: Make a test call to check if the earpiece is working clearly.
Fixing Memory Card Faults
Memory card faults can be due to the card itself or the phone’s memory card reader. Fixing involves checking both.
The procedure involves the following steps:
- Test Memory Card: Try the memory card in another working phone or a computer card reader to confirm if the card itself is faulty. If the card is faulty, replace it.
- Clean Memory Card Slot: If the card works elsewhere, carefully clean the memory card slot on the phone using a soft brush or compressed air to remove dust.
- Inspect Card Reader Pins: If the problem persists, dismantle the handset and visually inspect the pins inside the memory card reader for bends or damage.
- Repair/Replace Card Reader: If pins are bent, try to gently straighten them. If the reader is damaged, it may need to be replaced by a qualified technician.
- Reassemble Phone: Put the phone back together.
- Test Functionality: Insert a known good memory card and check if the phone detects it and can access files.
Fixing Power Supply Faults
Power supply faults can prevent the phone from turning on or staying on. This often involves checking the battery connector and power management circuits.
The procedure involves the following steps:
- Check Battery: Ensure the battery is charged and not swollen. Try a known good battery if possible.
- Inspect Battery Connector: Dismantle the handset and visually inspect the battery connector on the motherboard for dirt, corrosion, or bent pins. Clean or gently adjust as needed.
- Check Power Button: Ensure the power button is functioning correctly and not stuck.
- Test with Multimeter: A multimeter can be used to check voltage at the battery connector and other power points on the motherboard. This step requires technical knowledge and should be done under supervision.
- Professional Repair: Complex power supply issues often require advanced diagnostic tools and professional repair.
- Reassemble Phone: Put the phone back together after any repairs.
- Test Functionality: Attempt to power on the phone and observe its behaviour.
Fixing Charging System Faults
A faulty charging system means the phone cannot charge its battery. This usually involves checking the charging port and related components.
The procedure involves the following steps:
- Check Charger and Cable: Try a different charger and USB cable to rule out external issues.
- Clean Charging Port: Carefully clean the charging port on the phone with a small, non-metallic tool (like a toothpick) to remove lint or debris.
- Inspect Charging Port: Dismantle the handset and visually inspect the charging port for bent or broken pins.
- Replace Charging Port: If the port is damaged, it may need to be replaced. This often requires soldering and should be done under supervision.
- Reassemble Phone: Put the phone back together.
- Test Functionality: Connect the phone to a charger and observe if it starts charging.
Fixing Battery Faults
Battery faults are common and can cause various power-related issues. Replacing the battery is often the solution.
The procedure involves the following steps:
- Identify Faulty Battery: Look for signs like swelling, rapid discharge, or the phone not turning on despite being charged.
- Dismantle Handset: Open the phone to access the battery.
- Remove Old Battery: For removable batteries, simply lift it out. For non-removable batteries, carefully disconnect its connector from the motherboard and gently pry it out if it’s glued.
- Install New Battery: Place a new, compatible battery into the phone and connect its connector securely.
- Reassemble Phone: Put the phone back together.
- Test Functionality: Charge the new battery fully and observe its performance, checking how long it holds a charge.
Fixing Software Faults
Fixing software faults usually involves resetting settings, updating software, or reinstalling the operating system. These steps do not require opening the phone.
Fixing Operating System (OS) Faults
OS faults can make a phone unusable. Fixing them often involves a factory reset or flashing new firmware.
The procedure involves the following steps:
- Backup Data: Before any major software fix, back up all important data (contacts, photos, documents) to a computer or cloud service.
- Soft Reset: Try restarting the phone normally. This can fix minor glitches.
- Hard Reset (Factory Reset): This restores the phone to its original factory settings, deleting all user data. Access this option through the phone’s settings menu or by using specific button combinations while booting.
- Software Update: Check for and install any available operating system updates. Updates often fix bugs and improve performance.
- Firmware Flashing: For severe OS corruption, the phone’s firmware (operating system) may need to be reinstalled. This is an advanced procedure and should be done by a knowledgeable person or under strict supervision, as incorrect flashing can permanently damage the phone.
- Test Functionality: After the fix, set up the phone and check if the OS runs smoothly and without errors.
Fixing CPU Associated Problems (Software Related)
Software-related CPU problems often manifest as slow performance or overheating. These are usually addressed by optimising software.
The procedure involves the following steps:
- Close Background Apps: Close unnecessary applications running in the background to free up CPU resources.
- Uninstall Unused Apps: Remove applications that are no longer needed, especially those that consume a lot of processing power.
- Clear Cache: Regularly clear the cache of applications and the system cache to remove temporary files that can slow down the CPU.
- Software Update: Ensure the operating system and all applications are updated to their latest versions, as updates often include performance improvements.
- Factory Reset: If performance issues persist, a factory reset can clear all software conflicts that might be burdening the CPU.
- Test Functionality: Observe the phone’s speed and temperature after applying these fixes.
Fixing RAM Associated Problems (Software Related)
Software issues related to RAM often cause apps to crash or the phone to freeze. Managing memory usage is key.
The procedure involves the following steps:
- Close Unused Apps: Actively close applications that are not in use to free up RAM.
- Restart Phone: Regularly restarting the phone clears the RAM and can resolve temporary memory issues.
- Limit Widgets and Live Wallpapers: Reduce the number of widgets and avoid live wallpapers, as they consume RAM.
- Uninstall Heavy Apps: Remove applications that are known to be memory-intensive if they are not essential.
- Software Update: Keep the operating system and apps updated, as developers often optimise memory usage in newer versions.
- Factory Reset: As a last resort, a factory reset can resolve deep-seated software conflicts affecting RAM performance.
- Test Functionality: Open several applications and observe if the phone remains responsive and stable.
Fixing ROM Associated Problems (Software Related)
ROM issues are less common and usually relate to the core system software. Fixing them often involves advanced procedures.
The procedure involves the following steps:
- Software Update: Ensure the phone’s operating system is updated. Sometimes, updates can fix minor ROM-related bugs.
- Firmware Reinstallation (Flashing): If the ROM’s system software is corrupted, reinstalling the phone’s firmware is often necessary. This is a complex process that replaces the entire operating system and should only be attempted by experienced individuals or under expert supervision.
- Professional Repair: For severe ROM damage, especially if it’s hardware-related (e.g., a faulty ROM chip), professional repair or replacement of the motherboard may be required.
- Test Functionality: After any fix, ensure the phone boots up correctly and the system functions without errors.
Carrying Out Functionality Tests
After fixing any hardware or software fault, it is important to carry out a functionality test. This ensures that the repair was successful and that all parts of the phone are working as expected.
The procedure involves the following steps:
- Power On Test: Turn on the phone and ensure it boots up completely without any errors.
- Call Test: Make a test call to another phone. Check if the mouthpiece (microphone) is picking up your voice clearly and if the earpiece is playing the other person’s voice clearly.
- Speaker Test: Play some music or a video to check if the main loudspeaker is working correctly.
- Charging Test: Connect the phone to a charger and observe if it shows the charging indicator and if the battery percentage increases.
- Memory Card Test: Insert a memory card and check if the phone detects it and can access files stored on it. Try saving a new file to the card.
- Button Test: Press all physical buttons (power, volume) to ensure they are responsive.
- Application Test: Open several applications, including some that use the internet, to ensure they launch and run without crashing or freezing.
- Camera Test: Open the camera app and take a few pictures and videos to ensure both front and rear cameras are working.
- Connectivity Test: Turn on Wi-Fi, Bluetooth, and mobile data to ensure they connect to networks and devices.
If any part of the functionality test fails, it indicates that the fault may not be fully resolved, or a new problem might have occurred. Further troubleshooting and repair may be needed.



0 comments
Open the discussion when you need it. Comments stay collapsed until requested so the initial article remains light.