


ARTICLE CONTENTSOn this page 7 sections
Tools Used for Mobile Phone Repairs
Performance Objectives
By the end of the lesson, students should be able to:
- explain hand tools;
- identify hand tools used for mobile phone repairs;
- state functions of hand tools;
- use different tools for repairing mobile phones.
Mobile phones are important communication devices. Like any electronic device, they can sometimes develop faults and require repair. Repairing mobile phones requires special tools. These tools help technicians open the phone, fix problems, and put the phone back together safely.
Meaning of Hand Tools
Hand tools are devices that are operated manually, meaning they are powered by human hands rather than by electricity or motors.
These tools are essential for tasks that require precision, control, and direct human interaction, such as opening small devices, holding tiny parts, or making small connections.
Hand Tools Used for Mobile Phone Repairs and Their Functions
Mobile phone repair involves working with very small parts and delicate circuits. Therefore, specific hand tools are designed for these tasks. Each tool has a unique function that helps in the repair process.
The common hand tools used in mobile phone repairs include:
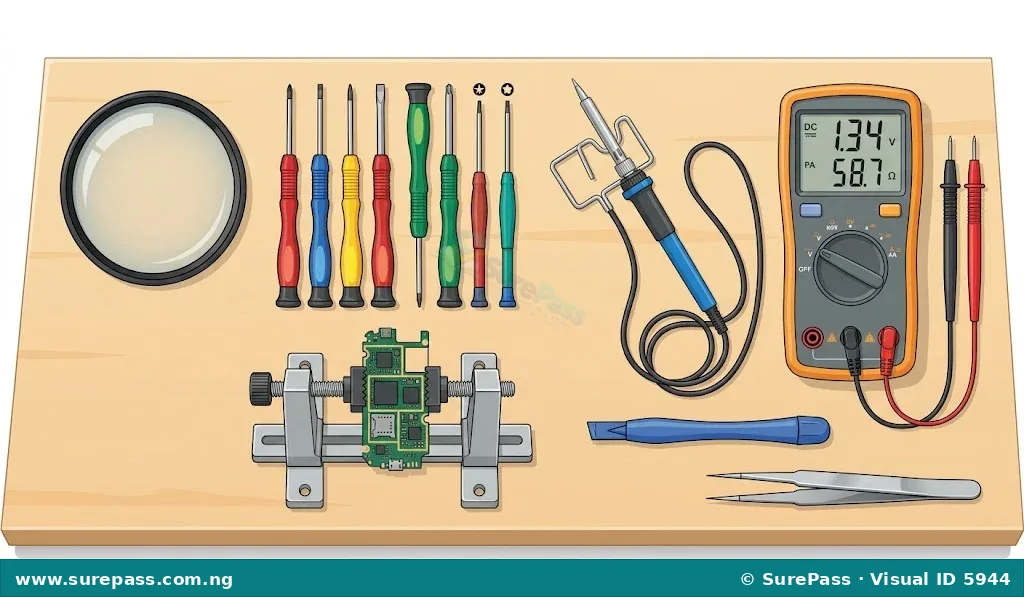
- Magnifying Lens: This tool helps to enlarge small objects or text, making it easier to see tiny components and connections on a mobile phone’s circuit board.
- Precision Screwdriver: Mobile phones use very small screws that cannot be removed with regular screwdrivers. Precision screwdrivers come with different small tips (like Phillips, Torx, or flathead) to fit these tiny screws, allowing technicians to open and close the phone casing.
- PCB Holder (Printed Circuit Board Holder): A PCB holder is a stand or clamp used to hold the mobile phone’s main circuit board (PCB) firmly in place. This allows the technician to work on the board with both hands without it moving or getting damaged.
- Soldering Iron: This tool is used to melt solder, which is a metal alloy, to create electrical connections or to remove components from the circuit board. It has a heated tip that melts the solder, allowing it to flow and join parts together.
- Multimeter/Battery Tester: These are testing devices used to check electrical properties. A multimeter can measure voltage, current, and resistance in different parts of the phone’s circuit. A battery tester specifically checks the health and charge level of the phone’s battery. These tools help diagnose problems rather than physically manipulate parts.
- Plastic Prying Tools (Spudgers): These are non-conductive tools, often made of plastic, used to safely open phone casings, disconnect flex cables, or lift delicate components without causing scratches or electrical shorts. They are designed to prevent damage to the phone’s plastic or metal parts.
- Tweezers: Tweezers are small, pointed tools used for picking up, holding, or positioning tiny components like screws, wires, or small chips on the circuit board. They allow for precise handling of very small parts.
Sketching and Labelling Mobile Phone Tools
Sketching and labelling tools help in understanding their shapes, parts, and functions. When sketching, observe the tool carefully and draw its main features. Labelling involves writing the name of the tool and its important parts next to the sketch.
For example, when sketching a precision screwdriver, you would draw the handle, the shaft, and the small tip. For a soldering iron, you would draw the handle, the heating element, and the tip.
Manipulating Tools for Mobile Phone Repair: Disassembling and Assembling a Mobile Phone
Learning to use hand tools correctly is a key skill in mobile phone repair. This involves holding the tools properly, applying the right amount of force, and understanding how each tool interacts with the phone’s components. One of the most basic and important skills is safely disassembling and assembling a mobile phone.
How to Disassemble and Assemble a Mobile Phone
This procedure involves carefully taking apart an old or non-functional mobile phone and then putting it back together. This helps you understand the internal structure of a phone and practice using the tools.
Required Materials:
- An old, non-functional mobile phone (e.g., an old feature phone or smartphone that is no longer in use).
- A set of precision screwdrivers.
- Plastic prying tools (spudgers).
- A small container or tray to keep screws and small parts organised.
Important Safety Tips:
- Always ensure the phone is powered off and the battery is removed before starting.
- Work on a clean, well-lit surface.
- Handle tools and phone components carefully to avoid injury or damage.
- If you are unsure about any step, ask an adult or your teacher for guidance.
- Never force any part; if it doesn’t come apart easily, you might be missing a screw or using the wrong technique.
The procedure involves the following steps:
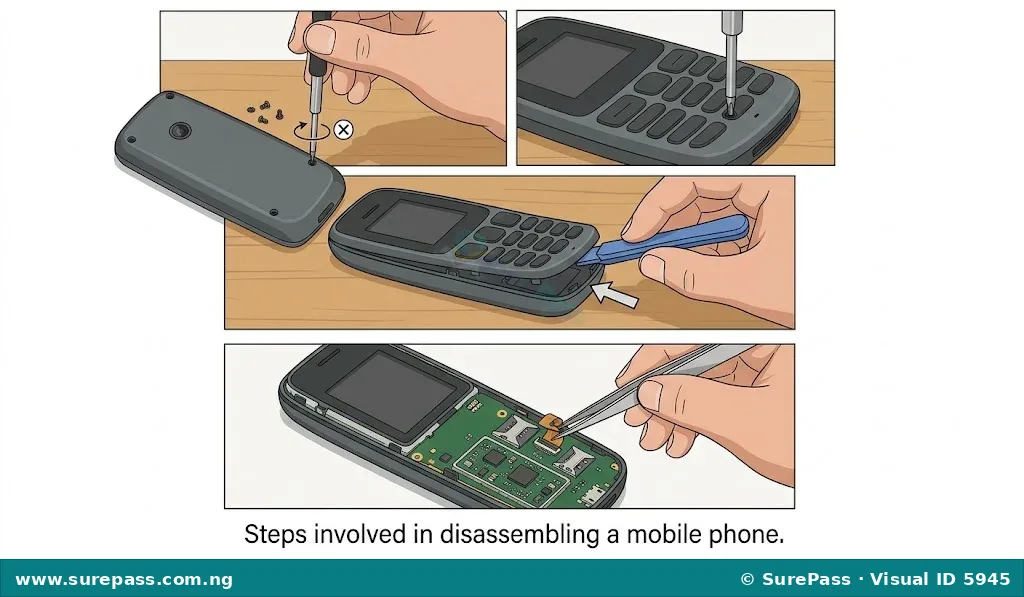
- Power Off and Remove Battery/SIM: Ensure the phone is completely switched off. Remove the back cover, then carefully take out the battery, SIM card, and memory card (if present).
- Locate and Remove Screws: Use the correct precision screwdriver to remove all visible screws on the back or inside the phone. Place the screws in your container, noting where each screw came from if they are of different sizes.
- Pry Open the Casing: Carefully insert a plastic prying tool (spudger) into the seam between the phone’s front and back casing. Gently slide it around the edges to unclip the casing. Avoid using metal tools for prying, as they can scratch the phone or cause electrical shorts.
- Disconnect Internal Cables: Once the casing is open, you may see flat, ribbon-like cables (flex cables) connecting different parts. Gently disconnect these using the plastic prying tool or tweezers. Do not pull on the cables directly.
- Remove the Printed Circuit Board (PCB): After disconnecting cables and removing any remaining screws holding the PCB, carefully lift the main circuit board from the phone’s frame. You can place it in a PCB holder if you need to examine it further.
- Observe Components: Take time to observe the different components on the PCB and inside the phone’s frame. Identify the camera, speaker, microphone, and other parts.
- Assemble the Phone: To assemble the phone, reverse the steps. Carefully place the PCB back into the frame, reconnect all flex cables, and secure any screws that hold the PCB.
- Close the Casing: Align the front and back casings and gently press them together until they click into place.
- Insert Battery/SIM and Power On: Reinsert the battery, SIM card, and memory card. Replace the back cover. Attempt to power on the phone to check if it functions.
Safety When Using Mobile Phone Repair Tools
Working with electronic devices and small tools requires careful attention to safety. Following safety guidelines helps prevent accidents and damage to the phone or the person repairing it.
Important safety tips include:
- Read Instructions: Always understand how to use a tool before attempting to use it.
- Use the Right Tool: Use the correct tool for each task. Using the wrong tool can damage the phone or cause injury.
- Handle with Care: Tools like screwdrivers and tweezers can be sharp. Handle them carefully to avoid cuts or punctures.
- Soldering Iron Safety: A soldering iron gets very hot. Never touch the tip. Always place it in its stand when not in use and allow it to cool completely before storing. Ensure good ventilation when soldering.
- Organise Your Workspace: Keep your work area clean and tidy. This prevents tools from rolling off the table and helps you keep track of small parts like screws.
- Static Electricity: Mobile phone components are sensitive to static electricity. Avoid working on carpets or wearing wool clothing that can generate static.
- Battery Safety: Handle mobile phone batteries carefully. Do not puncture, bend, or expose them to extreme heat, as they can be dangerous.


0 comments
Open the discussion when you need it. Comments stay collapsed until requested so the initial article remains light.