



ARTICLE CONTENTSOn this page 10 sections
Garment Making
Performance Objectives
By the end of the lesson, students should be able to:
- explain the meaning of fashion and garment making;
- discuss the importance of fashion and garment making;
- identify the tools and equipment used in fashion and garment making.
Meaning of Fashion and Garment Making
Fashion is the popular style of clothing, footwear, accessories, makeup or body decoration at a particular time and place.
It is a dynamic concept that changes constantly, influenced by culture, climate, technology and social trends. Fashion allows individuals to express their personality, status and preferences without speaking.
Garment making is the process of designing, cutting and sewing fabric to create wearable clothing.
It is a practical craft that combines artistic creativity with technical skills. Garment making transforms flat pieces of woven or knitted fabric into three-dimensional forms that fit the human body comfortably.
Importance of Fashion and Garment Making
Fashion and garment making play vital roles in individual lives and society. The main reasons for their importance include:
- Provision of Basic Needs: Clothing is one of the three primary needs of human beings, alongside food and shelter. Garment making ensures that people have clothes to protect their bodies from harsh weather conditions such as extreme heat, cold, wind and rain.
- Cultural Identity and Modesty: Clothing is used to express cultural heritage, traditional values and social roles. In Nigeria, different ethnic groups are identified by their unique traditional garments, such as the Yoruba Agbada, the Igbo Isiagu and the Hausa Babariga.
- Self-Expression and Confidence: Fashion allows individuals to showcase their personal style, creativity and mood. Wearing well-fitted, attractive garments boosts self-esteem and confidence in social and professional environments.
- Livelihood and Economic Empowerment: Garment making is a major source of income and employment. It offers career opportunities for fashion designers, tailors, pattern makers, textile manufacturers and retailers. Individuals can establish small-scale tailoring shops or large-scale garment factories to earn a living, thereby reducing unemployment and improving their standard of living.
Tools Used in Garment Making
Tools are small, hand-held devices used by a tailor or garment maker to perform specific tasks during the sewing process. These tools are grouped according to their functions, which include measuring, marking, cutting and sewing.
Measuring and Marking Tools
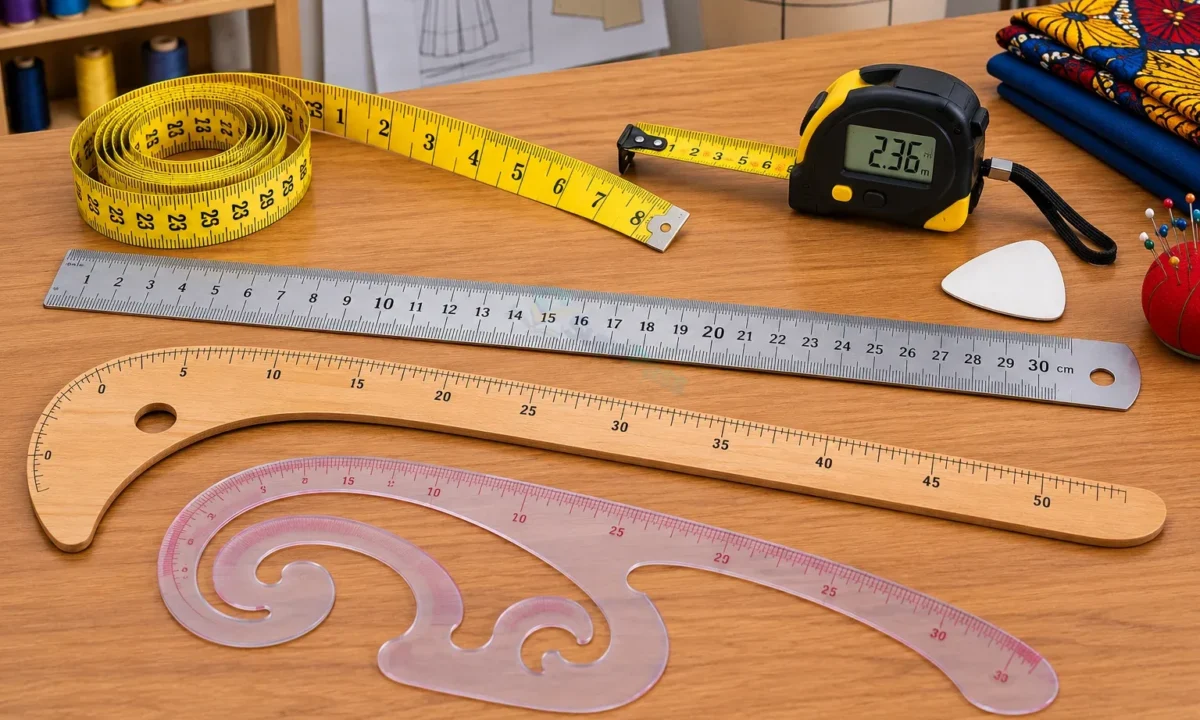
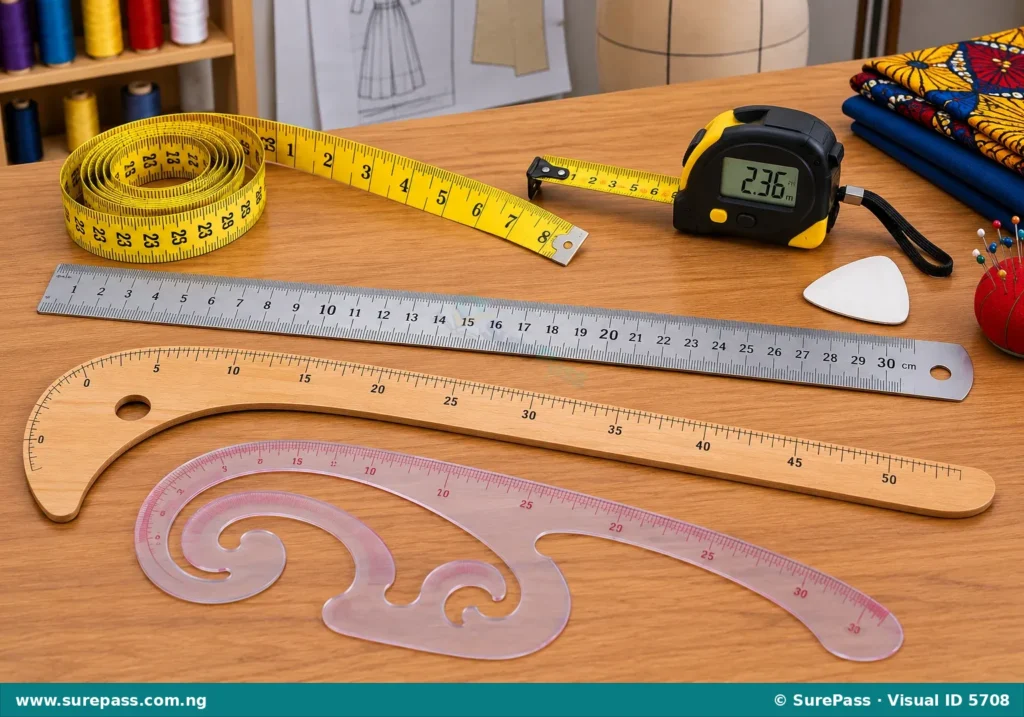
Accurate measurements are essential for creating well-fitting clothes. The primary measuring and marking tools include:
- Manual Measuring Tape: A flexible, narrow strip of plastic, fabric or fiberglass marked with inches and centimeters. It is used to take body measurements and measure fabric lengths.
- Digital Measuring Tape: An electronic measuring device that displays measurements on a digital screen. It provides quick and highly accurate readings.
- Long Straight Ruler: A rigid wooden, plastic or metal ruler used to draw straight lines on patterns or fabric.
- Short Ruler: A smaller ruler used for measuring short distances, such as hem widths, buttonholes and seam allowances.
- Curved Ruler: A specially shaped ruler, such as a French curve or hip curve, used to draw smooth, curved lines around armholes, necklines and hip lines.
- T-Ruler: A T-shaped ruler used to draw perfect perpendicular lines and ensure that pattern lines are at right angles to each other.
Observe the measuring and marking tools shown below.
Cutting Tools
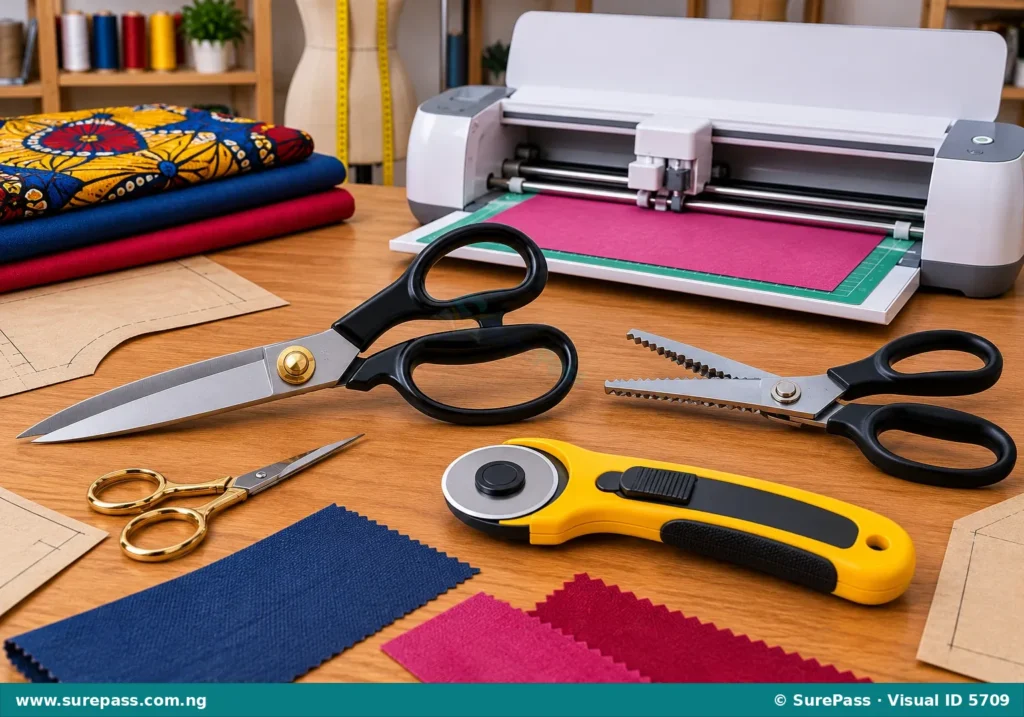
Cutting tools are used to cut paper patterns, fabrics, threads and trims. They must be kept sharp to prevent damaging the fabric. The main cutting tools include:
- Big Scissors (Shears): Large, heavy-duty scissors with bent handles that allow the blades to slide flat along the cutting table. They are used exclusively for cutting fabric.
- Small Scissors: Lightweight scissors used for trimming threads, cutting small details and snipping seam allowances.
- Zig-Zag Scissors (Pinking Shears): Scissors with saw-toothed blades that cut a zig-zag edge on fabric. This prevents the raw edges of woven fabric from fraying.
- Paper Scissors: Standard scissors used only for cutting paper patterns. Using fabric shears to cut paper makes the blades dull quickly.
- Rotary Cutters: Tools with a circular blade that rotates as it is pushed along the fabric. They are used with a cutting mat to cut straight lines through multiple layers of fabric.
- Electronic Cutters: Automated, computerized cutting machines used to cut intricate patterns and shapes from fabric or paper with high precision.
Observe the cutting tools shown below.
Sewing Tools
Sewing tools are used to join fabric pieces together. The most common sewing tools are needles:
- Hand Sewing Needles: Slender metal shafts with a sharp point at one end and an eye for holding thread at the other end. They come in various sizes and are used for hand stitching, tacking and sewing buttons.
- Machine Sewing Needles: Specialized needles designed for sewing machines. Unlike hand needles, the eye of a machine needle is located near the sharp point, and the top end (shank) is flat on one side to fit securely into the needle bar. They come in different sizes to suit light, medium and heavy fabrics.
Observe the differences between hand and machine needles below.
Equipment Used in Garment Making
Equipment refers to larger, often mechanical or electrical appliances used to facilitate garment construction, pressing and finishing. The primary equipment includes:
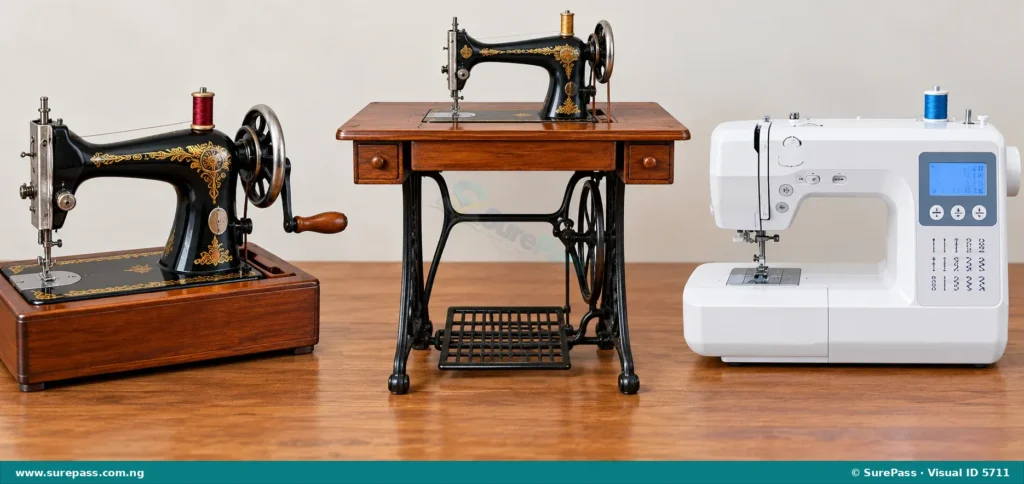
- Sewing Machine: The central piece of equipment used to stitch fabric pieces together. Sewing machines can be operated in three ways:
- Hand Sewing Machine: Operated manually by turning a handwheel with the right hand while guiding the fabric with the left hand.
- Treadle Sewing Machine: Operated mechanically by rocking a foot pedal (treadle) back and forth, leaving both hands free to guide the fabric.
- Electronic Sewing Machine: Powered by electricity and controlled by a foot pedal or buttons. It offers various stitch patterns and high-speed operation.
- Cutting Table: A large, flat, smooth table built at a comfortable waist height. It allows the garment maker to spread out fabric, lay down patterns and cut materials without bending or straining the back.
- Dry Iron: A pressing tool that uses heat and weight to flatten seams and remove wrinkles from fabric.
- Steam Iron: An advanced pressing tool that combines heat, weight and moisture (steam) to press fabrics easily and shape garments professionally.
- Ironing Table or Board: A padded, heat-resistant surface used for pressing garments. Manual ironing boards are foldable and portable, while electronic ironing boards may include built-in vacuum fans or heating elements to dry fabric quickly during pressing.
Observe the different types of sewing machines below.
Materials for Sewing
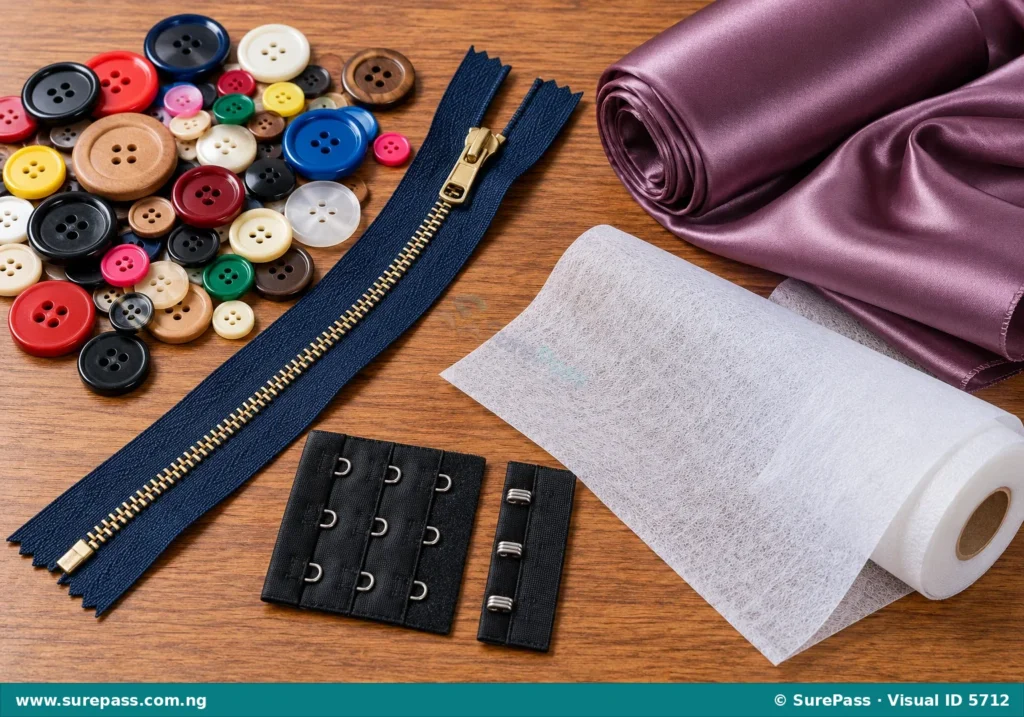
Materials are the consumable items that are incorporated into the garment during construction. Unlike tools and equipment, materials become a permanent part of the finished clothing. The main materials include:
- Fasteners: Items used to open and close garments easily. Common fasteners include:
- Buttons: Small discs or studs sewn onto fabric that slip through buttonholes to secure a garment.
- Zippers: Parallel rows of plastic or metal teeth that lock together when a slider is pulled.
- Hook-and-Eye: A small metal hook that catches onto a small loop (eye) to secure waistbands, collars or openings.
- Lining: A smooth, lightweight fabric sewn inside a garment to cover raw seams, protect the main fabric, make the garment easier to slip on and improve its drape.
- Gum-Stay (Fusible Interfacing): A stiffening material coated with adhesive on one side. It is ironed onto the wrong side of the fabric to provide structure, strength and support to areas like collars, cuffs, waistbands and button plackets.
Observe the sewing materials shown below.
Practical Skills in Garment Making
Developing practical skills in using tools safely and accurately is essential for successful garment making.
How to Use a Manual Measuring Tape
The manual measuring tape is the most basic tool for taking body measurements. The procedure involves the following steps:
- Ensure the person being measured stands straight and relaxed.
- Hold the metal tip (the zero mark) of the measuring tape against the starting point of the body part being measured.
- Wrap the tape smoothly around the body part, such as the chest, waist or hips.
- Keep the tape snug but not tight. It should be loose enough to slide two fingers flat underneath the tape.
- Read the measurement value where the tape overlaps the zero mark.
- Record the measurement immediately in a notebook.
How to Use Fabric Shears Safely
Using fabric shears correctly ensures clean cuts and prevents accidents. The procedure involves the following steps:
- Place the fabric flat on a clean, smooth cutting table.
- Hold the shears with the dominant hand, placing the thumb in the smaller loop and the index and middle fingers in the larger loop.
- Rest the flat bottom blade of the shears on the cutting table.
- Slide the blades under the fabric along the marked line.
- Make long, smooth cutting strokes, keeping the lower blade in contact with the table surface to prevent lifting the fabric.
- Close the blades completely and store the shears in a protective sheath or drawer when not in use.
- Never use fabric shears to cut paper, wire or plastic.
How to Thread a Hand Sewing Needle
Threading a needle is the first step in hand sewing. The procedure involves the following steps:
- Cut a piece of sewing thread about the length of the forearm (approximately 50 centimeters). Cutting it too long causes tangling.
- Cut the end of the thread at a sharp angle using sharp scissors to prevent fraying.
- Hold the needle firmly between the thumb and index finger of the non-dominant hand, keeping the eye of the needle visible.
- Hold the cut end of the thread between the thumb and index finger of the dominant hand.
- Pass the end of the thread smoothly through the eye of the needle.
- Pull about 10 centimeters of thread through the eye to prevent it from slipping out.
- Tie a small knot at the long end of the thread to secure it before stitching.
Summary
Garment making is a valuable skill that combines creativity with technical precision. By understanding the functions of various measuring, cutting and sewing tools, as well as the operation of sewing machines and pressing equipment, learners can create beautiful, functional clothing. This craft not only provides for personal needs but also opens up opportunities for self-employment and economic independence.
Questions for Evaluation
Answer the following questions to test your understanding of the lesson:
- Define the terms “fashion” and “garment making”.
- State three reasons why garment making is important to society.
- Explain how acquiring skills in garment making can improve the livelihood of an individual.
- Differentiate between a tool and a piece of equipment in garment making, giving two examples of each.
- List three types of sewing machines and explain how each is operated.
- What is the function of gum-stay in garment construction?
- Describe the safety rules to observe when using fabric shears.



0 comments
Open the discussion when you need it. Comments stay collapsed until requested so the initial article remains light.