



ARTICLE CONTENTSOn this page 7 sections
Parts of sewing machine and functions
Performance Objectives
By the end of the lesson, students should be able to:
- Identify and name parts of a sewing machine and their functions.
Meaning of a Sewing Machine
A sewing machine is a mechanical or electrical device used to stitch fabric and other materials together with thread.
This machine plays a vital role in fashion design and garment making. It allows tailors and garment makers to join pieces of fabric together quickly, neatly, and securely to create beautiful clothing and household items.
Observe the diagram below to see the main parts of a standard sewing machine.
Parts of a Sewing Machine and Their Functions
A sewing machine consists of several parts that work together to form stitches. Understanding these parts and their functions is essential for operating the machine safely and efficiently.
1. Spool Pin
The spool pin is a small rod located on top of the sewing machine head. Its primary function is to hold the spool of thread in place while the machine is sewing.
2. Thread Guide
The thread guide consists of small metal loops or slots located along the thread path. Its function is to direct the thread from the spool pin to the needle, preventing the thread from tangling or breaking during sewing.
3. Tension Disk
The tension disk consists of two metal discs that control the tightness or looseness of the upper thread. Proper tension is necessary to ensure that the stitches are even and do not puck or loop on the fabric.
4. Stitch Regulator
The stitch regulator is a dial or lever used to adjust the length or width of the stitches. It allows the operator to choose short stitches for strong seams or long stitches for temporary basting.
5. Presser Foot
The presser foot is a metal attachment that holds the fabric firmly against the feed dog while sewing. This prevents the fabric from slipping or rising with the needle.
6. Presser Foot Lifter
The presser foot lifter is a lever located at the back of the machine head. Its function is to raise and lower the presser foot. Raising the lifter allows fabric to be inserted or removed, while lowering it secures the fabric for sewing.
7. Feed Dog
The feed dog consists of small, metal teeth-like ridges located directly under the presser foot. Its function is to pull the fabric forward or backward through the machine as each stitch is made.
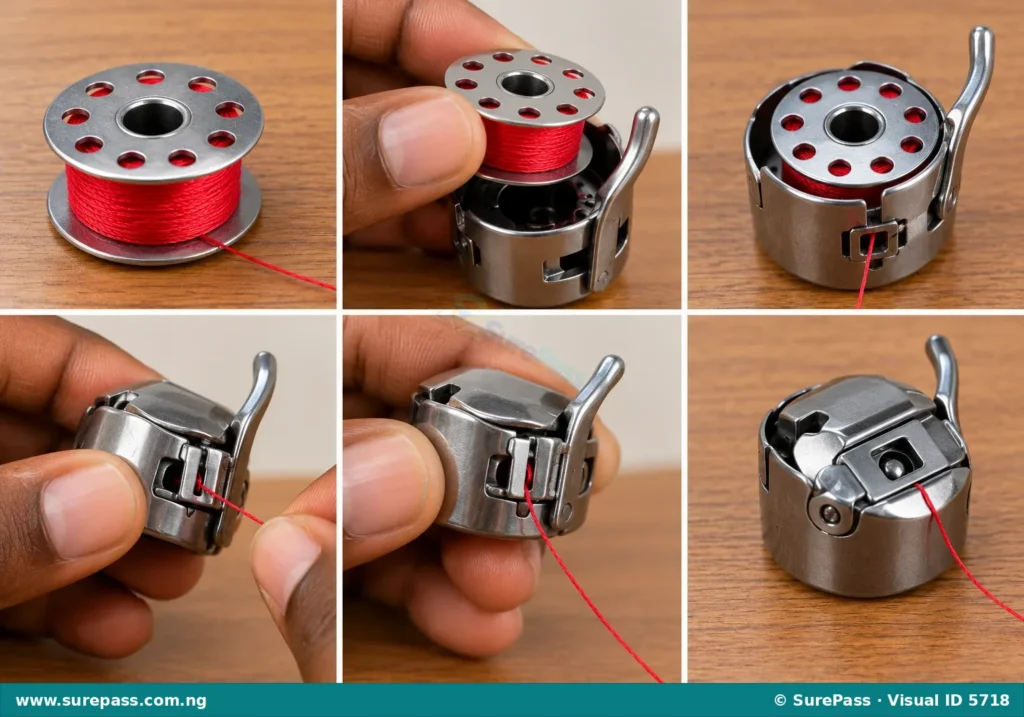
8. Bobbin and Bobbin Case
The bobbin is a small spool that holds the lower thread. The bobbin case is a metal container that holds the bobbin in place inside the machine, providing the lower thread needed to lock the upper thread and form a stitch.
Look at the illustration below to see how the bobbin fits into the bobbin case.
9. Bobbin Winder
The bobbin winder is a mechanism used to wind thread from the main spool onto the bobbin. It ensures that the thread is wound evenly and tightly onto the bobbin before sewing begins.
10. Hand/Fly Wheel
The handwheel, also known as the fly wheel, is a large wheel located on the right side of the machine. It is turned manually to raise or lower the needle, which is helpful when starting a seam, turning corners, or sewing delicate areas.
11. Stop Motion Screw
The stop motion screw is a small screw located in the center of the handwheel. Its function is to disconnect the needle mechanism when loosened, allowing the operator to wind the bobbin without the needle moving up and down.
12. Bed
The bed is the flat, horizontal base of the sewing machine. It supports the fabric and provides a smooth surface for the operator to slide the material during sewing.
13. Slide Plate
The slide plate is a movable metal cover on the bed of the machine. It slides open to allow easy access to the bobbin case for insertion, removal, or cleaning.
14. Needle Plate
The needle plate, also called the throat plate, is a semi-circular metal plate located directly under the needle and presser foot. It has openings for the needle to pass through and for the feed dog to emerge.
Observe the close-up diagram of the needle area below to identify these parts clearly.
15. Handle
The handle is a sturdy grip located on top of the machine head or its carrying case. It is used to lift and transport the sewing machine safely from one place to another.
16. Electric Motor
The electric motor is an electrical attachment that provides power to drive the machine. It converts electrical energy into mechanical movement, allowing for faster sewing than manual machines.
17. Pedal
The pedal is a foot control device. On electric machines, pressing the pedal regulates the speed of the motor. On manual treadle machines, rocking the large foot pedal back and forth drives the machine mechanically.
How to Identify and Demonstrate the Functions of Sewing Machine Parts
To develop practical skills in garment making, learners should practice identifying these parts on a real sewing machine and demonstrating how they work.
The procedure for identifying and demonstrating the functions of the parts involves the following steps:
- Place the sewing machine on a flat, stable table in a well-lit room.
- Locate the spool pin on top of the machine and place a spool of thread on it to demonstrate how it holds the thread.
- Pull the thread through the thread guides and pass it between the tension disks to show how the thread path is controlled.
- Turn the handwheel slowly toward the body to demonstrate how it controls the upward and downward movement of the needle.
- Locate the presser foot lifter at the back of the machine. Raise and lower it to show how it lifts and drops the presser foot.
- Place a piece of scrap fabric under the presser foot, lower the foot, and turn the handwheel to observe how the feed dog teeth grip and move the fabric forward.
- Slide open the slide plate on the bed of the machine to reveal the bobbin case, then remove and reinsert the bobbin to demonstrate how the lower thread is accessed.
- Gently press the foot pedal (or rock the treadle pedal) to demonstrate how the machine is powered and controlled.
Summary of Parts and Functions
The table below provides a quick reference for the parts of a sewing machine and their primary functions:
| S/N | Part of Sewing Machine | Primary Function |
|---|---|---|
| 1 | Spool Pin | Holds the spool of thread in place. |
| 2 | Thread Guide | Directs the thread from the spool to the needle. |
| 3 | Tension Disk | Controls the tightness or looseness of the upper thread. |
| 4 | Stitch Regulator | Adjusts the length or width of the stitches. |
| 5 | Presser Foot | Holds the fabric firmly against the feed dog. |
| 6 | Presser Foot Lifter | Raises and lowers the presser foot. |
| 7 | Feed Dog | Pulls the fabric forward or backward during sewing. |
| 8 | Bobbin and Bobbin Case | Holds the lower thread and forms the lockstitch. |
| 9 | Bobbin Winder | Winds thread onto the bobbin. |
| 10 | Hand/Fly Wheel | Manually raises and lowers the needle. |
| 11 | Stop Motion Screw | Stops the needle movement during bobbin winding. |
| 12 | Bed | Provides a flat surface to support the fabric. |
| 13 | Slide Plate | Covers and allows access to the bobbin case. |
| 14 | Needle Plate | Supports the fabric around the needle and feed dog. |
| 15 | Handle | Used for lifting and carrying the machine safely. |
| 16 | Electric Motor | Provides electrical power to run the machine. |
| 17 | Pedal | Controls the speed and operation of the machine. |
Evaluation Guide
Answer the following questions to test understanding of this unit:
- What is a sewing machine?
- State the function of the spool pin and the thread guide.
- Which part of the sewing machine holds the fabric firmly against the feed dog?
- Explain the difference in function between the handwheel and the pedal.
- What is the purpose of the stop motion screw?
- Describe how to access the bobbin and bobbin case on a sewing machine.
- Explain the function of the feed dog during the sewing process.



0 comments
Open the discussion when you need it. Comments stay collapsed until requested so the initial article remains light.