


ARTICLE CONTENTSOn this page 11 sections
Basic Sewing Techniques and Their Uses
Performance Objectives
By the end of the lesson, students should be able to:
- identify basic types and uses of stitches, seams and edge finishes in sewing;
- demonstrate types of stitches, seams and finishes and their uses in sewing;
- use stitches to make different seams and edge finishes.
Introduction to Sewing Techniques
Sewing is the craft of fastening or attaching objects using stitches made with a needle and thread. It is a fundamental skill in fashion design and garment making. To create neat, durable, and beautiful garments, a sewer must master basic sewing techniques. These techniques include making stitches, joining fabrics with seams, and finishing raw edges to prevent fraying.
Understanding these basic techniques helps learners develop the hand-eye coordination and technical skills required for garment construction. These skills are applied in making simple household items and clothing.
Stitch Types and Their Uses
A stitch is a single loop of thread passed through fabric using a needle during sewing.
Stitches are the building blocks of all sewing projects. They can be made by hand or with a sewing machine. Stitches are broadly classified into two main groups based on their durability and purpose. These are temporary stitches and permanent stitches.
Temporary Stitches
Temporary stitches are stitches designed to hold fabric pieces together temporarily before the final, permanent stitching is done.
These stitches are made loosely so that they can be easily removed once the permanent stitches are in place. The process of making temporary stitches is often called tacking or basting. The main types of temporary stitches include:
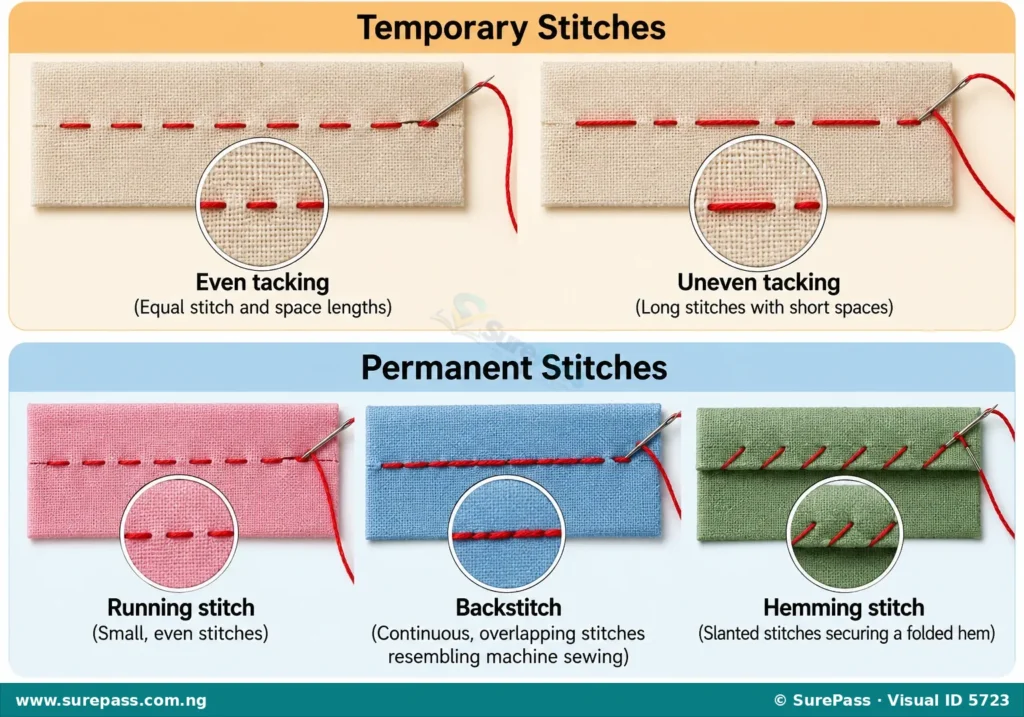
- Even Tacking: This consists of stitches and spaces of equal length, usually about 6 millimetres long. It is used for holding flat seams together before machine stitching.
- Uneven Tacking: This consists of a long stitch followed by a short space. It is used for marking straight lines on fabric or holding lightweight fabrics together.
- Diagonal Tacking: This consists of slanted stitches used to hold two or more layers of fabric flat, such as linings or collars, to prevent them from slipping.
Permanent Stitches
Permanent stitches are stitches designed to remain in the fabric permanently to join pieces together or finish edges.
These stitches are strong, secure, and neat. They are not removed after the garment is completed. The main types of permanent stitches include:
- Running Stitch: This is a simple stitch made by passing the needle in and out of the fabric at regular intervals. It is used for gathering, darning, and making simple seams.
- Backstitch: This is a very strong hand stitch where each stitch overlaps the previous one. It resembles machine stitching and is used to sew strong seams by hand or to repair torn seams.
- Hemming Stitch: This is a slanted stitch used to secure folded edges, such as hems, on the inside of a garment. It is designed to be nearly invisible on the right side of the fabric.
- Overcasting Stitch: This is a diagonal stitch made over the raw edge of fabric. It is used to prevent the raw edges from fraying.
Observe the diagram below to see the appearance of temporary and permanent hand stitches.
Seam Types and Their Uses
A seam is a line of stitching that joins two or more pieces of fabric together.
Seams hold the different parts of a garment together. A well-made seam must be strong, flat, and neat. Seams are classified into two main categories: open seams and enclosed seams.
Open Seams
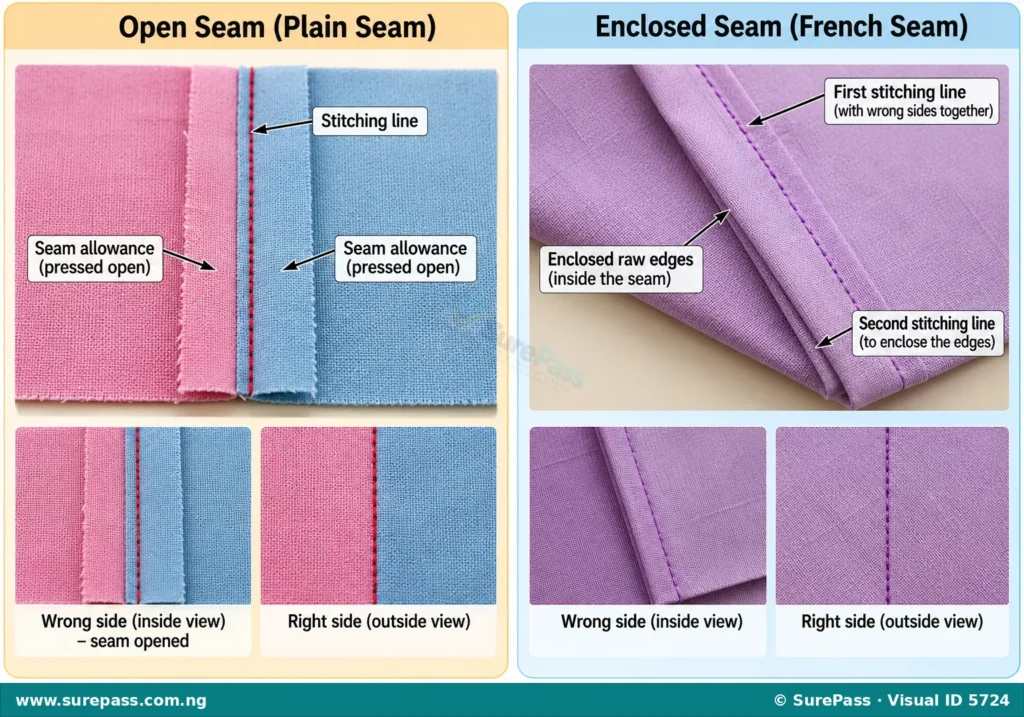
An open seam is a seam where the seam allowances are pressed flat and open on either side of the stitching line.
The plain seam is the most common type of open seam. It is made by placing the right sides of two fabric pieces together, stitching along the seam line, and pressing the seam allowances open. Because the raw edges of the seam allowance are exposed on the inside of the garment, they must be finished to prevent fraying. Open seams are used on medium to heavy fabrics for side seams, shoulder seams, and skirt seams.
Enclosed Seams
An enclosed seam is a seam where the raw edges of the fabric are completely enclosed within the stitching, leaving no raw edges visible.
Enclosed seams are neat, strong, and do not require additional edge finishing. The most common enclosed seams are:
- French Seam: This is a seam within a seam. It is made by first stitching the fabric with wrong sides together, trimming the seam allowance, folding the fabric with right sides together, and stitching again to enclose the raw edges. It is used on fine, lightweight, or sheer fabrics like silk and chiffon.
- Run-and-Fell Seam: This is a flat, durable seam where one seam allowance is trimmed and the other is folded over it and stitched down flat. It is highly visible and very strong. It is commonly used on jeans, shirts, and sportswear.
Look at the diagram below to compare an open seam and an enclosed seam.
Edge Finishes and Their Uses
An edge finish is a treatment applied to the raw edge of a fabric to prevent it from fraying or unraveling.
Raw edges of woven fabrics tend to shed threads when handled or washed. Edge finishes make the inside of a garment neat and extend its lifespan. The choice of edge finish depends on the type of fabric and the garment being made. Common edge finishes include:
- Hem: This is made by folding the raw edge of the fabric to the wrong side once or twice and securing it with stitches. Hems are used to finish the bottom edges of skirts, dresses, trousers, and sleeves.
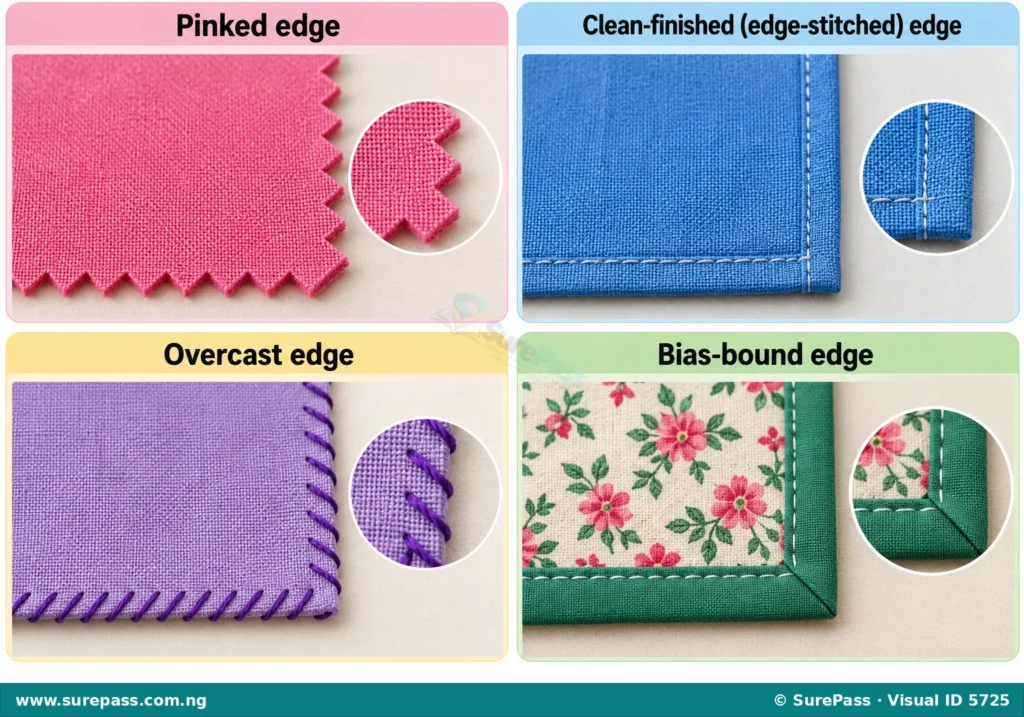
- Bias Binding: This involves wrapping a strip of fabric cut on the bias (diagonal grain) around the raw edge and stitching it down. It is used to finish curved edges such as necklines, armholes, and pocket edges.
- Pinking: This is a quick finish made by cutting the raw edge of the fabric with pinking shears, which are scissors with zigzag blades. The zigzag cut prevents the fabric threads from pulling out easily. It is suitable for tightly woven fabrics that do not fray easily.
- Edge Stitching: This is a machine finish where the raw edge is folded under by about 3 millimetres and stitched close to the fold. It is used on lightweight and medium-weight fabrics.
- Oversewing or Overcasting: This is a hand or machine stitch made over the raw edge of the fabric. It binds the edge threads together to prevent fraying. It is commonly used on bulky or loosely woven fabrics.
Observe the image below to see different types of edge finishes.
How to Produce Samples of Basic Stitches, Seams and Edge Finishes
Practising these techniques on small pieces of fabric helps build confidence and skill before working on actual garments. These small practice pieces are called samples or specimens.
The required materials for making samples are:
- Plain cotton fabric pieces (calico or any firm cotton fabric cut into 10cm x 10cm squares)
- Sewing needles (hand sewing needles)
- Sewing thread (in a contrasting colour for easy visibility)
- Pinking shears and dressmaker’s shears
- A ruler and a tailor’s chalk
- An iron and ironing board
Procedure for Making an Even Tacking Sample (Temporary Stitch)
The procedure involves the following steps:
- Thread the needle and make a small knot at the end of the thread.
- Place a single layer of fabric flat on the table.
- Insert the needle from the wrong side to the right side of the fabric.
- Pass the needle in and out of the fabric, making stitches that are 6 millimetres long, with spaces that are also 6 millimetres long.
- Keep the line of stitching straight using a chalk line as a guide.
- Finish the row with a single backstitch to secure it without a knot, so it can be easily pulled out later.
Procedure for Making a Plain Seam Sample (Open Seam)
The procedure involves the following steps:
- Place two pieces of fabric together with their right sides facing each other.
- Align the raw edges perfectly.
- Pin the fabrics together along the edge to be sewn.
- Tack the pieces together 1.5 centimetres away from the raw edge to hold them in place.
- Sew a permanent running stitch or backstitch along the tacking line.
- Remove the temporary tacking stitches.
- Open the two fabric pieces and press the seam allowances flat and open on the wrong side using a warm iron.
Procedure for Making a Pinked Edge Finish Sample
The procedure involves the following steps:
- Place a single layer of fabric flat on the cutting surface.
- Hold the pinking shears firmly.
- Cut along the raw edge of the fabric, ensuring the zigzag teeth of the shears cut cleanly through the fabric.
- Do not cut too close to the seam line; leave at least 1 centimetre of seam allowance.
How to Construct a Sewing Sample Album
A sewing sample album, also known as a specimen book, is a record book where sewing samples are mounted, labelled, and preserved for future reference.
The required materials for constructing an album are:
- A clean drawing book, scrapbook, or cardboard sheets cut to size
- Glue, adhesive tape, or needle and thread
- A pen or marker
- Completed sewing samples (stitches, seams, and edge finishes)
The procedure for constructing the album involves the following steps:
- Prepare the pages of the album by drawing neat borders around each page.
- Mount each fabric sample onto a separate page using a small amount of glue on the top corners, or by stitching the corners of the sample to the page. Ensure the sample can be lifted to inspect both the front and back sides.
- Write the title of the sample at the top of the page (e.g., “PLAIN SEAM”).
- Write a brief description below the sample, including the type of stitch used, the fabric type, and the common uses of that technique.
- Bind the cardboard sheets together using a ribbon or office treasury tag if loose sheets were used.
How to Produce a Simple Pillowcase
This practical project applies the stitches, seams, and edge finishes learned in this unit to produce a useful household item.
The required materials for making a simple pillowcase are:
- Cotton fabric (dimensions: 50 centimetres wide by 120 centimetres long)
- Sewing thread matching the fabric colour
- Hand sewing needle or a sewing machine
- Scissors and tailor’s chalk
- Measuring tape and pins
- An iron
The procedure involves the following steps:
- Prepare the fabric: Lay the fabric flat and cut it to the required dimensions of 50cm by 120cm. Ensure the edges are cut straight.
- Hem the short edges: Fold one of the short edges (50cm side) over by 1 centimetre to the wrong side, then fold it over again by 2 centimetres to create a double hem. Pin and tack it in place. Sew the hem down using a neat hemming stitch or machine stitch. Repeat this process for the other short edge.
- Fold the fabric: Lay the fabric flat with the right side facing up. Fold the fabric so that the two hemmed ends overlap in the middle, creating a pocket shape that measures approximately 50cm by 70cm. The overlapped section will form the opening of the pillowcase.
- Pin and tack the sides: Align the raw edges on the top and bottom sides. Pin them together, then tack along the sides 1.5 centimetres from the edge.
- Sew the seams: Sew a strong backstitch or machine stitch along the tacked lines on both sides to join the fabric.
- Finish the raw edges: Finish the raw edges of the side seams using an overcasting stitch or pinking shears to prevent fraying.
- Turn and press: Remove all temporary tacking stitches. Turn the pillowcase right side out through the overlapped opening. Push out the corners neatly using a blunt tool, and press the entire pillowcase flat with an iron.
Summary
Basic sewing techniques are essential for creating durable and neat textile items. Stitches are divided into temporary stitches (like tacking) which hold fabric temporarily, and permanent stitches (like running stitch and backstitch) which join fabrics permanently. Seams, such as open plain seams and enclosed French seams, are used to join fabric pieces together. Edge finishes, including hems, bias binding, and pinking, protect raw edges from fraying. Practising these techniques through making samples, keeping a sample album, and constructing simple items like a pillowcase builds the foundational skills needed for fashion design and garment making.
Evaluation Guide
Answer the following questions and carry out the practical exercises:
- Define a stitch and state the main difference between a temporary stitch and a permanent stitch.
- List three types of temporary stitches and three types of permanent stitches.
- What is a seam? Describe the difference between an open seam and an enclosed seam.
- Explain the purpose of an edge finish and list four common types of edge finishes.
- Practical Exercise 1: Produce three fabric samples showing:
- Even tacking
- A plain seam pressed open
- A pinked edge finish
- Practical Exercise 2: Construct a neat sewing sample album and mount the three samples produced in Exercise 1 with clear labels and descriptions.
- Practical Exercise 3: Use the basic sewing techniques learned to produce a simple item such as a headband, a chairback, an apron, or a pillowcase.


0 comments
Open the discussion when you need it. Comments stay collapsed until requested so the initial article remains light.