


ARTICLE CONTENTSOn this page 9 sections
Organising and Uploading Fashion Work to a Digital Portfolio
Performance Objectives
By the end of the lesson, students should be able to:
- upload images from phones and digital cameras to the computer and save in a folder;
- upload images on to the digital portfolio from the folder.
Meaning of a Digital Portfolio
A digital portfolio is a curated online or electronic collection of a person’s work, designs, projects and achievements.
In fashion design and garment making, a digital portfolio serves as a modern showcase. Instead of carrying heavy physical sketchbooks or fabric samples, a designer can store, organise and display creative works on a computer or the internet. This makes it easy to present designs to teachers, classmates and potential clients at any time.
Saving Fashion Design Works
Fashion designers often find inspiration online or create digital sketches that need to be saved properly. Saving works systematically ensures that designs are not lost and can be easily retrieved when needed.
Downloading Online Works
Downloading is the process of copying data or files from the internet to a local computer or device.
When searching for fashion inspiration, fabric textures or garment styles online, images can be saved directly to the computer. The process of downloading an online image involves the following steps:
- Right-click on the desired image on the website.
- Select the option labeled “Save image as” from the menu.
- Choose the destination folder on the computer.
- Click the “Save” button to complete the download.
Default Storage Locations on a Computer
Computers have default folders designed to store different types of files. The most common storage locations include:
- Downloads: This is the default folder where all files downloaded from the internet are automatically saved.
- Pictures: This folder is ideal for storing photos, digital fashion sketches, fabric patterns and design illustrations.
- Documents: This folder is used for saving text files, project reports, measurement sheets and cost estimates.
Observe the diagram below to see how files are structured in a computer directory.
Creating and Naming Folders
A folder is a virtual storage space on a computer used to group and organise related files.
Creating specific folders prevents the computer from becoming cluttered. For example, a student can create a folder named “JSS1 Fashion Designs” to keep all school projects in one place. The procedure for creating and naming a folder involves the following steps:
- Navigate to the desired location on the computer, such as the Desktop or the Documents folder.
- Right-click on an empty space in that window.
- Move the cursor over the “New” option in the menu.
- Click on “Folder” from the sub-menu to create a new, unnamed folder.
- Type a clear name for the folder, such as “My Fashion Sketches”, while the text is highlighted.
- Press the “Enter” key on the keyboard to save the folder name.
Transferring Images to a Computer
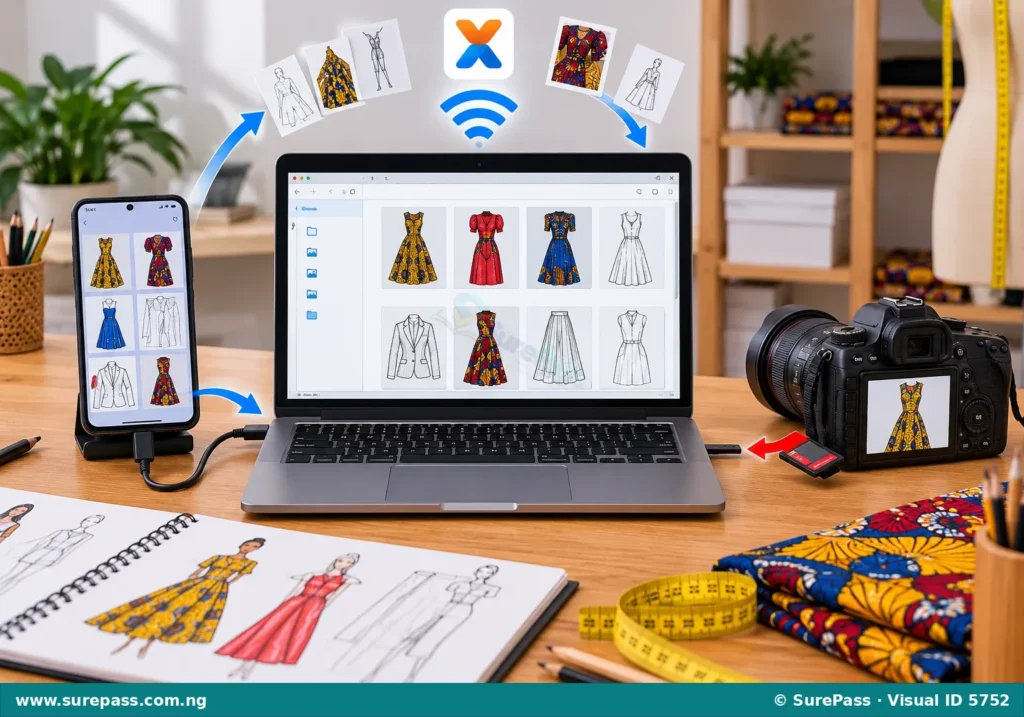
Fashion designs are often captured using physical devices like smartphones or digital cameras. To organise these images into a digital portfolio, they must first be transferred to a computer. Several methods can be used to transfer these files.
Using a USB Cable
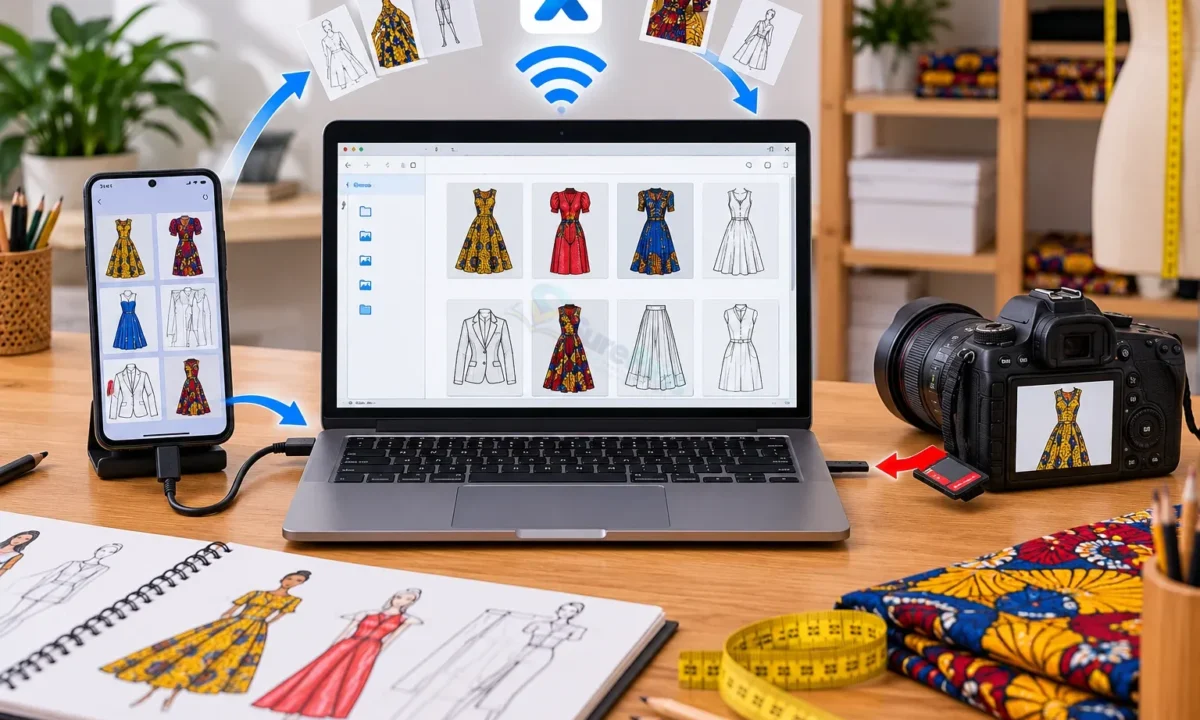
A Universal Serial Bus (USB) cable physically connects a smartphone or digital camera to a computer. This is one of the most reliable methods for transferring high-quality design images. The transfer process involves the following steps:
- Connect one end of the USB cable to the phone or camera and the other end to the computer USB port.
- Unlock the phone screen and select “File Transfer” or “Transfer Files” from the USB settings notification.
- Open “This PC” or “File Explorer” on the computer.
- Double-click on the connected device icon to view its storage.
- Locate the folder containing the images, which is usually named “DCIM” or “Camera”.
- Select the desired fashion images, copy them, and paste them into the created folder on the computer.
Using a Digital Camera Memory Card
Digital cameras store photos on a small removable card called an SD card. To transfer images using this card, the following steps are required:
- Turn off the digital camera and gently remove the memory card.
- Insert the memory card into the computer card reader slot or an external card reader connected to the computer.
- Open “File Explorer” on the computer and click on the memory card drive.
- Open the “DCIM” folder to locate the fashion photographs.
- Copy the images and paste them into the designated computer folder.
Using Wireless Transfer (Xender)
Xender is a popular wireless file-sharing application used to transfer files between devices without using internet data. To transfer images from a phone to a computer using Xender, the following steps are followed:
- Open the Xender application on the smartphone.
- Tap the menu icon and select “Connect to PC”.
- Follow the on-screen instructions to set up a hotspot or scan the web address shown on the phone screen using the computer web browser.
- Once connected, select the fashion images on the phone screen through the computer browser interface.
- Click the download icon on the computer screen to save the images directly to the computer.
Look at the illustration below to understand the different transfer methods.
Updating and Sharing the Digital Portfolio
Once all fashion design images are saved and organised on the computer, they are ready to be uploaded to a digital portfolio platform. Common platforms include Google Drive, Padlet, school portal systems, or presentation software like PowerPoint.
Uploading Images to the Portfolio
Uploading is the process of sending data or files from a local computer to a remote server or online platform.
The process of uploading design images from a computer folder to an online digital portfolio involves the following steps:
- Open the web browser and log into the chosen digital portfolio platform.
- Click on the “Upload”, “Add File”, or “+” button on the platform interface.
- Navigate through the computer file directory to locate the folder where the fashion images were saved.
- Select the specific design images to be uploaded.
- Click “Open” or “Upload” and wait for the files to load completely onto the platform.
- Save or publish the changes to make the images visible on the portfolio.
Sharing the Digital Portfolio
A digital portfolio is created to be viewed by others. Sharing allows teachers to grade the work, peers to provide feedback, and potential clients to view the designs. The main methods of sharing include:
- Sharing with Teachers: This is done by sending the portfolio link via email, submitting it on a school learning management system, or presenting it directly in class using a projector.
- Sharing with Peers: This involves sending the link through school communication groups or collaborative platforms so classmates can view and learn from each other’s work.
- Sharing Online: This involves publishing the portfolio link on educational blogs, social media platforms, or professional design networks to showcase creative skills to a wider audience.
Observe the process sequence diagram below to see how a portfolio is updated and shared.
Practical Activities
These practical exercises help develop the skills needed to manage digital fashion files and build a portfolio.
Activity 1: Creating a Fashion Folder and Transferring Images
This activity guides learners on how to set up a storage space and transfer design photos from a mobile phone to a computer.
The required materials are:
- A computer with working USB ports
- A smartphone containing photos of hand-drawn fashion sketches or sewn garments
- A compatible USB cable
The procedure involves the following steps:
- Turn on the computer and go to the “Documents” directory.
- Create a new folder and name it “My JSS1 Fashion Portfolio”.
- Connect the smartphone to the computer using the USB cable.
- On the smartphone, select “File Transfer” mode.
- On the computer, open “File Explorer” and double-click on the phone icon.
- Navigate to the “DCIM” folder, then open the “Camera” folder.
- Select three photos of fashion designs, right-click, and choose “Copy”.
- Go back to the “My JSS1 Fashion Portfolio” folder in Documents, right-click on an empty space, and choose “Paste”.
- Safely disconnect the USB cable from both devices.
Activity 2: Uploading Designs to an Online Portfolio
This activity guides learners on how to upload the transferred images to a simple online storage platform like Google Drive to act as a digital portfolio.
The required materials are:
- A computer with internet access
- The folder named “My JSS1 Fashion Portfolio” containing the transferred images
- A web browser opened to Google Drive or the school’s designated portfolio platform
The procedure involves the following steps:
- Log into the online platform using the provided student credentials.
- Click the “New” button (or the “+” icon) and select “File upload”.
- In the file window that opens, click on “Documents” and double-click the “My JSS1 Fashion Portfolio” folder.
- Select the design images and click “Open”.
- Wait for the upload progress bar to show that the files have successfully uploaded.
- Click the “Share” button on the platform, copy the link, and send it to the teacher’s email address for evaluation.
Revision Questions
Answer the following questions to test understanding of the topic:
- Explain how to download a fashion design image from the internet to a computer.
- Describe the steps required to create and name a new folder on a computer desktop.
- List three methods of transferring design images from a mobile phone or digital camera to a computer.
- Explain the process of uploading fashion design images from a computer folder to an online digital portfolio.
- State two ways a student can share a completed digital fashion portfolio with a teacher or peers.



0 comments
Open the discussion when you need it. Comments stay collapsed until requested so the initial article remains light.