


ARTICLE CONTENTSOn this page 12 sections
Drafting Basic Pattern
Performance Objectives
By the end of the lesson, students should be able to:
- draft basic pattern: back bodice;
- draft basic pattern: front bodice.
Meaning of Pattern Drafting
Pattern drafting is the process of drawing flat templates or paper shapes on paper using accurate body measurements.
These paper shapes, called patterns, are used as guides to cut fabric for sewing garments. Pattern drafting ensures that the finished clothing fits the body shape perfectly without wasting fabric.
Meaning of a Bodice
A bodice is the portion of a garment that covers the upper part of the human body from the neck and shoulders down to the natural waistline.
A basic bodice pattern consists of two main parts: the front bodice pattern and the back bodice pattern. These two parts are joined at the shoulder and side seams during garment construction.
Importance of Drafting Patterns
Drafting patterns before cutting fabric is a fundamental skill in fashion design. The main reasons for drafting patterns include:
- It prevents the wastage of expensive fabrics by allowing adjustments to be made on paper first.
- It ensures accurate fitting of garments to individual body shapes.
- It serves as a permanent template that can be used repeatedly to make different styles of clothing.
- It saves time during the actual cutting and sewing process.
Tools and Materials for Pattern Drafting
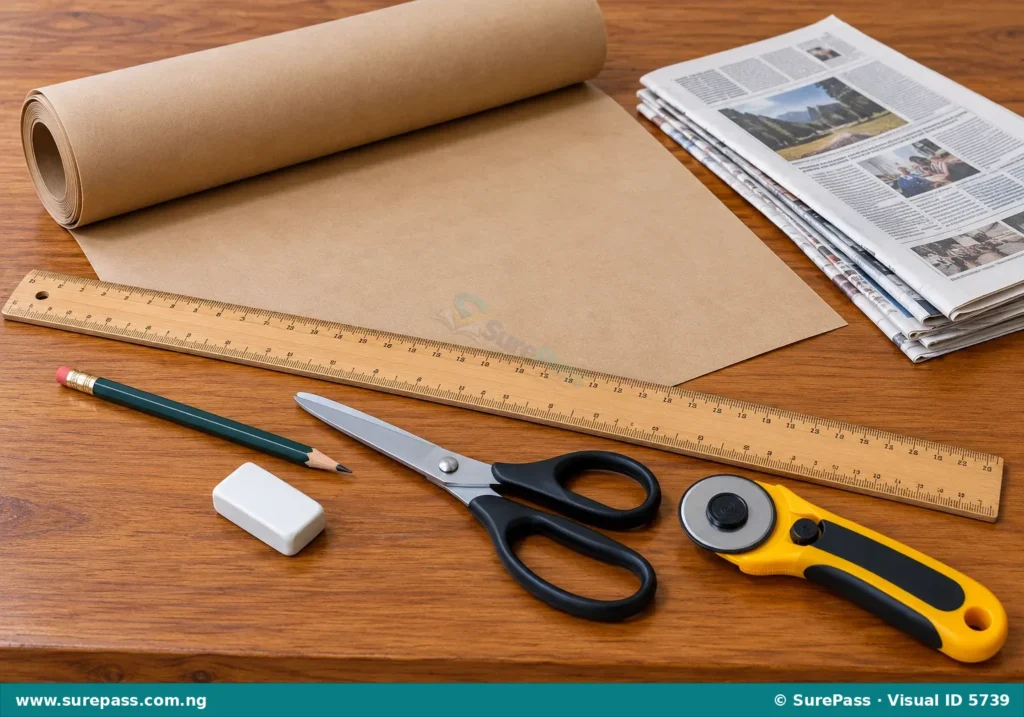
To draft accurate basic patterns, specific tools and materials are required. The standard tools and materials include:
- Brown paper: This is the primary paper used for drafting patterns because it is strong, flat, and wide enough to accommodate full-size drafts.
- Newspaper or old calendar: These serve as cheap and readily available alternatives to brown paper for practice drafts.
- Rulers: Long straight rulers are used to draw straight lines, while curved rulers help in shaping necklines and armholes.
- Pen or pencil: These are used to mark points, draw lines, and write pattern instructions on the paper.
- Eraser: This is used to clean off incorrect lines and markings during the drafting process.
- Paper scissors: These are sharp shears used exclusively for cutting paper patterns. Fabric scissors should never be used to cut paper as paper dulls the blades.
- Rotary cutter: This is a tool with a circular blade that rolls to cut paper or fabric smoothly along straight or curved lines.
Observe the pattern drafting tools shown below.
Key Body Measurements for Bodice Drafting
Before drafting a basic bodice, specific body measurements must be taken. The key measurements required for a basic bodice draft are:
- Bust Circumference: The horizontal measurement taken around the fullest part of the chest.
- Waist Circumference: The horizontal measurement taken around the narrowest part of the natural waistline.
- Back Waist Length: The vertical measurement taken from the prominent bone at the base of the neck down to the natural waistline.
- Front Waist Length: The vertical measurement taken from the shoulder neck point, over the bust point, down to the natural waistline.
- Shoulder Width: The horizontal measurement taken across the back from one shoulder tip to the other.
How to Draft the Basic Back Bodice Pattern
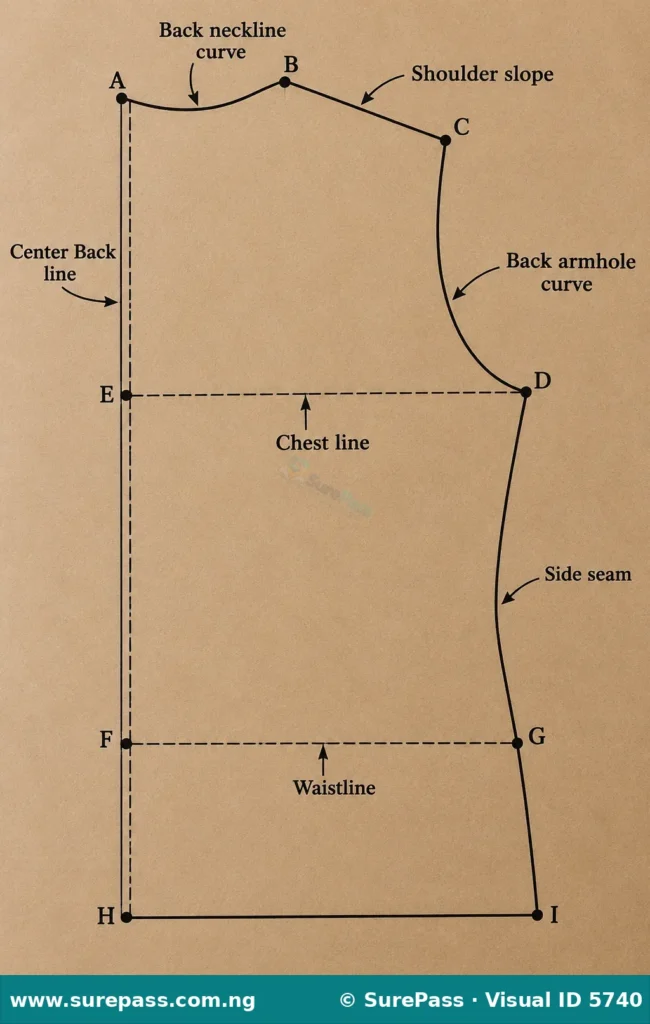
The basic back bodice pattern represents half of the back of the upper body. It is drafted using the back waist length, shoulder width, and one-quarter of the bust and waist measurements.
The procedure for drafting the basic back bodice involves the following steps:
- Place a sheet of brown paper flat on the worktable and secure the corners.
- Draw a vertical line near the left edge of the paper. Label the top point A and the bottom point B. The distance from A to B must equal the back waist length measurement. This line represents the Center Back line.
- From point A, draw a horizontal line to the right. Label the end point C. The distance from A to C must equal one-quarter of the bust circumference plus 2 centimetres for ease of movement.
- From point B, draw a horizontal line to the right. Complete the rectangle by drawing a vertical line down from C to meet the waistline at point D.
- Mark the back neck width from point A along the line A-C (usually 7 centimetres for standard sizes). Label this point E.
- Mark the back neck depth down from point A along the line A-B (usually 2 centimetres). Label this point F. Draw a gentle, smooth curve to connect point E to point F. This forms the back neckline.
- Mark half of the shoulder width measurement from point A along the line A-C. Label this point G.
- From point G, draw a short vertical line down by 2 centimetres to mark the shoulder slope. Label this point H. Draw a straight line from E to H to form the shoulder seam.
- Calculate the armhole depth (usually one-quarter of the bust circumference). Measure this distance down from point A along the line A-B. Draw a horizontal line across the draft to represent the chest line.
- Draw a curved line from point H down to meet the chest line at the side. This forms the back armhole curve.
- On the waistline B-D, measure one-quarter of the waist circumference plus 2 centimetres for a basic dart. Label this point I. Draw a straight line from the chest line at the side down to point I to form the side seam.
- Cut out the drafted pattern along the outer lines using paper scissors.
Observe the diagram of the basic back bodice pattern below.
How to Draft the Basic Front Bodice Pattern
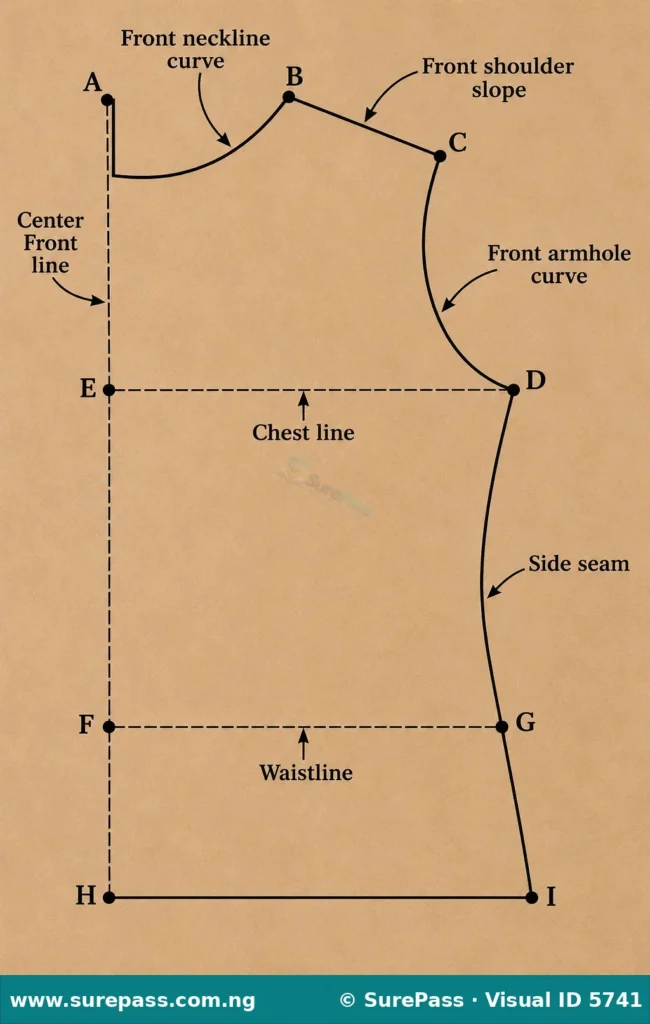
The basic front bodice pattern represents half of the front of the upper body. It is drafted similarly to the back bodice, but it has a deeper neckline curve and a slightly deeper armhole curve to accommodate the front shape of the body.
The procedure for drafting the basic front bodice involves the following steps:
- Place a fresh sheet of brown paper flat on the worktable.
- Draw a vertical line near the left edge of the paper. Label the top point A and the bottom point B. The distance from A to B must equal the front waist length measurement. This line represents the Center Front line.
- From point A, draw a horizontal line to the right. Label the end point C. The distance from A to C must equal one-quarter of the bust circumference plus 2 centimetres for ease of movement.
- From point B, draw a horizontal line to the right. Complete the rectangle by drawing a vertical line down from C to meet the waistline at point D.
- Mark the front neck width from point A along the line A-C (usually 7 centimetres). Label this point E.
- Mark the front neck depth down from point A along the line A-B (usually 7.5 centimetres to create a deeper front neck drop). Label this point F. Draw a deep, smooth curve to connect point E to point F. This forms the front neckline.
- Mark half of the shoulder width measurement from point A along the line A-C. Label this point G.
- From point G, draw a short vertical line down by 3 centimetres to mark the front shoulder slope. Label this point H. Draw a straight line from E to H to form the front shoulder seam.
- Measure the armhole depth down from point A along the line A-B. Draw a horizontal line across the draft to represent the chest line.
- Draw a curved line from point H down to meet the chest line at the side. Curve this line slightly deeper inward than the back armhole to allow comfortable arm movement. This forms the front armhole curve.
- On the waistline B-D, measure one-quarter of the waist circumference plus 2 centimetres for a basic dart. Label this point I. Draw a straight line from the chest line at the side down to point I to form the side seam.
- Cut out the drafted pattern along the outer lines using paper scissors.
Observe the diagram of the basic front bodice pattern below.
Safety Rules in Pattern Drafting
Safety is important when working with sharp tools in the fashion design workshop. Important safety rules include:
- Always pass scissors to another person with the handles facing them, not the blades.
- Keep fingers away from the path of the rotary cutter blade when cutting paper.
- Store rotary cutters with the safety guard on when they are not in use.
- Keep the worktable clean and free of unnecessary objects to prevent accidents.
- Dispose of paper scraps immediately to keep the workspace tidy.
Summary of Differences Between Front and Back Bodice Patterns
The main differences between the front and back bodice drafts are:
- The front neckline is deeper than the back neckline to accommodate the neck comfortably.
- The front shoulder slope is slightly steeper than the back shoulder slope.
- The front armhole curve is curved deeper inward than the back armhole curve to allow easy forward movement of the arms.
- The front waist length is often slightly longer than the back waist length due to the bust curve.
Review Questions
The following questions can be used to test understanding of this unit:
- Define pattern drafting.
- What is a bodice in garment making?
- State three tools used in pattern drafting and explain their uses.
- Explain two differences between a basic front bodice pattern and a basic back bodice pattern.
- List three safety rules that must be observed when drafting patterns.
0 comments
Open the discussion when you need it. Comments stay collapsed until requested so the initial article remains light.