



ARTICLE CONTENTSOn this page 7 sections
Soil Texture
Performance Objectives
By the end of the lesson, students should be able to:
- take different soil samples;
- conduct hydrometer test;
- identify soil components;
- label soil texture.
What is Soil Texture?
Soil texture refers to the feel and composition of the soil. It describes the proportion of different-sized mineral particles in the soil. These particles are sand, silt, and clay.
The texture of soil is important because it affects how well plants grow. It influences how much water the soil can hold, how easily air moves through it, and how nutrients are available to plants.
Types of Soil Texture
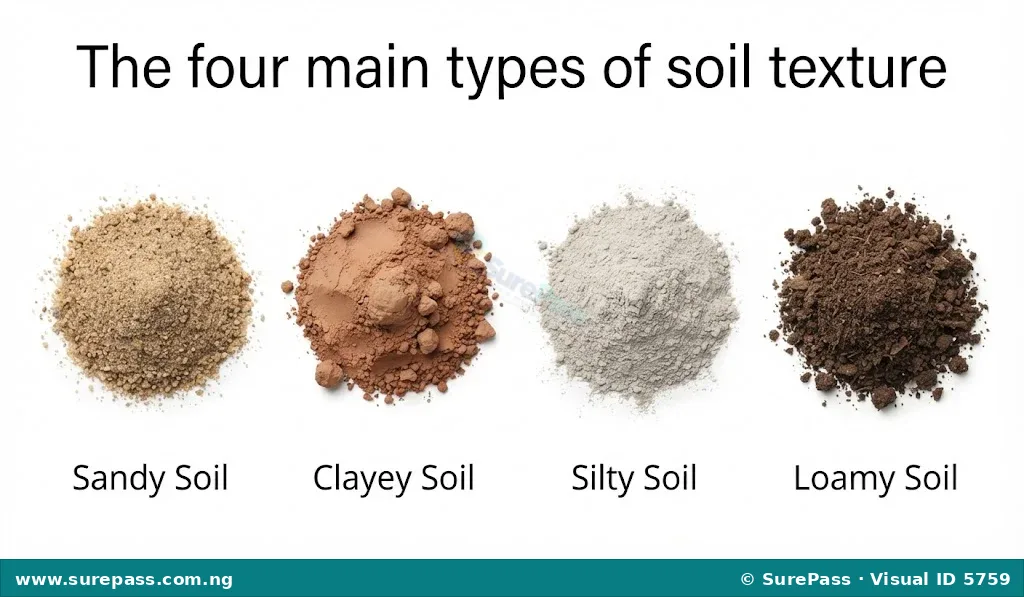
Soil is made up of different particles. The size of these particles determines the type of soil texture. The main types of soil texture are sand, clay, silt, and loam.
Sandy Soil
Sandy soil contains a high proportion of sand particles. Sand particles are the largest soil particles. When felt, sandy soil feels gritty and coarse.
Water drains very quickly through sandy soil, and it does not hold much water or nutrients. This type of soil is often found in dry areas.
Clayey Soil
Clayey soil contains a high proportion of clay particles. Clay particles are the smallest soil particles. When felt, clayey soil feels smooth and sticky when wet, and hard when dry.
Clayey soil holds a lot of water and nutrients, but water drains slowly through it. It can become very heavy and difficult to work with when wet.
Silty Soil
Silty soil contains a high proportion of silt particles. Silt particles are medium-sized, smaller than sand but larger than clay. When felt, silty soil feels smooth and powdery, like flour.
Silty soil holds water better than sandy soil but drains better than clayey soil. It is often fertile and good for growing crops.
Loamy Soil
Loamy soil is a mixture of sand, silt, and clay in balanced proportions. It is considered the best type of soil for most plants because it has good drainage, holds enough water, and is rich in nutrients.
When felt, loamy soil feels crumbly and soft. It is easy to work with and supports healthy plant growth.
Identifying Soil Components
Identifying soil components means recognising the different particles that make up the soil. These particles are sand, silt, and clay. Their proportions determine the soil texture.
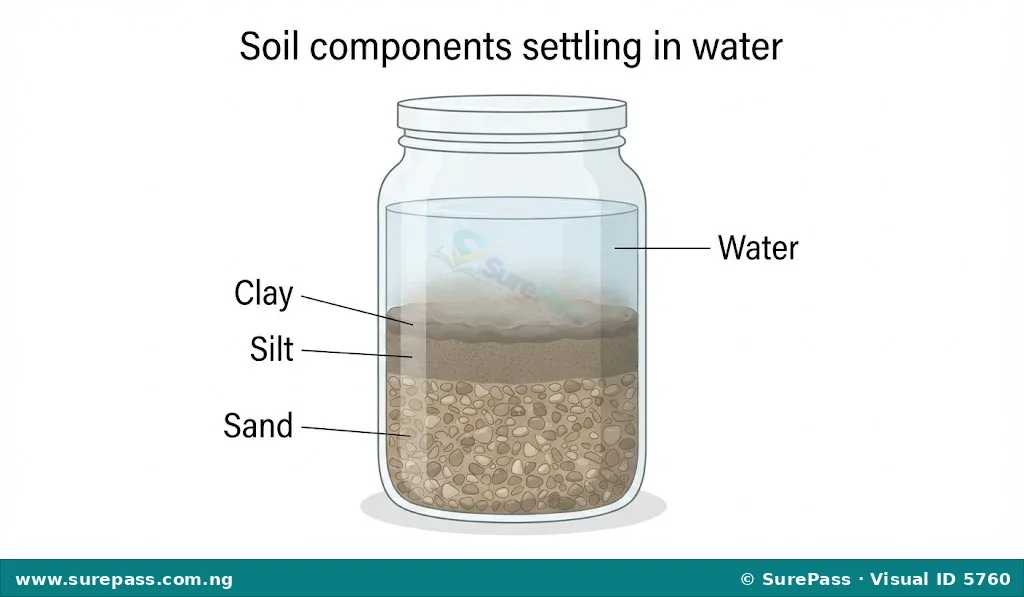
One way to identify these components is by observing how they settle in water. Larger particles like sand settle first, followed by silt, and then the smallest clay particles remain suspended or settle last.
The Hydrometer Test
The hydrometer test is a method used to determine the proportions of sand, silt, and clay in a soil sample. This test helps to classify the soil texture accurately.
A hydrometer is a tool used to measure the density of liquids. In the context of soil, it measures the density of the soil-water mixture as particles settle over time. This helps to calculate the amount of clay and silt present.
Materials for the Hydrometer Test
To conduct a hydrometer test, the following materials are required:
- Different soil samples (e.g., from a garden, a sandy area, a clayey area).
- Clear glass jars or cylinders with lids.
- Water.
- A hydrometer (for accurate measurement, though a simpler settling test can be done without it for JSS1).
- A ruler or measuring tape.
- Labels.
- A timer or clock.
How to Conduct a Simple Hydrometer Test (Settling Test)
This simplified version of the hydrometer test helps to observe the different soil components settling in water. It allows for identification and labelling of soil texture based on visual observation.
The procedure involves the following steps:
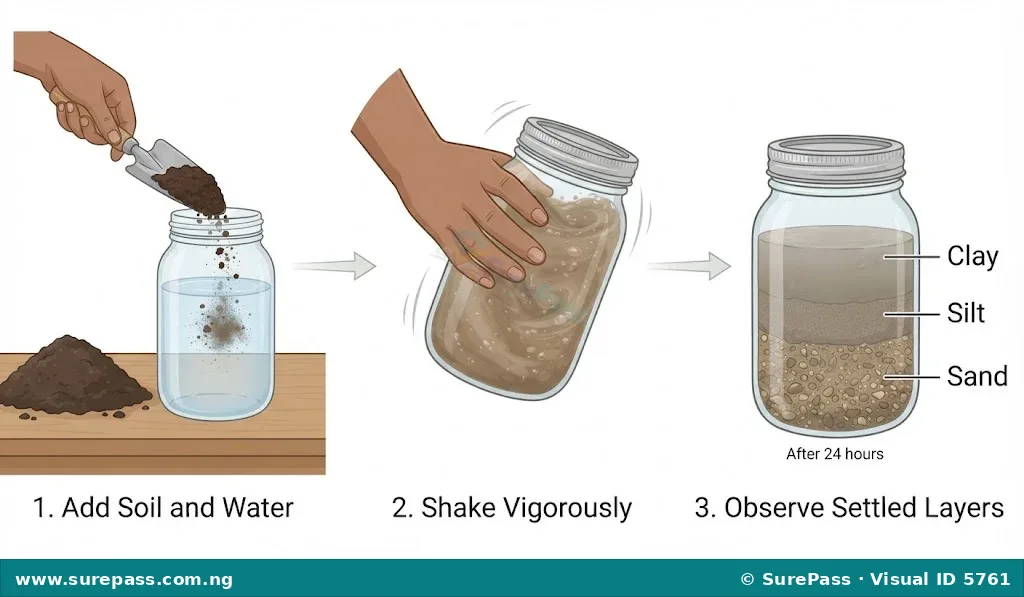
- Take Soil Samples: Collect different soil samples from various locations. Ensure each sample is about one cup in volume and free from large stones, roots, or organic matter.
- Prepare the Jars: Label each clear glass jar with the name of the soil sample (e.g., “Garden Soil,” “Riverbank Soil”).
- Add Soil to Jars: Place one soil sample into each labelled jar.
- Add Water: Fill each jar with water, leaving about two inches of space at the top.
- Shake the Jars: Secure the lids tightly and shake each jar vigorously for at least two minutes. This helps to break up soil clumps and mix the particles thoroughly with water.
- Observe Settling (First Minute): Immediately after shaking, place the jars on a flat surface. Observe the bottom of the jar. The largest particles, which are sand, will settle quickly within the first minute. Mark the level of the sand layer with a marker or by observing the jar.
- Observe Settling (After Two Hours): After about two hours, observe the jars again. The medium-sized particles, silt, will have settled on top of the sand layer. Mark the level of the silt layer.
- Observe Settling (After 24 Hours): Leave the jars undisturbed for 24 hours. The smallest particles, clay, will have settled on top of the silt layer. The water above the clay layer may still appear cloudy, but the clay layer itself will be visible. Mark the level of the clay layer.
- Measure Layers: After 24 hours, measure the height of the total soil settled and the height of each layer (sand, silt, clay) using a ruler.
- Calculate Proportions (Optional for JSS1): Divide the height of each layer by the total height of the settled soil to get a percentage. For example, if the sand layer is 5 cm and the total soil is 10 cm, then sand is 50%.
- Identify and Label Soil Texture: Based on the dominant layer or the proportions, identify the soil texture. For example, if sand is the largest layer, it is sandy soil. If there is a good balance, it is likely loamy soil. Label the jars with the identified soil texture.
Labelling Soil Texture
After conducting the hydrometer test or the simple settling test, the soil texture can be labelled based on the observed proportions of sand, silt, and clay.
For example, if a soil sample shows a large sand layer, a moderate silt layer, and a small clay layer, it can be labelled as “Sandy Loam” or “Sandy Soil” if sand is very dominant. If all three layers are roughly equal, it is “Loamy Soil.”
The feel of the soil can also help in labelling. Gritty soil is sandy, sticky soil is clayey, and smooth, powdery soil is silty. Loamy soil feels crumbly.




0 comments
Open the discussion when you need it. Comments stay collapsed until requested so the initial article remains light.