


ARTICLE CONTENTSOn this page 7 sections
Seed Collection and Dormancy Breaking
Performance Objectives
By the end of the lesson, students should be able to:
- explain dormancy breaking
- collect seeds;
- test seed viability;
- break seed dormancy.
Seeds are essential for growing new plants. For successful crop production, farmers need to ensure that the seeds they plant will grow into healthy seedlings. This unit explores how to collect good seeds, how to check if they are alive and capable of growing, and how to help them sprout when they are unwilling to grow naturally.
Seed Collection
Seed collection is the process of gathering seeds from mature plants. Collecting seeds from healthy, strong parent plants helps ensure that the new plants will also be healthy and productive. Proper collection methods help to preserve the quality of the seeds.
Steps for Collecting Seeds
The procedure for collecting seeds involves the following steps:
- Identify Healthy Parent Plants: Choose plants that are strong, free from diseases, and produce good yields.
- Wait for Maturity: Allow the fruits or seed pods to fully ripen on the plant. Seeds collected too early may not be fully developed and might not germinate.
- Harvest Seeds: Carefully remove the seeds from the ripe fruits or pods. For some plants, like maize, the entire cob is harvested and then shelled. For others, like tomatoes, the seeds are extracted from the fruit.
- Clean the Seeds: Remove any pulp, dirt, or plant debris from the collected seeds. This prevents mould and diseases during storage.
- Dry the Seeds: Spread the cleaned seeds in a thin layer in a cool, dry, and well-ventilated place away from direct sunlight. Proper drying prevents mould growth and helps the seeds store well.
- Store Properly: Place the dried seeds in airtight containers or paper bags and label them with the plant type and date of collection. Store them in a cool, dry place.
Meaning of Dormancy Breaking
Seed dormancy is a state where a seed will not germinate even when conditions like water, warmth, and light are favourable for growth. It is like the seed is “sleeping.”
Dormancy breaking is the process of treating dormant seeds to help them germinate. These treatments overcome the natural barriers that prevent the seed from sprouting, allowing it to grow into a seedling.
Seed Viability
Seed viability refers to the ability of a seed to germinate and grow into a healthy plant. A viable seed is alive and has the potential to sprout under suitable conditions. Non-viable seeds are dead and will not grow.
Testing Seed Viability
Before planting, it is important to test seeds to know if they are viable. This helps farmers avoid wasting time and effort planting seeds that will not grow. Two common methods for testing seed viability are the floatation method and plating.
1. Floatation Method
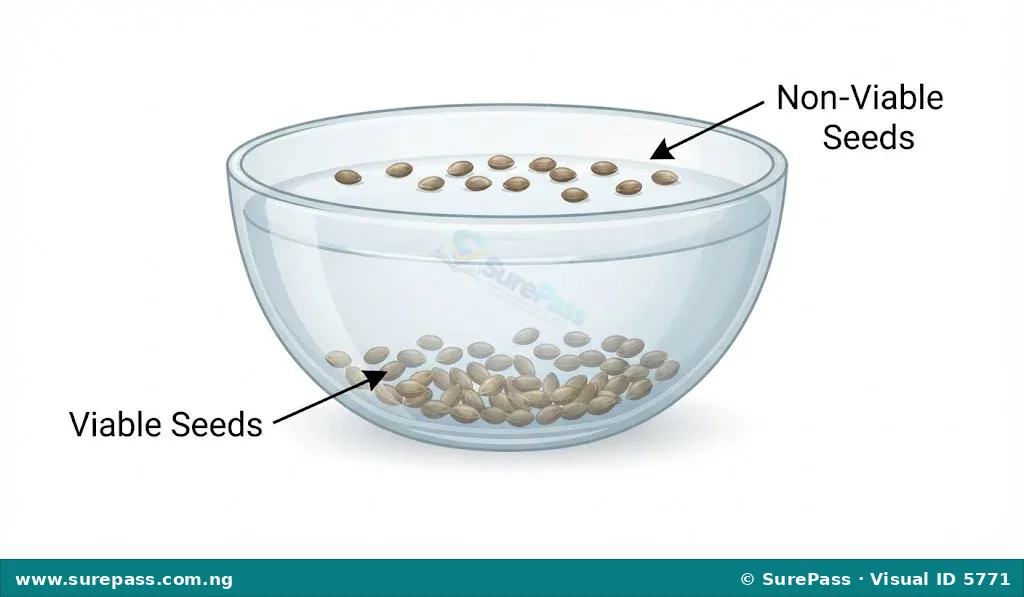
The floatation method is a simple way to quickly check the viability of a batch of seeds. It is based on the principle that healthy, viable seeds are usually dense and sink in water, while non-viable or damaged seeds are often lighter and float.
Procedure for the Floatation Method:
The procedure involves the following steps:
- Gather Materials: Obtain a bowl or bucket and clean water.
- Place Seeds in Water: Put a sample of the seeds into the bowl of water.
- Observe: Wait for about 10-15 minutes.
- Separate Seeds: Observe which seeds float and which sink.
- Interpret Results:
- Seeds that sink are generally considered viable and have a good chance of germinating.
- Seeds that float are likely non-viable, damaged, or empty, and should be discarded.
2. Plating (Using a Petri Dish)
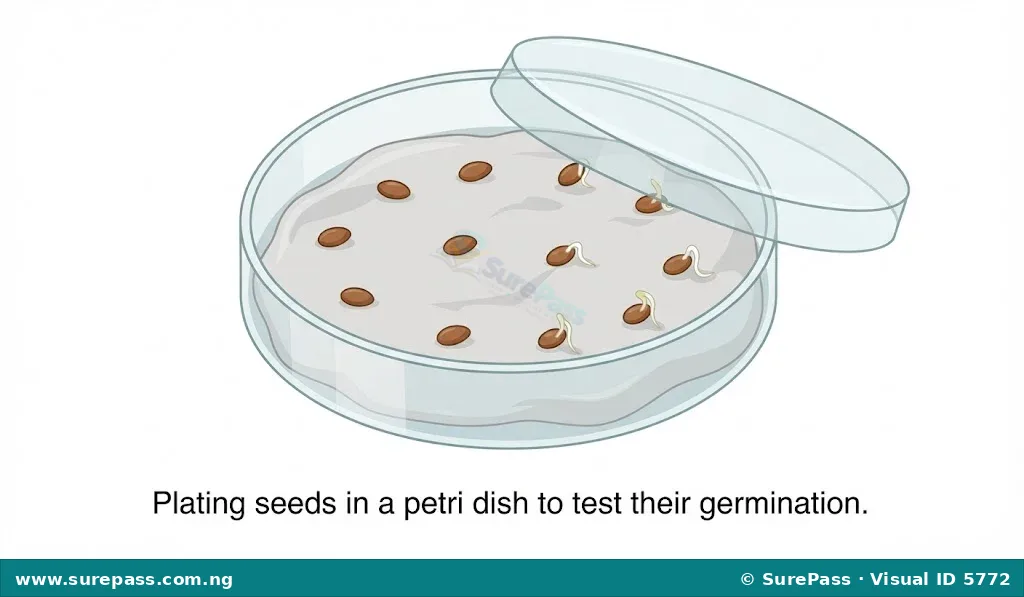
The plating method, also known as the germination test, provides a more accurate assessment of seed viability by allowing seeds to actually germinate under controlled conditions. This method uses a petri dish or a similar container.
Procedure for Plating:
The procedure involves the following steps:
- Gather Materials: Obtain a petri dish (or a clean plate), blotting paper or cotton wool, and water.
- Prepare the Dish: Place a layer of moist blotting paper or cotton wool at the bottom of the petri dish. Ensure it is damp but not waterlogged.
- Arrange Seeds: Carefully place a known number of seeds (e.g., 10 or 20) on the moist paper, spacing them out evenly.
- Cover the Dish: Close the petri dish or cover the plate to maintain humidity.
- Provide Conditions: Place the dish in a warm place, away from direct sunlight. Keep the paper moist by adding a few drops of water daily if needed.
- Observe Germination: Check the seeds daily for signs of germination (sprouting).
- Count and Calculate: After a few days (the exact time depends on the seed type), count the number of seeds that have germinated. Calculate the percentage of viable seeds. For example, if 8 out of 10 seeds germinated, the viability is 80%.
Breaking Seed Dormancy
Some seeds have natural mechanisms that prevent them from germinating immediately, even when conditions are favourable. These mechanisms include hard seed coats or chemical inhibitors. Breaking dormancy involves applying treatments to overcome these barriers.
1. Cutting
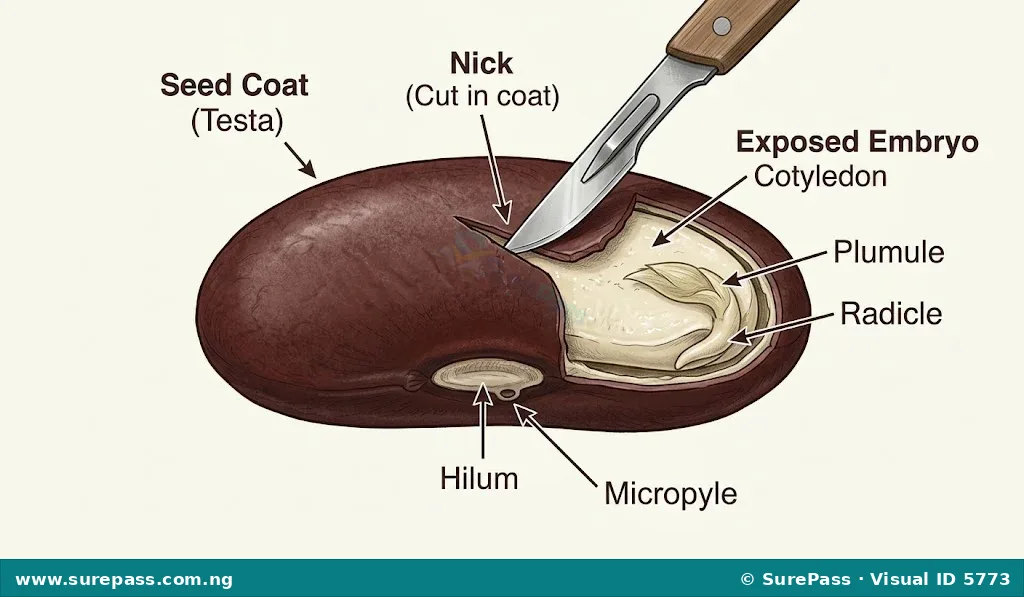
Cutting involves carefully making a small cut or nick in the hard seed coat. This allows water and oxygen to enter the seed, which are necessary for germination.
Procedure for Cutting:
The procedure involves the following steps:
- Select Seeds: Choose seeds with very hard outer coats.
- Use a Sharp Tool: Carefully use a sharp knife or razor blade to make a small cut on the edge of the seed coat. Be very careful not to damage the embryo inside the seed.
- Soak: After cutting, soak the seeds in water for a few hours or overnight to allow them to absorb water.
- Plant: Plant the treated seeds as usual.
Safety Tip: Knives and razor blades are sharp. Always ask an adult for help or supervision when using them to avoid injury.
2. Scarification
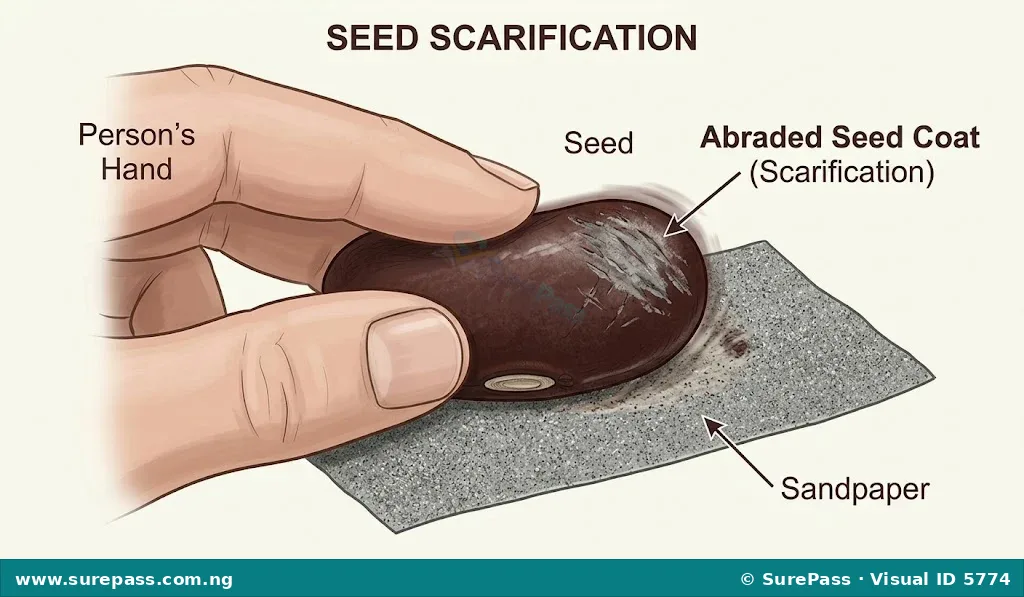
Scarification is the process of weakening, opening, or scratching the seed coat to make it permeable to water and gases. This can be done mechanically or chemically.
Mechanical Scarification Procedure:
The procedure involves the following steps:
- Gather Materials: Obtain seeds with hard coats and sandpaper or a file.
- Rub the Seed: Gently rub the seed against sandpaper or use a file to scratch the seed coat. The aim is to thin the coat, not to remove it completely or damage the inner parts.
- Soak: Soak the scarified seeds in water for several hours.
- Plant: Plant the treated seeds.
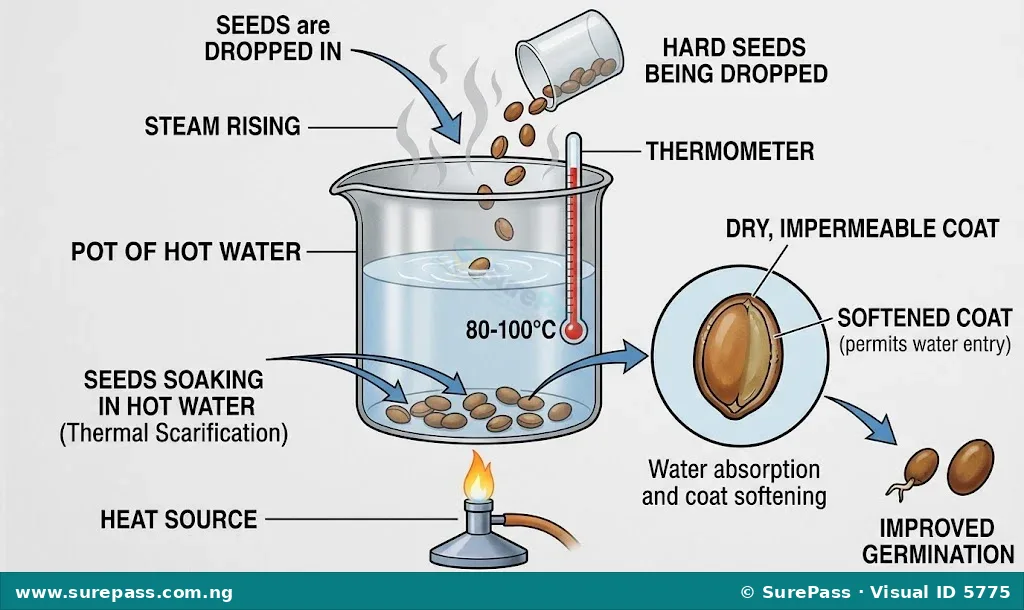
3. Hot Water Treatment
Hot water treatment is used for seeds with very hard coats that prevent water absorption. The hot water softens the seed coat, allowing water to penetrate.
Procedure for Hot Water Treatment:
The procedure involves the following steps:
- Boil Water: Bring a pot of water to a boil.
- Remove from Heat: Take the pot off the heat source.
- Add Seeds: Carefully drop the seeds into the hot water.
- Soak: Allow the seeds to soak in the cooling water for 12 to 24 hours. As the water cools, the seed coats soften.
- Plant: Remove the seeds and plant them immediately.
Safety Tip: Hot water can cause burns. Always ask an adult to handle boiling water and supervise this process.
4. Dilute Acid Treatment
Dilute acid treatment is a chemical method of scarification. The acid helps to dissolve or weaken the hard seed coat, making it permeable to water. This method is usually for very tough seed coats and requires extreme caution.
Procedure for Dilute Acid Treatment:
The procedure involves the following steps:
- Gather Materials: Obtain seeds, dilute hydrochloric acid (HCl), a glass container, and safety gloves.
- Place Seeds in Acid: Carefully place the seeds in a glass container. Pour just enough dilute acid to cover the seeds.
- Soak: Allow the seeds to soak for a short period, usually a few minutes to an hour, depending on the seed type. The acid will slowly soften the seed coat.
- Rinse Thoroughly: After the treatment, carefully pour off the acid. Rinse the seeds thoroughly under running water for several minutes to remove all traces of acid.
- Plant: Plant the rinsed seeds immediately.
Safety Tip: Dilute acid is corrosive and can cause severe burns. This treatment should ONLY be performed by an adult or under strict adult supervision, using appropriate safety equipment like gloves and eye protection. Never handle acid without proper safety measures.


0 comments
Open the discussion when you need it. Comments stay collapsed until requested so the initial article remains light.