



ARTICLE CONTENTSOn this page 7 sections
Nursery Bed Preparation
Performance Objectives
By the end of the lesson, students should be able to:
- explain the meaning of nursery bed;
- list the types of nursery beds;
- select the site for nursery beds;
- list the activities involved in nursery beds preparation;
- prepare a nursery bed.
Growing healthy crops starts even before the seeds are planted in the main farm. For many plants, especially vegetables and some tree crops, seeds are first planted in a special place called a nursery bed. This unit will teach you what a nursery bed is, its different types, how to choose the best place for it, and the steps involved in preparing one.
Meaning of Nursery Bed
A nursery bed is a specially prepared piece of land or container where young plants, called seedlings, are grown and cared for before they are transplanted to a larger, permanent farm or garden.
Nursery beds provide a safe and controlled environment for seeds to germinate and for young seedlings to grow strong enough to survive in the main field. This helps to protect them from harsh weather, pests, and diseases during their most delicate stage.
Types of Nursery Beds
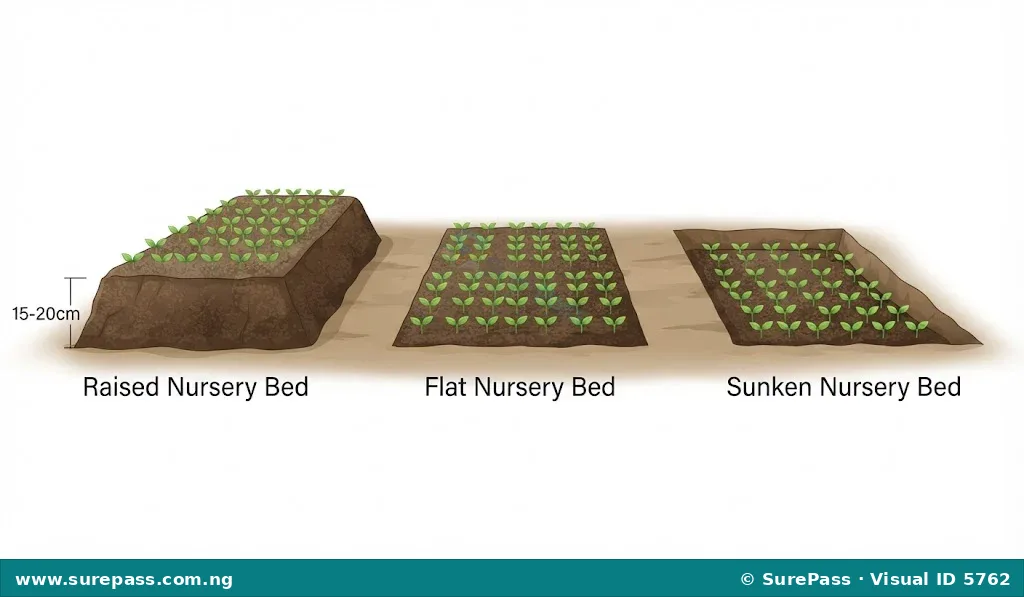
Nursery beds can be prepared in different ways depending on the environment, the type of crop, and the amount of rainfall in an area. The main types of nursery beds are:
- Raised Nursery Bed: This type of bed is built by heaping up soil to form a bed that is higher than the surrounding ground. Raised beds are usually about 15-30 cm high and are good for areas with heavy rainfall or poor drainage, as they prevent waterlogging.
- Sunken Nursery Bed: A sunken nursery bed is made by digging out soil to create a bed that is lower than the surrounding ground. These beds are useful in dry areas or places with low rainfall because they help to conserve moisture and reduce the need for frequent watering.
- Flat Nursery Bed: A flat nursery bed is prepared at the same level as the surrounding ground. This type is common in areas with moderate rainfall and good soil drainage. It is the simplest to prepare.
Site Selection for Nursery Beds
Choosing the right location for a nursery bed is very important for the healthy growth of seedlings. When selecting a site, consider the following factors:
- Proximity to Water: The nursery bed should be located close to a reliable water source, such as a well, borehole, stream, or tap. This makes it easy to water the seedlings regularly, which is crucial for their survival and growth.
- Secured Environment: The site should be in a secured area to protect the young plants from theft, damage by animals (like goats, chickens, or rodents), and human interference. Fencing or locating the nursery near a residential area can help provide security.
- Access to Market: If the seedlings are grown for sale, the nursery site should have easy access to a market or good roads. This helps in transporting the seedlings quickly and efficiently to buyers without causing damage.
Site Preparation for Nursery Beds
Once a suitable site has been selected, the next step is to prepare the ground before forming the actual nursery bed. The activities involved in site preparation are:
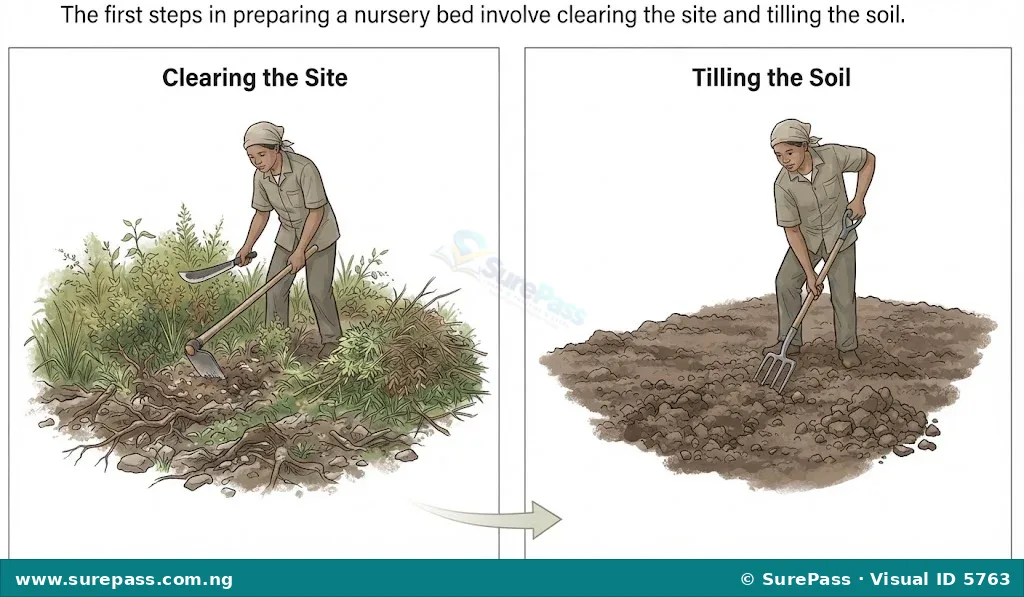
- Clearing of the Site: This involves removing all unwanted materials from the chosen area. These materials include weeds, grasses, shrubs, stones, stumps, and any other debris. Clearing makes it easier to work on the soil and prevents competition for nutrients and light with the young seedlings. Tools like a cutlass, hoe, and rake are used for clearing.
- Tilling the Soil: After clearing, the soil needs to be tilled. Tilling means digging up the soil, breaking up large lumps, and loosening it. This improves soil aeration, allows water to penetrate easily, and makes it easier for young roots to grow. Tilling also helps to mix in any organic matter or manure that might be added to enrich the soil. Tools like a spade, garden fork, and hoe are used for tilling.
Preparing a Nursery Bed
Preparing a nursery bed involves several practical steps to ensure it is ready for planting seeds. This skill is essential for successful crop production.
Materials and Tools Needed
To prepare a nursery bed, you will need the following:
- Spade or Shovel
- Garden fork
- Hoe
- Cutlass (for clearing tough vegetation)
- Rake
- Hand trowel
- Measuring tape or string
- Stakes (small wooden sticks)
- Watering can
Procedure for Preparing a Nursery Bed
The procedure involves the following steps:
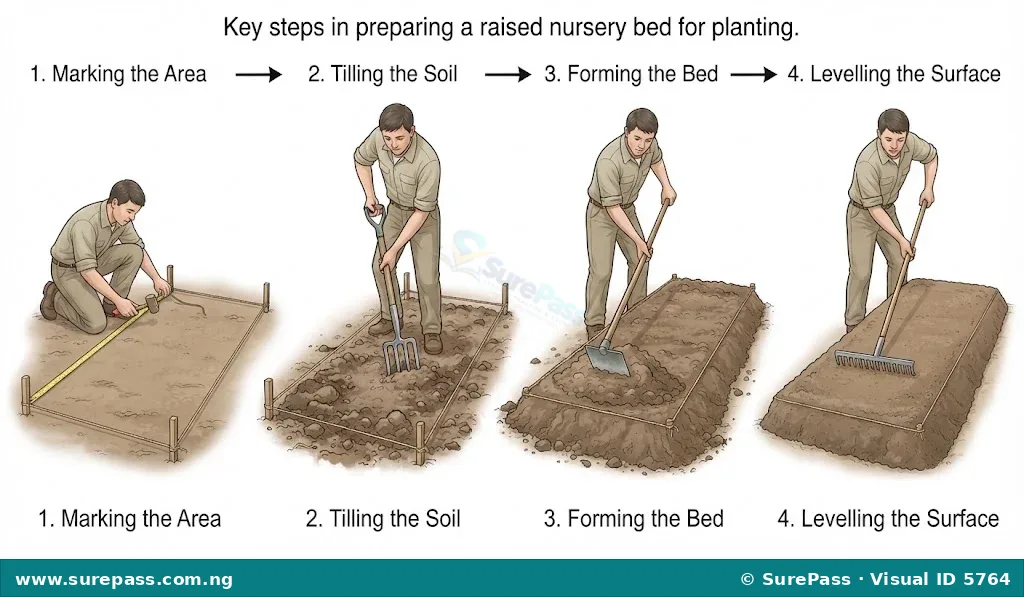
- Clear the Site: Use a cutlass to cut down tall grasses and shrubs. Then, use a hoe and rake to remove all weeds, stones, and debris from the chosen area. Ensure the ground is completely free of unwanted materials.
- Measure and Mark the Bed: Use a measuring tape or string and stakes to mark out the desired size and shape of your nursery bed. A common size for a nursery bed is about 1 metre wide and 3-5 metres long, but this can vary.
- Dig and Till the Soil: Use a spade or garden fork to dig the soil within the marked area to a depth of about 20-30 cm. Break up any large soil lumps with the hoe or garden fork until the soil is fine and loose.
- Remove Remaining Debris: As you till, remove any small stones, roots, or other debris that you find in the soil. This ensures a smooth and clean bed for the seedlings.
- Form the Bed:
- For a Raised Bed: Gently heap the loosened soil inwards from the edges to form a raised bed, about 15-30 cm high. Use the back of the hoe or a rake to shape the sides neatly.
- For a Sunken Bed: Dig out the soil from the marked area to create a depression, about 15-20 cm deep. Ensure the sides are firm to prevent collapse.
- For a Flat Bed: Simply level the tilled soil within the marked area, ensuring it is even with the surrounding ground.
- Level the Surface: Use a rake or the back of a hand trowel to make the surface of the nursery bed smooth and level. This ensures even seed distribution and uniform growth of seedlings.
- Water Lightly: After preparing the bed, water it lightly using a watering can with a fine rose. This settles the soil and provides moisture for planting.
Safety Tips for Nursery Bed Preparation
Working with tools requires care to prevent accidents. Important safety tips include:
- Always handle sharp tools like cutlasses and hoes with extreme caution.
- Ensure adult supervision when using sharp or heavy tools.
- Wear appropriate footwear to protect your feet.
- Keep tools clean and store them properly after use.
- Avoid playing or running around with tools.




0 comments
Open the discussion when you need it. Comments stay collapsed until requested so the initial article remains light.