


ARTICLE CONTENTSOn this page 9 sections
Clay
Performance Objectives
By the end of the lesson, students should be able to:
- explain the meaning of clay;
- list types of clays;
- describe source of clay;
- explain clay preparation and storage;
- explain the techniques used in creating moulding artworks;
- use simple technique to create a clay work.
Meaning of Clay
Clay is a natural, fine-grained earth material that becomes plastic when wet and hard when fired.
It is formed from the breakdown of rocks over a very long time. When wet, clay can be easily shaped and moulded into different forms. Once dried and heated to high temperatures, it becomes permanently hard and strong.
Types of Clay
There are different types of clay, each with unique properties and uses. The main types of clay commonly used in art and craft include:
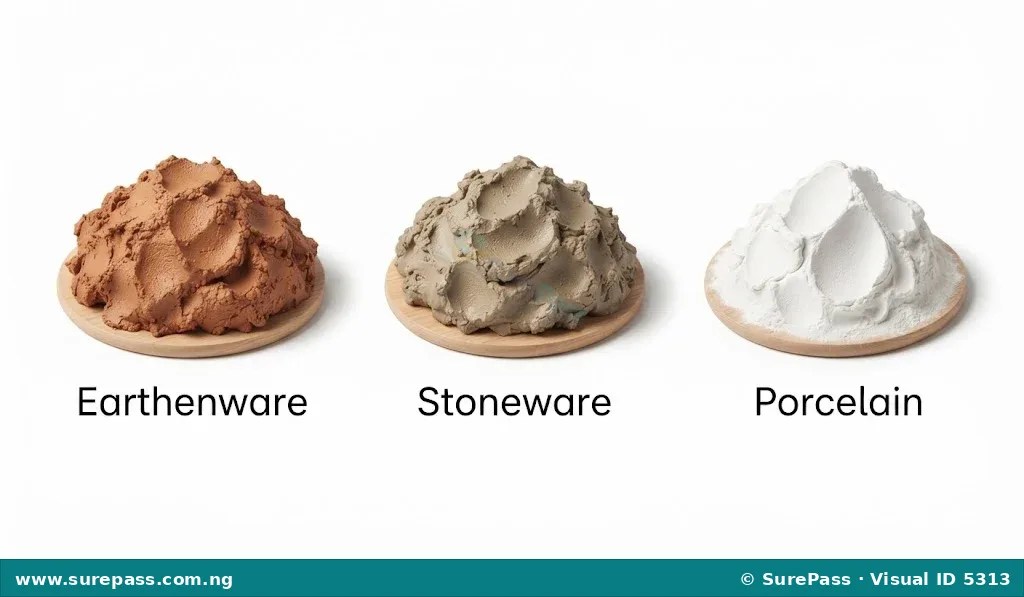
- Earthenware Clay: This is the most common type of clay. It is usually red, brown, or orange in colour due to iron impurities. Earthenware clay is easy to work with and is often used for making pottery, tiles, and sculptures. It fires at lower temperatures and remains porous unless glazed.
- Stoneware Clay: This type of clay is stronger and less porous than earthenware when fired. It can be grey, brown, or buff in colour. Stoneware clay is durable and is used for making functional items like plates, mugs, and bowls that need to hold liquids.
- Porcelain Clay: Porcelain is a very fine, white, and translucent clay. It is known for its delicate appearance and strength when fired at very high temperatures. Porcelain is often used for making fine dinnerware, decorative objects, and sanitary ware.
Sources of Clay
Clay is found naturally in many parts of the world, including Nigeria. It is usually located in the earth’s crust, often near rivers, lakes, and streams, or in areas where ancient bodies of water once existed.
Clay deposits are formed when rocks like granite and feldspar are weathered and broken down by water, wind, and ice over thousands of years. The tiny particles are then carried by water and settle in layers, forming beds of clay. These natural sources are dug up and processed for various uses.
Uses of Clay
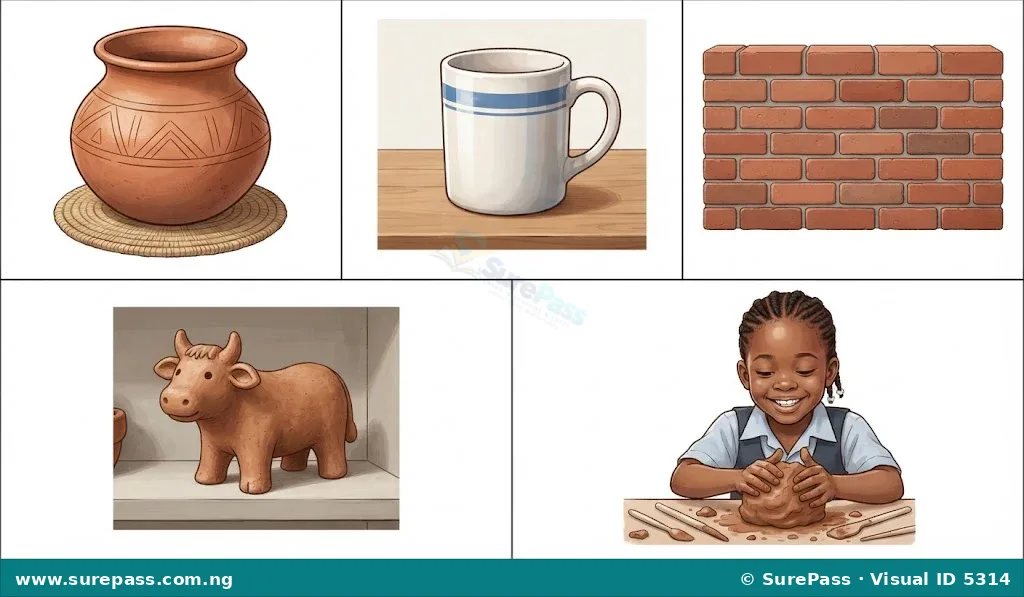
Clay has been used by humans for thousands of years for both practical and artistic purposes. Some common uses of clay include:
- Pottery and Ceramics: Clay is widely used to make pots, bowls, plates, cups, and other household items. These items are shaped from clay, dried, and then fired in a kiln to make them hard and durable.
- Sculptures and Artworks: Artists use clay to create beautiful sculptures, figures, and decorative objects. Its ability to be easily shaped makes it a popular medium for creative expression.
- Building Materials: Clay is an important material in construction. It is used to make bricks, tiles for roofs and floors, and even as a component in cement.
- Traditional Crafts: In many Nigerian communities, clay is used to make traditional cooking pots, water storage vessels, and ceremonial objects.
- Modelling: Children and students use clay for modelling and learning about shapes and forms in art classes.
Clay Preparation and Storage
Before clay can be used for artwork, it often needs to be prepared. Proper storage is also important to keep the clay in good condition.
Preparing Clay for Use
Raw clay dug from the ground may contain impurities like stones, roots, or sand. It also needs to have the right amount of moisture to be workable.
The process of preparing clay involves the following steps:
- Cleaning: Remove any large stones, sticks, or other unwanted materials from the clay.
- Wedging: This is like kneading dough. Wedging helps to remove air bubbles from the clay and makes its consistency even. It also helps to distribute moisture evenly throughout the clay. This makes the clay stronger and easier to work with.
- Adding Water (if too dry): If the clay is too hard or crumbly, a small amount of water can be added gradually and wedged in until the clay reaches a soft, pliable consistency.
- Drying (if too wet): If the clay is too soft and sticky, it can be left exposed to the air for a short time to dry out slightly, or placed on an absorbent surface like plaster or newspaper.
Storing Clay
Proper storage prevents clay from drying out and becoming unusable. The following methods help keep clay fresh:
- Airtight Containers: Store clay in airtight plastic bags or containers. This prevents air from reaching the clay and drying it out.
- Damp Cloth: If storing for a short period, wrap the clay in a damp cloth before placing it in an airtight bag. This helps maintain moisture.
- Cool Place: Keep stored clay in a cool place, away from direct sunlight or heat, which can cause it to dry out quickly.
Techniques for Creating Clay Artworks
Creating artworks with clay involves several simple techniques. For JSS1, the main techniques are pinching, coiling, and moulding.
Pinching Technique
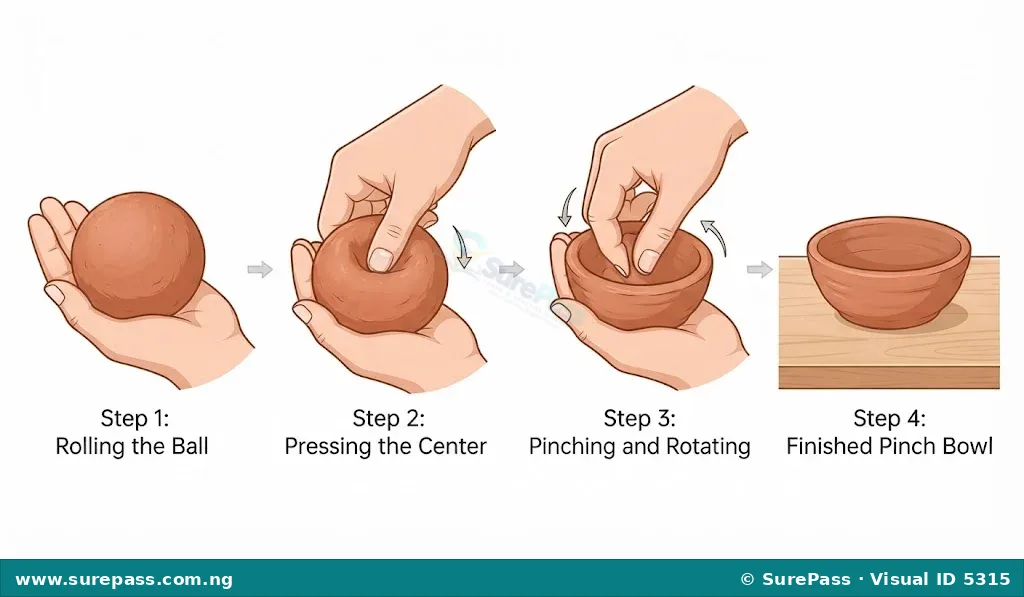
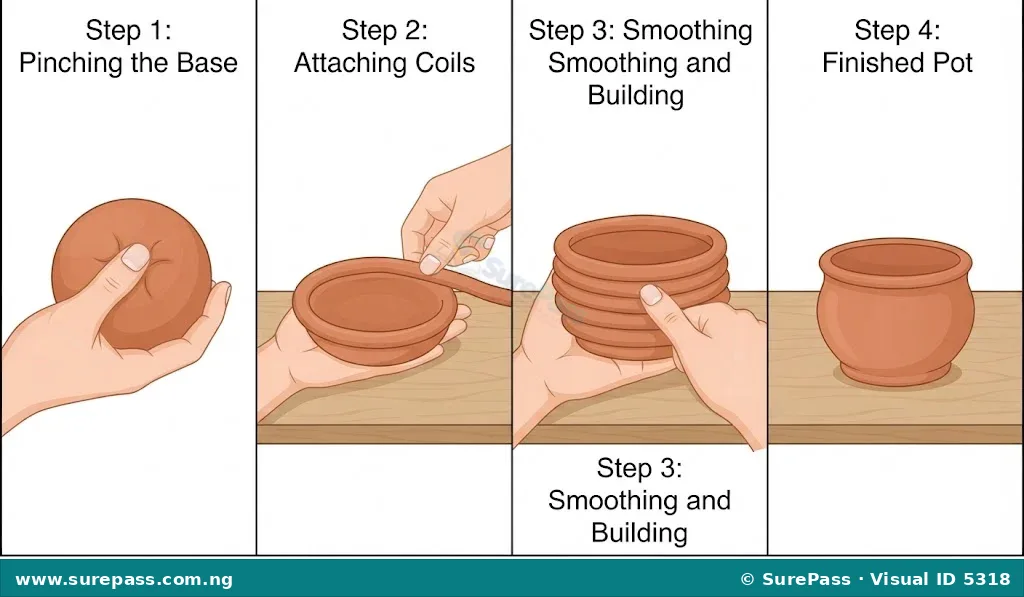
Pinching is one of the simplest and oldest methods of making pottery. It involves using the thumb and fingers to shape a ball of clay into a desired form, usually a bowl or a pot.
The procedure for pinching a clay pot involves the following steps:
- Start with a Ball: Take a lump of wedged clay and roll it into a smooth, firm ball.
- Make an Indent: Hold the clay ball in one hand and press your thumb into the centre of the ball, leaving about 1 to 2 centimetres of clay at the bottom.
- Pinch and Rotate: Begin to pinch the clay between your thumb (inside) and fingers (outside). Slowly rotate the clay ball as you pinch, working your way up the sides.
- Even Thickness: Try to keep the walls of the pot an even thickness. Continue pinching and rotating until the pot reaches the desired shape and size.
- Smooth the Surface: Use your fingers or a damp sponge to smooth out any rough spots or cracks on the surface.
Coiling Technique
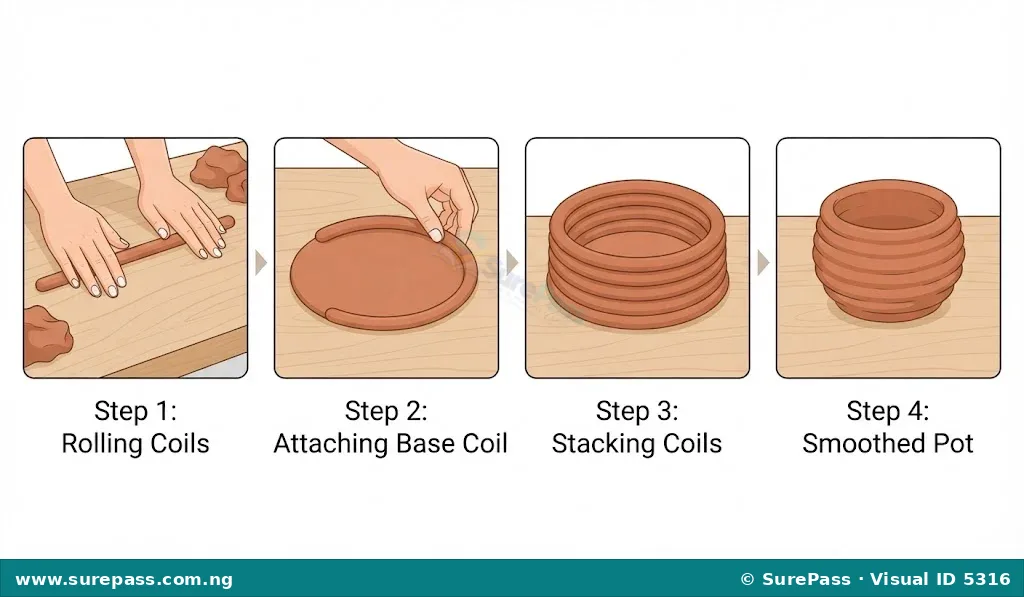
Coiling is a method where clay is rolled into long, snake-like ropes (coils) and then stacked and joined together to build up a form.
The procedure for creating a coiled clay artwork involves the following steps:
- Prepare a Base: Start by making a flat, circular base for your artwork. You can cut this from a slab of clay or flatten a ball of clay.
- Roll Coils: Take a piece of wedged clay and roll it between your palms or on a flat surface to create long, even coils, similar to ropes.
- Attach the First Coil: Place the first coil around the edge of your base. Score (make small scratches) both the base and the coil where they will join, and apply a little slip (liquid clay) to help them stick together. Press the coil firmly onto the base.
- Build Up Layers: Continue to make and attach coils, stacking them one on top of the other. Score and slip each new coil to the one below it.
- Smooth Joins: As you add coils, use your fingers or a tool to smooth the joins on both the inside and outside of the pot. This strengthens the structure and creates a seamless surface.
- Shape the Form: You can shape the artwork by placing coils directly above each other for a straight wall, or by moving them slightly inwards or outwards to create different forms like a vase or a wider bowl.
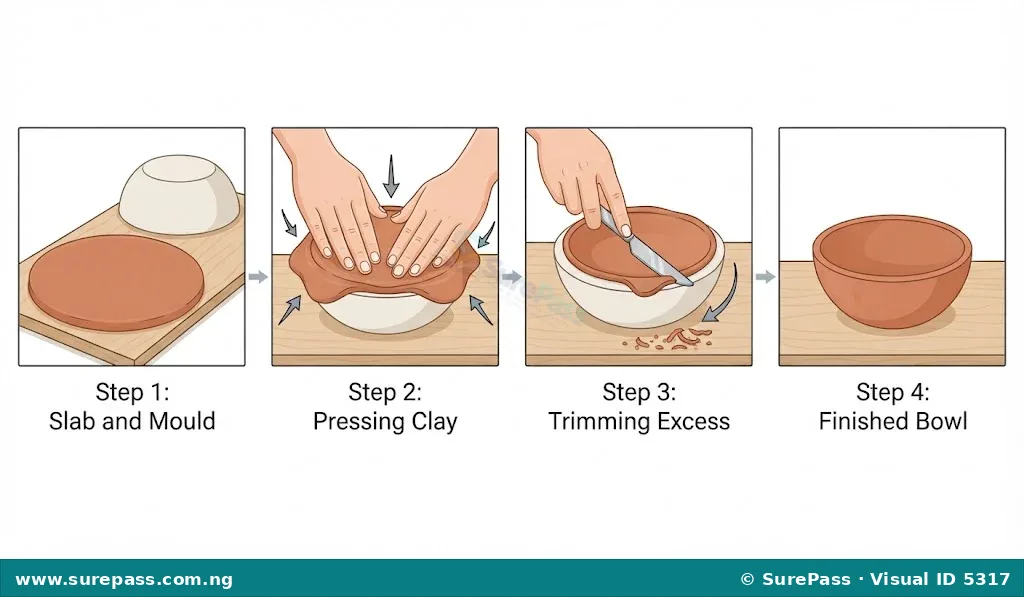
Moulding Technique
Moulding involves pressing clay into or over a pre-made form (a mould) to create a specific shape. This technique is useful for making multiple identical items or for achieving complex shapes easily.
The procedure for moulding a clay artwork involves the following steps:
- Prepare the Mould: Ensure the mould is clean and dry. If the mould is absorbent (like plaster), it may not need a release agent. If it’s non-absorbent (like plastic), you might lightly dust it with cornstarch or a thin layer of oil to prevent the clay from sticking.
- Prepare the Clay: Take a slab of wedged clay that is slightly larger than the mould and of an even thickness.
- Press into the Mould: Carefully press the clay into or over the mould, ensuring it fills all the details and curves. Use your fingers or a soft tool to gently push the clay into place.
- Trim Excess: Once the clay is firmly pressed into the mould, trim away any excess clay from the edges using a knife or a wire tool.
- Allow to Stiffen: Let the clay stiffen slightly in the mould. This is called “leather-hard” stage. If removed too soon, it might collapse. If left too long, it might crack.
- Remove from Mould: Carefully remove the clay form from the mould. Gently lift or invert the mould to release the clay.
- Finish: Smooth any rough edges or seams with a damp sponge or your fingers.
Creating a Simple Clay Work (Practical Activity)
This activity will guide you to create a small bowl or container using the pinching and coiling techniques.
The required materials are:
- Wedged clay
- Water in a small bowl
- Spatula or blunt knife (for scoring)
- Small sponge (optional, for smoothing)
- Table or board (working surface)
The procedure involves the following steps:
- Prepare Your Clay: Take a lump of wedged clay about the size of an orange. Roll it into a smooth ball.
- Create the Base (Pinching): Press your thumb into the centre of the clay ball, leaving a thick bottom. Begin to pinch the clay between your thumb and fingers, rotating the ball to create a small, even-walled bowl shape. This will be the base of your artwork.
- Prepare Coils: Take another piece of clay and roll it into long, even coils, about the thickness of your finger. Make several coils.
- Score and Slip: Use the spatula or blunt knife to make small scratches (score) along the rim of your pinched base. Dip your finger in water and apply a thin layer of wet clay (slip) over the scored area.
- Attach the First Coil: Place the first coil onto the scored and slipped rim of your base. Press it down firmly.
- Join the Coil: Use your fingers to gently blend the coil into the base, both on the inside and outside. Smooth the join so it looks like one piece of clay.
- Add More Coils: Score and slip the top of the first coil. Add another coil on top, pressing firmly and blending the join. Continue adding coils, blending each one, until your artwork reaches the desired height.
- Shape Your Work: As you add coils, you can make the walls go straight up, curve inwards to make a narrower opening, or curve outwards to make a wider form.
- Smooth the Surface: Once all coils are added and blended, use a damp sponge or your fingers to smooth the entire surface of your artwork, removing any visible coil lines or rough spots.
- Dry Slowly: Place your finished clay work in a cool, dry place away from direct sunlight. Allow it to dry slowly and completely. This can take several days or even weeks, depending on the size and thickness of the artwork.


0 comments
Open the discussion when you need it. Comments stay collapsed until requested so the initial article remains light.