



ARTICLE CONTENTSOn this page 9 sections
Mosaic
Performance Objectives
By the end of the lesson, students should be able to:
- explain the meaning of mosaic;
- identify the Materials and tools used in mosaic;
- identify things produce from creating mosaic;
- describe the direct method of making mosaic;
- draw a simple object then create a mosaic of it.
Meaning of Mosaic
A mosaic is a piece of art created by assembling small pieces of coloured materials, such as stone, glass, ceramic or paper, onto a surface to form a pattern or picture.
The small individual pieces used to make a mosaic are called tesserae. These pieces are arranged closely together and held in place with an adhesive or cement to create a durable and decorative design. Mosaic art has been used for thousands of years to decorate floors, walls and ceilings in homes, public buildings and places of worship.
Materials and Tools Used in Mosaic
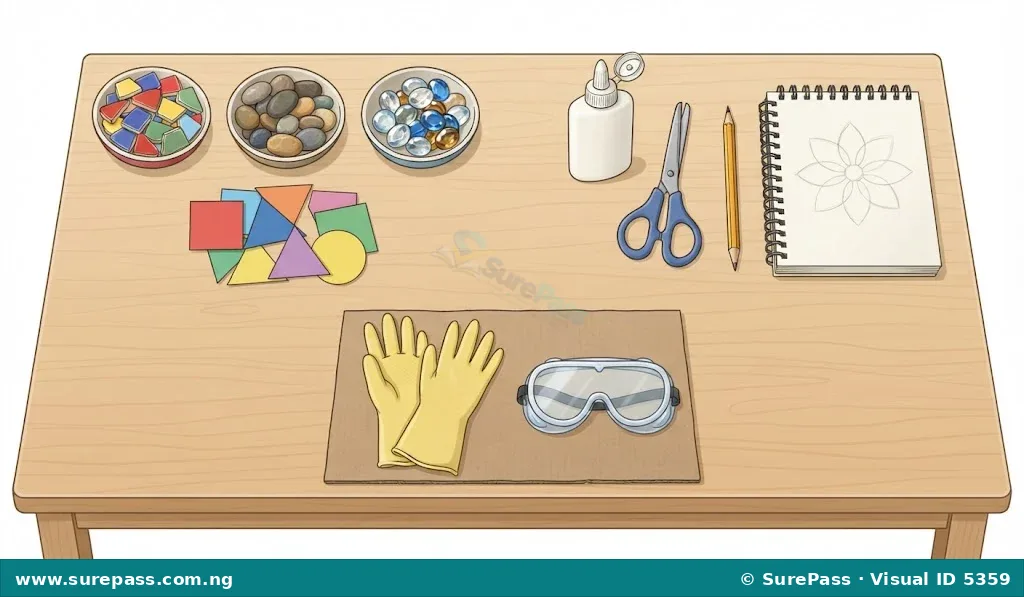
Making a mosaic requires specific materials to form the design and tools to shape and apply them safely. The materials and tools used in making a mosaic include:
- Pebbles: Small, smooth, rounded stones used to create natural textures and earthy colours in a mosaic design.
- Glass nuggets: Smooth, rounded pieces of coloured glass that reflect light and add brightness to the artwork.
- Paper shapes: Coloured paper cut into small pieces, which is a safe and easy material for beginners to practice mosaic making.
- Adhesive: Glue, paste or cement used to stick the mosaic pieces firmly onto the background surface.
- Stone: Natural rock pieces of different colours and textures used for durable outdoor or indoor mosaic designs.
- Ceramic: Broken pieces of tiles or pottery that provide a wide range of bright colours and smooth surfaces.
- Rubber gloves: Protective handwear used to keep hands clean and safe from sharp edges or strong adhesives.
- Safety goggles: Protective eyewear worn to shield the eyes from flying fragments when cutting stone or ceramic pieces.
- Scissors: A cutting tool used to shape paper, cardboard or thin plastic materials into small mosaic pieces.
- Pencil: A drawing tool used to sketch the outline of the design on the background surface before applying the mosaic pieces.
- Drawing pad: A book of paper used for sketching and planning the mosaic design before starting the actual work.
Observe the materials and tools shown below.
Things Produced from Mosaic
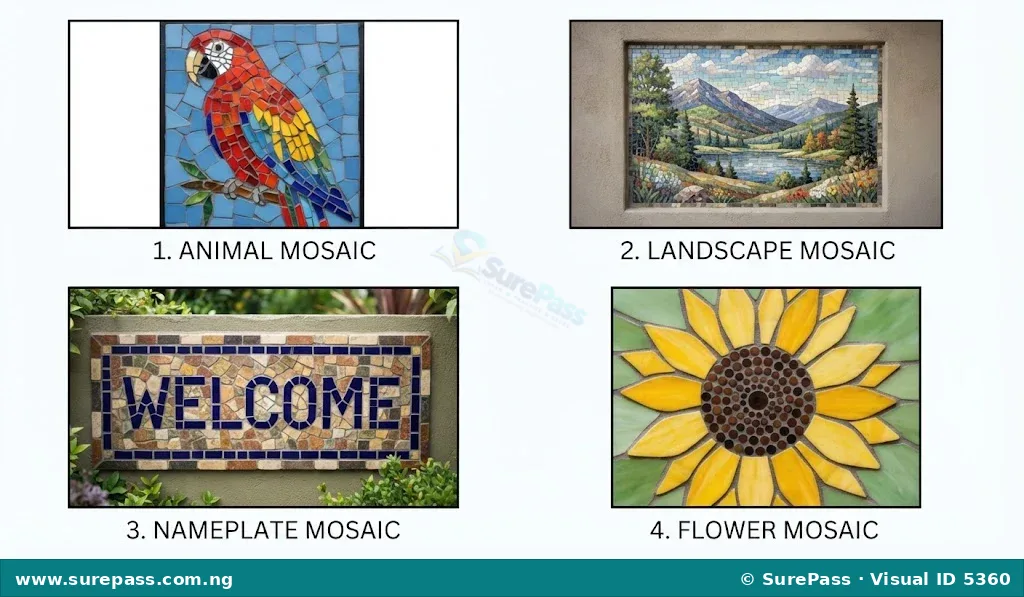
Mosaic art is highly versatile and can be used to create a variety of decorative and functional items. Common things produced from mosaic include:
- Animals: Mosaic pieces can be arranged to represent different animals, such as birds, fish, lizards or domestic animals, capturing their shapes and colours.
- Pictures on the wall: Large decorative artworks, murals or portraits are created on walls to beautify homes, schools, religious buildings and public spaces.
- Titles of names: Letters and numbers can be formed using mosaic pieces to create durable nameplates, signboards, house numbers or school signs.
- Flowers: Colourful floral patterns, plants and garden scenes are popular subjects for mosaic designs on walls, floors or garden stones.
Look at the examples of finished mosaic artworks below.
Methods of Making Mosaic
The primary method taught at this level is the direct method, which is the most straightforward way to create a mosaic.
The Direct Method
The direct method is a mosaic-making technique where the individual pieces (tesserae) are glued directly onto the final background surface.
In this method, the artist sketches the design onto the surface, applies adhesive to a small section, and presses the mosaic pieces directly into the adhesive with the front side facing upwards. This method is highly visual because the artist can see the design develop exactly as it will look when finished. It is ideal for flat surfaces such as walls, panels, picture frames and stepping stones.
How to Draw and Create a Simple Mosaic
Creating a mosaic involves planning the design, preparing the materials, and carefully assembling the pieces. The process is divided into three main stages: drawing, painting (planning), and creating.
The required materials for this activity are:
- A drawing pad or cardboard sheet
- A pencil
- Coloured paints or markers
- Coloured paper shapes or small pebbles
- Adhesive (craft glue)
- Scissors
- Safety goggles and rubber gloves
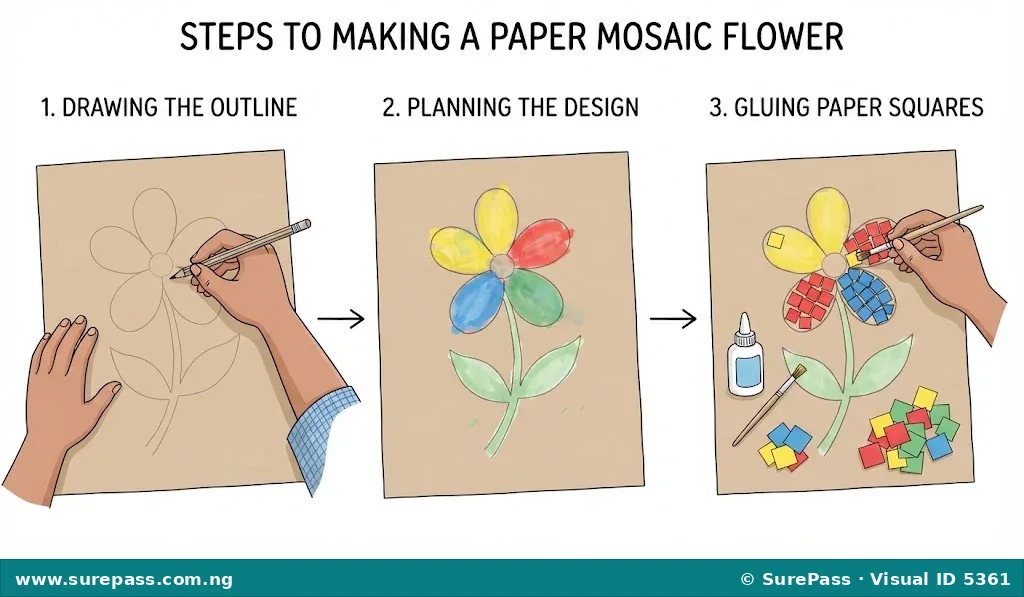
The procedure involves the following steps:
- Drawing the design: Use a pencil to sketch a simple outline of an object, such as a flower or a fish, on the drawing pad or cardboard. Keep the lines simple and avoid tiny details.
- Painting (planning the colours): Paint or colour the sketch using paints or markers to plan where each colour will go. This serves as a guide for placing the mosaic pieces. Alternatively, paint sheets of paper in different colours and let them dry before cutting them into small shapes.
- Preparing the mosaic pieces: Use scissors to cut the coloured paper into small, irregular shapes (tesserae). If using pebbles or glass nuggets, sort them by colour and size. Wear safety goggles and rubber gloves if handling hard materials.
- Applying the adhesive: Spread a thin, even layer of adhesive onto a small section of the drawn design. Do not cover the entire drawing at once, as the glue may dry before the pieces are placed.
- Placing the pieces (Creating): Press the small paper shapes or pebbles firmly into the adhesive. Leave tiny gaps between the pieces to create the classic mosaic look. Follow the painted colour plan.
- Completing and drying: Continue applying adhesive and placing pieces section by section until the entire design is filled. Allow the completed mosaic to dry completely in a safe place.
Observe the steps of creating a mosaic shown below.
Safety Precautions in Mosaic Making
Working with mosaic materials requires care to prevent injuries and keep the workspace clean. Important safety tips for making mosaics include:
- Wear safety goggles when cutting or breaking hard materials like ceramic or glass to protect the eyes from flying fragments.
- Use rubber gloves to protect the hands from sharp edges and strong adhesives.
- Handle scissors and other cutting tools carefully to avoid cuts.
- Keep the workspace clean and sweep up any small fragments immediately after finishing the project.
Evaluation Guide
To review understanding of this unit, answer the following questions:
- What is a mosaic?
- List five materials and three tools used in making a mosaic.
- State four things that can be produced using mosaic.
- Describe the direct method of making a mosaic.
- Outline the steps involved in drawing and creating a simple paper mosaic.



0 comments
Open the discussion when you need it. Comments stay collapsed until requested so the initial article remains light.