


ARTICLE CONTENTSOn this page 7 sections
Weaving
Performance Objectives
By the end of the lesson, students should be able to:
- explain the meaning of weaving;
- list types of weaving;
- list simple material for weaving;
- produce a hand-woven product.
Meaning of Weaving
Weaving is the process of interlacing two separate sets of threads or strips of material to form a fabric or cloth.
Imagine crossing threads over and under each other to create a strong, flat piece. This process has been used for thousands of years to make clothes, baskets, mats and many other useful items.
Types of Weaving
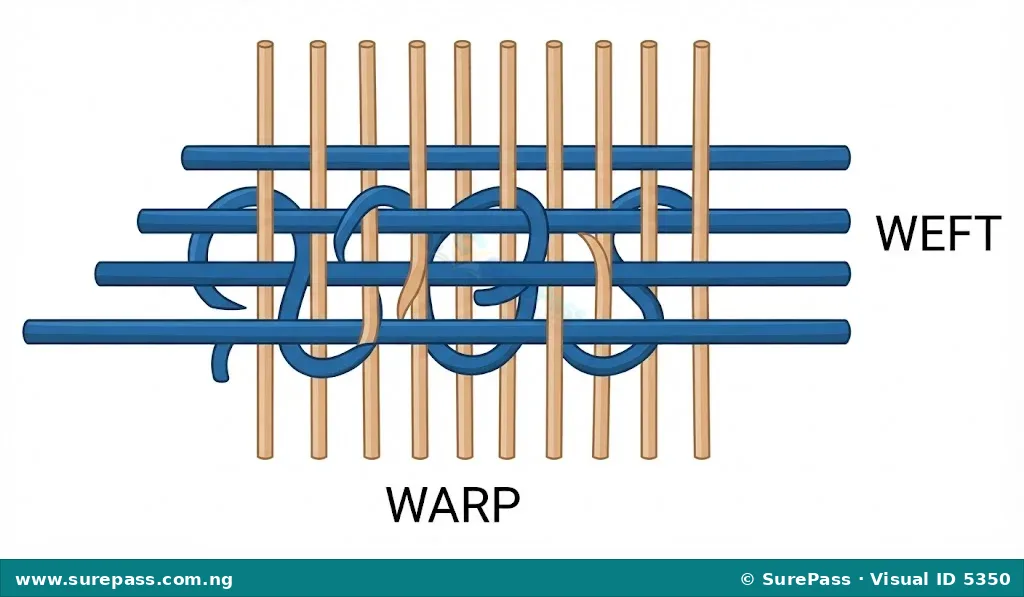
There are different ways to interlace threads, and these different methods create various types of woven fabrics with unique textures and patterns. The main types of weaving include:
- Plain Weaving: This is the simplest and most common type of weaving. In plain weaving, each weft thread passes over one warp thread and then under the next, alternating across the fabric. The next weft thread does the opposite, passing under the first warp thread and over the next. This creates a strong, flat, and durable fabric. Examples of fabrics made with plain weave include calico, muslin, and taffeta.
- Twill Weaving: Twill weaving creates a diagonal pattern on the surface of the fabric. This is achieved by passing the weft thread over two or more warp threads and then under one or more warp threads, in a staggered pattern. Each subsequent row shifts the diagonal line, creating a distinct diagonal ridge. Denim fabric, often used for jeans, is a common example of twill weave. Other examples include gabardine and tweed.
- Leno Weaving: Leno weaving creates an open, gauze-like fabric. In this method, two warp threads are twisted around the weft threads to hold them in place. This twisting action prevents the threads from slipping, even when the weave is loose, making the fabric strong despite its open structure. Leno weave is often used for mosquito nets, fruit bags, and some sheer curtains.
Materials for Weaving
Weaving can be done using a wide variety of materials, both natural and artificial. The choice of material depends on the type of product being made and its intended use. Simple materials commonly used for weaving include:
- Yarn/Thread: This is the most common material, made from cotton, wool, silk, or synthetic fibres. It is used to weave fabrics for clothing, blankets, and decorative items.
- Raffia: A natural fibre obtained from the leaves of the raffia palm tree. It is strong and flexible, often used for weaving mats, baskets, hats, and decorative items.
- Strips of Fabric: Old clothes or fabric scraps can be cut into strips and used for weaving rugs, mats, or colourful wall hangings. This is a good way to recycle materials.
- Paper Strips: Coloured paper can be cut into strips and woven to create decorative mats, bookmarks, or simple paper baskets. This is a popular material for beginners.
- Leaves and Grasses: Certain strong and flexible leaves, such as palm fronds, and various types of grasses can be woven to make traditional mats, baskets, and roofing materials.
- Plastic Strips: Strips cut from plastic bags or other plastic materials can be woven to create durable, water-resistant mats or bags. This is another way to reuse waste materials.
Methods of Weaving
The method of weaving refers to the way the materials are interlaced. While there are complex machines for weaving, hand weaving uses simple methods. The basic principle involves creating a set of stationary threads (warp) and then passing another set of threads (weft) over and under them.
Common methods of hand weaving include:
- Loom Weaving: This method uses a frame or machine called a loom to hold the warp threads under tension. The weft threads are then passed through the warp using a shuttle or by hand. Looms can be simple hand-held frames or large industrial machines.
- Finger Weaving: This method does not require a loom. The weaver uses their fingers to interlace the threads directly. It is often used for making narrow bands, belts, or simple braids.
- Basket Weaving: This method involves interlacing stiff materials like raffia, cane, or strips of wood to create three-dimensional objects such as baskets. It often uses a base and then builds up the sides by weaving.
Producing a Hand-Woven Product with Local Materials
Creating a hand-woven product allows learners to apply the principles of weaving using simple, readily available materials. This activity focuses on plain weaving using paper strips or raffia to make a small mat or coaster.
Materials Required:
The required materials are:
- Coloured paper or raffia strips (at least 10 strips of one colour and 10 strips of another colour, each about 1-2 cm wide and 20-30 cm long)
- Scissors (for cutting strips if not pre-cut)
- Ruler (optional, for measuring strips)
- Pencil (optional, for marking)
Procedure for Plain Weaving a Mat:
The procedure involves the following steps:
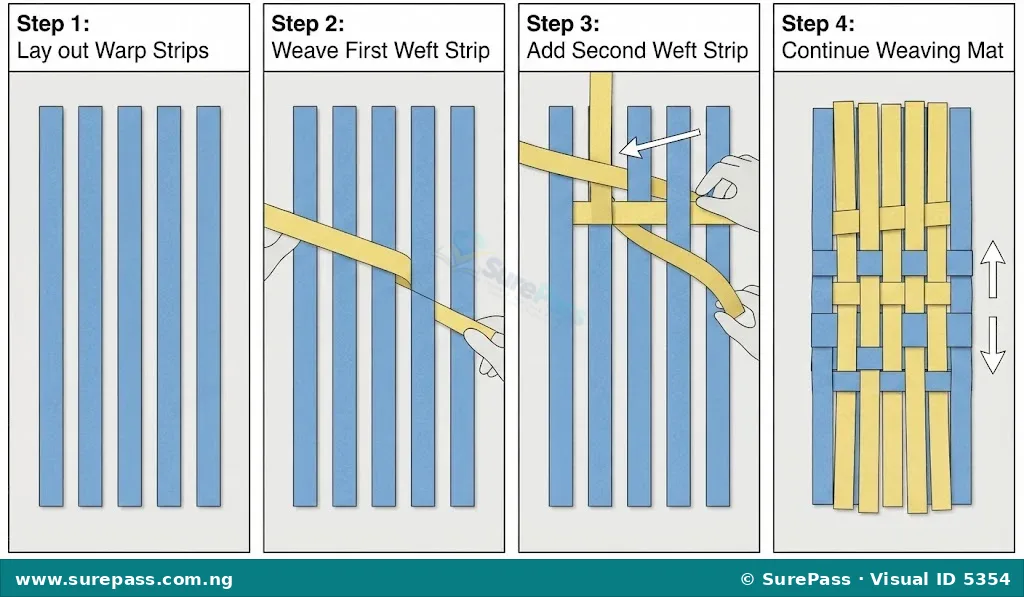
- Prepare the Warp Strips: Take five strips of one colour (e.g., blue). Lay them parallel to each other on a flat surface, spaced slightly apart. These are your warp strips.
- Start the First Weft Strip: Take one strip of the second colour (e.g., yellow). Begin at one end of the warp strips. Pass the yellow strip OVER the first blue strip, UNDER the second, OVER the third, UNDER the fourth, and OVER the fifth.
- Push the Weft Strip Up: Gently push the yellow strip upwards so it is close to the top edge of the blue warp strips.
- Add the Second Weft Strip: Take another yellow strip. This time, start by passing it UNDER the first blue strip, OVER the second, UNDER the third, OVER the fourth, and UNDER the fifth. This is the opposite pattern of the first yellow strip.
- Push the Second Weft Strip Up: Push this second yellow strip close to the first one, making sure the weave is tight.
- Continue Weaving: Repeat steps 2 and 3, alternating the “over and under” pattern with each new yellow strip. If the previous strip started OVER, the next one starts UNDER. If it started UNDER, the next one starts OVER.
- Keep the Weave Tight: As you add more weft strips, gently push them upwards to keep the weave compact and prevent gaps.
- Finish the Weaving: Continue until all your yellow strips are woven in, or until the mat reaches your desired size.
- Secure the Ends (Optional): For paper strips, you can use a tiny bit of glue at the edges to prevent them from unraveling. For raffia, you might tie the ends or tuck them into the weave.
- Trim Excess: Carefully trim any excess length from the warp and weft strips to make the edges neat.

0 comments
Open the discussion when you need it. Comments stay collapsed until requested so the initial article remains light.