



ARTICLE CONTENTSOn this page 6 sections
Crafts and Design
Performance Objectives
By the end of the lesson, students should be able to:
- define crafts;
- identify types of crafts;
- state materials used for crafts;
- produce a designed crafts.
Meaning of Crafts and Design
Crafts are activities where people make useful or decorative things by hand, often using simple tools and materials. These items can be for everyday use or for decoration.
Design is the plan or drawing that shows how something will be made or how it will look. It involves thinking about the shape, colour, pattern and purpose of an item before it is created.
Crafts and design work together. Before a craft item is made, it is usually designed. The design guides the craftsperson in choosing materials and making the item.
Types of Crafts
There are many different types of crafts, each using specific materials and techniques. These crafts allow people to express their creativity and make unique items.
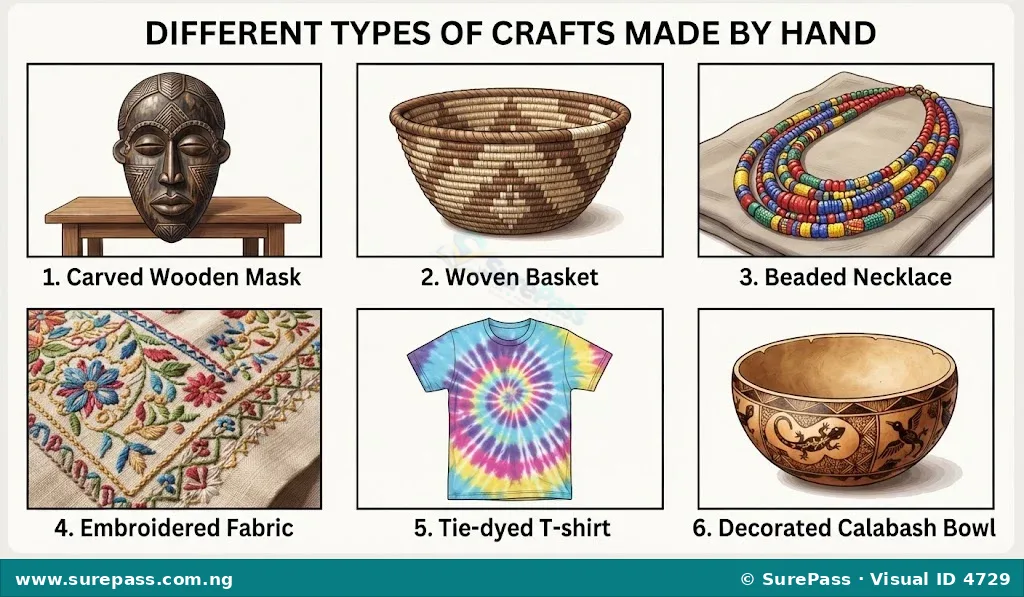
Carving
Carving is the art of shaping materials by cutting away parts of them. Common materials for carving include wood, stone, and sometimes soap. Carvers use special tools to create sculptures, figures, or decorative patterns.
Weaving
Weaving is the process of interlacing two sets of threads or strips of material to form a fabric or mat. One set of threads runs lengthwise (warp), and the other runs across (weft). Materials like raffia, cotton, wool, and even plastic strips can be woven to make baskets, mats, clothes, and bags.
Bead Work
Bead work involves creating designs and patterns using small, decorative beads. Beads can be made from glass, plastic, wood, or seeds. They are usually strung together with thread or wire to make necklaces, bracelets, earrings, and decorative coverings for objects.
Embroidery
Embroidery is the art of decorating fabric or other materials with needle and thread. Different types of stitches are used to create patterns, pictures, or text on cloth. It can be used to decorate clothes, tablecloths, or wall hangings.
Tie and Dye
Tie and dye is a method of creating patterns on fabric by tying parts of the fabric tightly before dyeing it. The tied parts resist the dye, creating unique patterns when the fabric is untied. This craft is popular for making colourful clothes and fabrics.
Calabash Decoration
Calabash decoration involves decorating the dried shell of a calabash fruit. Calabashes are often used as bowls, containers, or musical instruments. They can be decorated by carving, painting, burning patterns, or adding beads and other materials.
Materials and Tools Used for Crafts
Crafts require different materials and tools depending on the type of craft being made. Choosing the right materials and tools helps in creating a good craft item.
Common Craft Materials
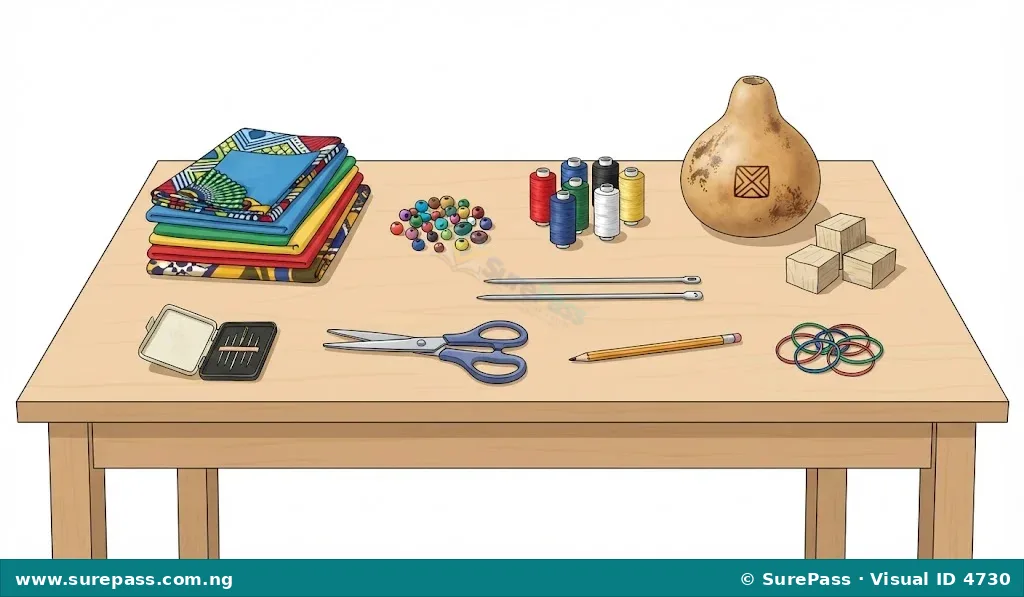
The materials used in crafts are the basic substances from which the craft items are made. Examples of common craft materials include:
- Fabric: Used for weaving, embroidery, and tie and dye. Examples are cotton, ankara, and lace.
- Threads: Used for sewing, embroidery, bead work, and weaving. They come in different colours and thicknesses.
- Beads: Small, decorative objects used for bead work. They can be made of glass, plastic, wood, or seeds.
- Wood: A natural material used for carving and sometimes for making parts of other crafts.
- Calabash: The dried shell of a calabash fruit, used as a base for decoration.
- Dyes: Colouring agents used to change the colour of fabric in tie and dye.
- Raffia: Fibres from palm leaves, used for weaving mats and baskets.
- Paper: Used for drawing designs, cutting, and folding in various crafts.
- Crayons: Used for drawing and adding colour to designs on paper or fabric.
Common Craft Tools
Tools are instruments that help craftspeople to shape, cut, join, or decorate materials. Examples of common craft tools include:
- Needles: Small, thin tools with a sharp point and an eye for thread, used for sewing and embroidery.
- Knitting pins: Long, pointed tools used to create knitted fabrics by looping yarn.
- Pencils: Used for drawing designs, marking patterns, and sketching ideas before starting a craft.
- Scissors: Used for cutting fabric, thread, paper, and other soft materials.
- Carving tools: Special sharp tools like small knives or chisels used to cut and shape wood or other carving materials. These tools should only be used by adults or under strict adult supervision.
- Rubber bands: Used in tie and dye to tie sections of fabric tightly.
Making a Tie and Dye Craft
This activity will guide you through making a simple tie and dye craft using fabric and dyes. This process involves planning a design and then using materials and tools to create it.
Materials Needed:
The required materials are:
- A piece of white or light-coloured cotton fabric (e.g., an old t-shirt, handkerchief, or small cloth).
- Fabric dyes (one or two colours).
- Rubber bands or strong string.
- Plastic buckets or bowls for dyeing.
- Gloves (to protect hands from dye).
- Newspaper or plastic sheet (to protect work surface).
- Water.
Safety Tips:
Important safety tips include:
- Always wear gloves when handling dyes to protect the skin.
- Work in a well-ventilated area or outdoors to avoid inhaling dye fumes.
- Cover your work surface with newspaper or a plastic sheet to prevent staining.
- Ask an adult for help when mixing dyes or handling hot water.
Procedure for Tie and Dye:
The procedure involves the following steps:
- Prepare your workspace: Lay down newspaper or a plastic sheet on a flat surface to protect it from dye spills.
- Prepare the fabric: Wash your fabric and make sure it is damp. This helps the dye spread evenly.
- Plan your design: Decide on the pattern you want to create. Common patterns include spirals, circles, or stripes.
- Tie the fabric:
- For a spiral pattern: Lay the damp fabric flat. Pinch the fabric in the centre and twist it clockwise until the entire fabric forms a flat spiral disc. Secure the disc tightly with several rubber bands crisscrossing over it, dividing it into sections like a pie.
- For a circular pattern: Pinch a small section of the fabric and pull it upwards. Wrap rubber bands tightly around the raised section at different intervals to create rings.
- Prepare the dyes: Follow the instructions on the dye packet to mix the dye with water in separate plastic buckets or bowls. Ensure the dye is fully dissolved.
- Dye the fabric: Wearing gloves, carefully dip different sections of your tied fabric into different dye colours. For a spiral, you might dip each “pie slice” into a different colour. For circles, you can dip the tied sections or the untied parts into dye. Make sure the fabric absorbs the dye well.
- Allow to set: Once dyed, place the fabric in a plastic bag and let it sit for at least 6-8 hours, or as recommended by the dye instructions, to allow the colour to set.
- Rinse the fabric: After the dye has set, remove the fabric from the bag. While still tied, rinse it under cold running water until the water runs clear.
- Untie and wash: Carefully remove all the rubber bands or strings. Wash the fabric again with a little soap and cold water to remove any excess dye.
- Dry the craft: Hang the tie-dyed fabric to dry completely. Once dry, your unique craft is ready!


0 comments
Open the discussion when you need it. Comments stay collapsed until requested so the initial article remains light.