


ARTICLE CONTENTSOn this page 7 sections
Weaving
Performance Objectives
By the end of the lesson, students should be able to:
- define weaving;
- list types of simple material for weaving;
- engage in producing a woven craft.(Hat, bag, containers, cloths, hand fans, etc)
Meaning of Weaving
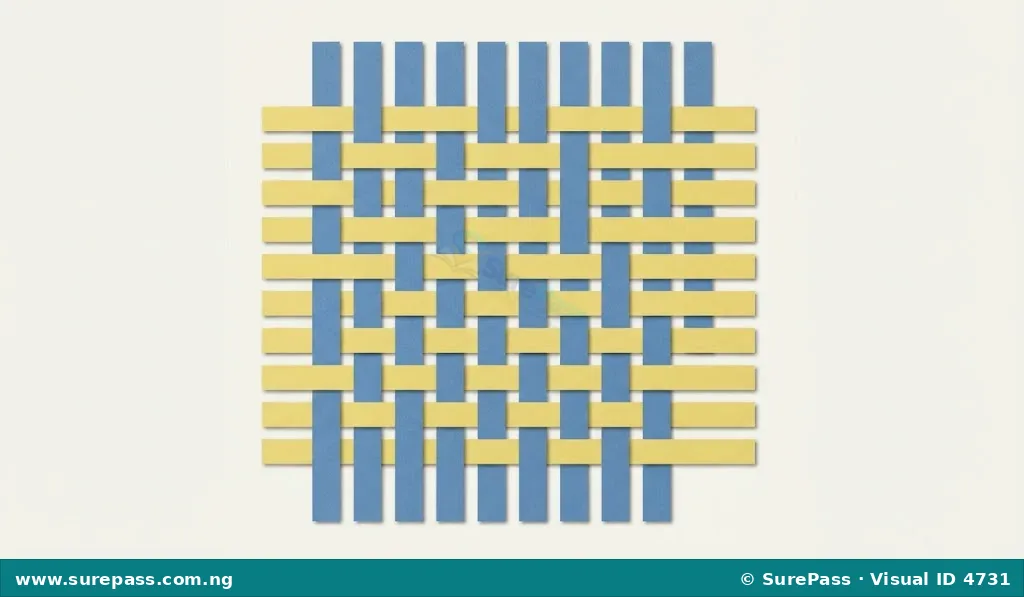
Weaving is the process of making fabric or other materials by interlacing two separate sets of threads, strips, or strands.
Imagine crossing two sets of lines over and under each other. This crossing action creates a strong, connected material. People have used weaving for thousands of years to make useful and beautiful items.
Materials for Weaving
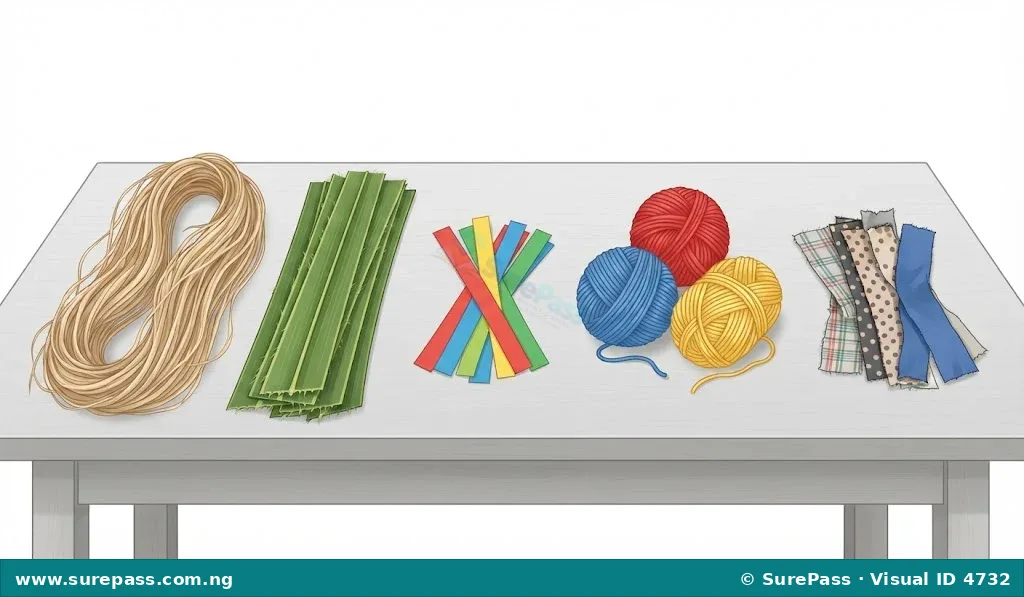
Many different materials can be used for weaving, depending on the type of craft being made. Simple materials are often used for hand weaving.
Common simple materials for weaving include:
- Raffia: This is a natural fibre from palm leaves, often used for mats, baskets, and hats.
- Palm Fronds: The leaves of palm trees can be cut into strips and woven into various items like hand fans and baskets.
- Paper Strips: Coloured paper can be cut into strips and woven to make decorative mats, cards, or small containers.
- Yarn: Different colours and thicknesses of yarn (thread) can be used to weave small fabrics or decorative pieces.
- Fabric Strips: Old clothes or fabric scraps can be cut into strips and woven to make rugs or bags.
These materials are easy to find and safe for children to use in craft activities.
Methods of Weaving and its Tools
The basic method of weaving involves interlacing one set of material (called the weft) over and under another set of material (called the warp). For simple hand weaving, the main tool is usually the hands.
The process generally involves these steps:
- Preparing the Warp: This involves setting up the first set of strips or threads, usually in parallel lines. For simple crafts, these can be glued onto a base or held in place.
- Interlacing the Weft: The second set of strips or threads is then passed over and under the warp strips. This is done row by row, alternating the over-and-under pattern.
- Securing the Ends: Once the weaving is complete, the ends of the strips are secured to prevent the woven item from unravelling.
Simple tools that can assist in weaving include:
- Scissors: Used for cutting materials into strips.
- Ruler and Pencil: Used for measuring and marking materials before cutting.
- Simple Loom (e.g., Cardboard Loom): A piece of cardboard with notches can be used to hold the warp threads in place, making it easier to weave.
Types of Weaving
There are different ways to interlace threads or strips, which create different patterns and textures in the woven material. At this level, three common types of weaving patterns are:
Plain Weaving
Plain weaving is the simplest and most common type of weave. In plain weaving, each weft thread passes over one warp thread and then under the next, alternating across the row. The next row reverses this pattern, going under where the previous row went over, and over where it went under.
This creates a strong, flat, and checkerboard-like pattern. Many everyday fabrics like simple cotton cloths are made with plain weave.
Twill Weaving
Twill weaving creates a diagonal pattern or line on the surface of the fabric. In twill weave, each weft thread passes over two or more warp threads and then under one or more warp threads, in a staggered pattern from row to row.
This staggering creates the distinct diagonal lines. Fabrics like denim (used for jeans) and gabardine are examples of twill weave. Twill fabrics are often strong and durable.
Leno Weaving
Leno weaving is a special type of weave where the warp threads are twisted around the weft threads. Instead of just going over and under, one warp thread crosses over another warp thread to hold the weft thread in place.
This twisting action creates an open, sheer, and stable fabric. Leno weave is often used for materials that need to be lightweight and airy, like mosquito nets, fruit bags, or some types of curtains, because it prevents the threads from slipping apart.
Producing a Woven Paper Mat
This activity will guide you in making a simple woven mat using paper strips. This helps to understand the basic method of weaving.
Required Materials and Tools:
The required materials and tools are:
- Two different colours of A4 paper (e.g., blue and yellow)
- Ruler
- Pencil
- Scissors
- Glue stick (optional, for securing ends)
Procedure:
The procedure involves the following steps:
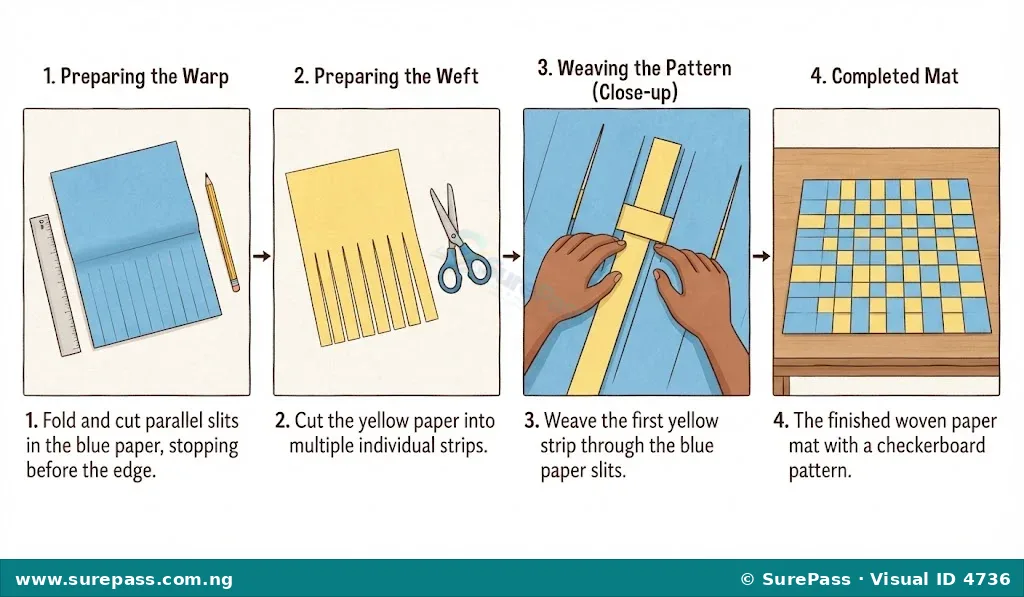
- Prepare the Base Paper (Warp):
- Take one sheet of A4 paper (e.g., blue).
- Fold it in half lengthwise.
- Using a ruler and pencil, draw lines from the folded edge towards the open edge, stopping about 2 cm before the open edge. Make these lines about 1.5 cm apart.
- Carefully cut along these lines, but do not cut all the way to the end. This creates the warp strips.
- Unfold the paper. You will have a sheet with slits, forming your warp.
- Prepare the Weaving Strips (Weft):
- Take the second sheet of A4 paper (e.g., yellow).
- Using a ruler and pencil, draw lines across the short side of the paper, about 1.5 cm apart.
- Cut along these lines to create several individual strips. These are your weft strips.
- Begin Weaving:
- Take one yellow weft strip.
- Starting from one end of your blue warp paper, pass the yellow strip OVER the first blue warp strip, UNDER the second, OVER the third, UNDER the fourth, and so on, until you reach the end of the row.
- Push this yellow strip gently up to the top of the blue warp paper.
- Continue Weaving:
- Take a second yellow weft strip.
- For this strip, reverse the pattern: start by passing it UNDER the first blue warp strip, OVER the second, UNDER the third, OVER the fourth, and so on.
- Push this strip up close to the first one.
- Complete the Mat:
- Continue weaving with the remaining yellow strips, alternating the over-and-under pattern for each new row.
- Push each strip firmly against the previous one to create a tight weave.
- When you run out of yellow strips or fill the blue warp paper, your mat is complete.
- Secure the Ends (Optional):
- If desired, you can use a glue stick to lightly glue the ends of the yellow strips to the blue warp paper to prevent them from slipping out.


0 comments
Open the discussion when you need it. Comments stay collapsed until requested so the initial article remains light.