


ARTICLE CONTENTSOn this page 7 sections
Meaning, Materials and Methods of Printing for Primary 4
Performance Objectives
By the end of the lesson, students should be able to:
- define printing and print making;
- state types of printing;
- list materials for printing;
- list stages involved in printing;
- create designs using printing materials.
What is Printing?
Printing is the process of making copies of an image or design by transferring it from one surface to another.
Printmaking is the art of creating these images or designs using different methods and materials. It allows people to make many copies of the same picture or pattern.
Imagine pressing a stamp onto paper. The image on the stamp is transferred to the paper, making a print. This is a simple form of printing.
Types of Printing
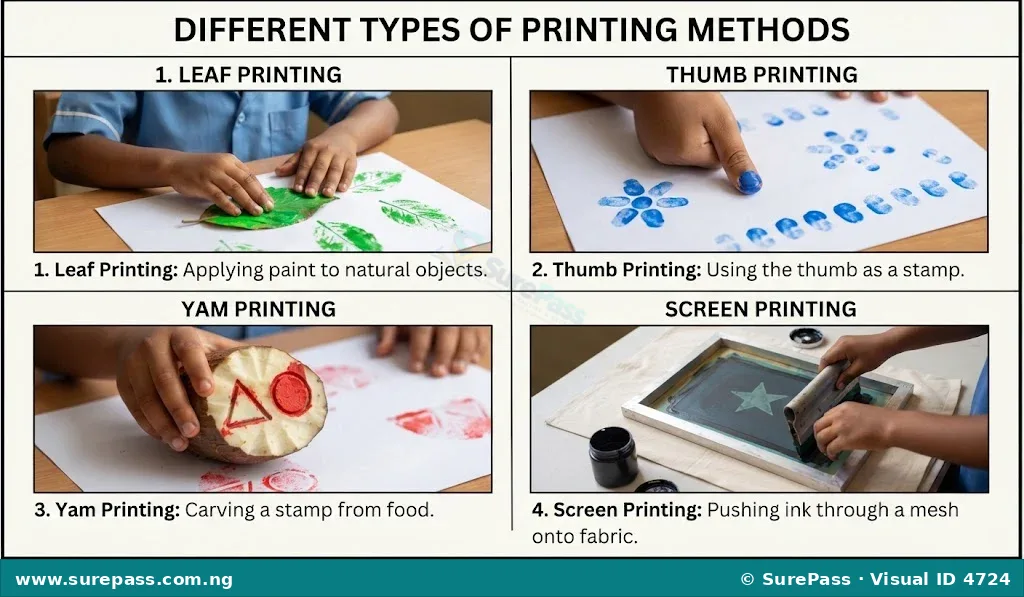
There are different ways to make prints. Each method uses different materials and techniques to create unique designs. Some common types of printing include:
- Leaf Printing: This method uses real leaves to create patterns. The natural veins and shapes of the leaves are transferred onto paper or fabric.
- Thumb Printing: This involves using a thumb or finger dipped in ink or paint to make prints. It is a simple way to create patterns or small images.
- Yam Printing: This method uses pieces of yam cut into different shapes or designs. The yam acts like a stamp to transfer colour onto a surface.
- Screen Printing: This technique uses a screen mesh with a stencil to transfer ink onto a surface. Areas not covered by the stencil are blocked, allowing ink to pass through only where the design is needed.
Materials for Printing
To make prints, various materials are needed. These materials help to create the image and transfer it to another surface.
The required materials are:
- Leaves: For leaf printing, fresh leaves with clear vein patterns are used.
- Yam: For yam printing, a fresh yam tuber is needed to cut and carve designs.
- Screen Mesh: For screen printing, a fine mesh screen stretched on a frame is essential.
- Cardboard Paper: This is a common surface for printing. Other surfaces like fabric can also be used.
- Ink or Paint: These are used to create the colour and image. Examples include poster colours, fabric paint, or printing ink.
- Sponge or Brush: These are used to apply ink or paint to the printing material.
- Cutting Tools: For yam printing, a safe knife or cutter is needed to carve designs into the yam. Adult supervision is required for using sharp tools.
- Tray or Plate: This is used to hold the ink or paint.
Stages in Printing
Printing usually involves several steps, regardless of the type of printing method used. These stages help to create a clear and successful print.
The stages involved in printing are:
- Preparation: This stage involves gathering all the necessary materials and preparing the printing surface. For example, if using yam, the yam is cut and carved into a design. If using leaves, the leaves are selected and cleaned.
- Applying Colour: Ink or paint is applied to the printing material (like a leaf, thumb, or carved yam). This can be done with a sponge, brush, or by dipping the material into the colour.
- Transferring the Image: The coloured printing material is carefully pressed onto the surface where the print is desired, such as paper or fabric. Even pressure is applied to ensure the image transfers clearly.
- Lifting and Drying: The printing material is gently lifted from the surface. The printed image is then allowed to dry completely to prevent smudging.
- Repeating (Optional): If multiple copies or a pattern are needed, the process of applying colour and transferring the image can be repeated.
Creating Prints
Creating prints is a fun way to make art and designs. This skill involves using the materials and following the stages of printing to produce unique patterns or images.
How to Create a Yam Print Design
Yam printing is a simple and enjoyable way to make prints using carved yam pieces.
The required materials are:
- Fresh yam tuber
- Safe knife or cutter (for adult use only)
- Poster colours or paint
- Small plate or tray
- Cardboard paper or drawing book
- Sponge or brush
The procedure involves the following steps:
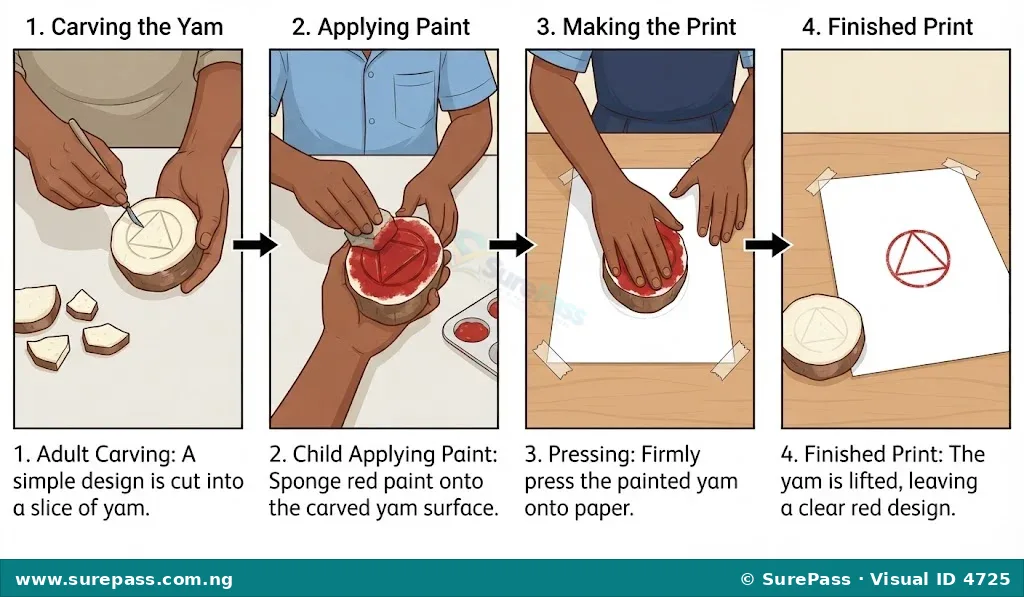
- Prepare the Yam: Ask an adult to help cut a slice of yam about 2-3 centimetres thick.
- Carve the Design: With adult supervision, carefully carve a simple design into the flat surface of the yam slice. This design will be transferred to the paper. Examples of designs include squares, circles, triangles, or simple patterns.
- Prepare the Colour: Pour a small amount of poster colour or paint onto a flat plate or tray.
- Apply Colour to Yam: Use a sponge or brush to apply a thin, even layer of paint onto the carved surface of the yam. Make sure the entire design is covered with colour.
- Make the Print: Carefully press the coloured yam onto the cardboard paper or drawing book. Apply firm, even pressure for a few seconds.
- Lift the Yam: Gently lift the yam from the paper to reveal the printed design.
- Dry the Print: Allow the printed design to dry completely before touching it.
- Repeat: If more prints are desired, reapply paint to the yam and repeat steps 5-7. Different colours can be used for variety.
How to Create a Leaf Print Design
Leaf printing uses the natural patterns of leaves to create beautiful prints.
The required materials are:
- Fresh leaves with clear veins (e.g., hibiscus, mango leaves)
- Poster colours or paint
- Small plate or tray
- Cardboard paper or drawing book
- Sponge or brush
The procedure involves the following steps:
- Select a Leaf: Choose a fresh leaf with clear veins. Clean it gently to remove any dirt.
- Prepare the Colour: Pour a small amount of poster colour or paint onto a flat plate or tray.
- Apply Colour to Leaf: Place the leaf with its vein side facing up on a flat surface. Use a sponge or brush to apply a thin, even layer of paint over the vein side of the leaf.
- Make the Print: Carefully place the painted side of the leaf onto the cardboard paper or drawing book. Place another piece of paper or a clean cloth over the leaf and gently rub it to ensure the paint transfers.
- Lift the Leaf: Carefully peel off the leaf from the paper to reveal the printed design. The veins of the leaf should be visible in the print.
- Dry the Print: Allow the printed design to dry completely.
- Repeat: Use different leaves or colours to create a variety of prints.

0 comments
Open the discussion when you need it. Comments stay collapsed until requested so the initial article remains light.