



ARTICLE CONTENTSOn this page 7 sections
Modelling
Performance Objectives
By the end of the lesson, students should be able to:
- define modelling;
- identity types of modelling;
- describe the techniques of modelling
- list materials and tools for modelling;
- Make shapes, sculpture or pottery compositions by modelling.
Meaning of Modelling
Modelling is the art of creating three-dimensional (3D) shapes or figures from soft, pliable materials.
When a person models, they use their hands and sometimes tools to push, pull, squeeze, and shape a material until it looks like the desired object. This can be anything from a simple ball to a detailed animal figure or a pot.
Types of Modelling Materials
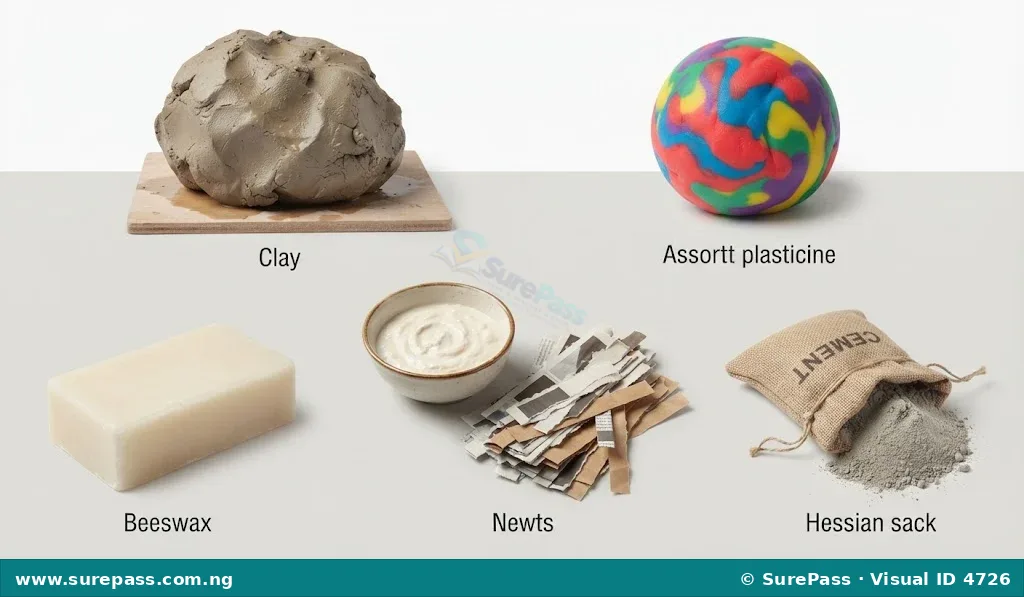
Many different materials can be used for modelling. These materials are usually soft and can be easily shaped, but they become firm when they dry or cool.
Common modelling materials include:
- Clay: This is a natural earth material that is soft and wet. It can be easily shaped and then dried in the air or baked in a hot oven to make it hard and permanent. Clay is often used for making pottery and sculptures.
- Paper Modelling (Paper Mache): This involves using strips of paper soaked in a paste (like glue or flour and water mixture) to build up shapes. When the paper mache dries, it becomes very hard and strong.
- Wax: Wax is a soft material that can be melted and shaped when warm. It hardens when it cools down. Wax is often used for making candles or small figures.
- Plasticine: This is a type of modelling clay that does not dry out. It stays soft and can be reused many times. Plasticine is good for practising different shapes and figures.
- Cement: Cement is a powder that, when mixed with water and sand, forms a strong, hard material. It is used for making strong, permanent sculptures and structures.
Techniques of Modelling
Modelling techniques are the different ways hands and tools are used to shape materials. Each technique helps to create different forms and textures.
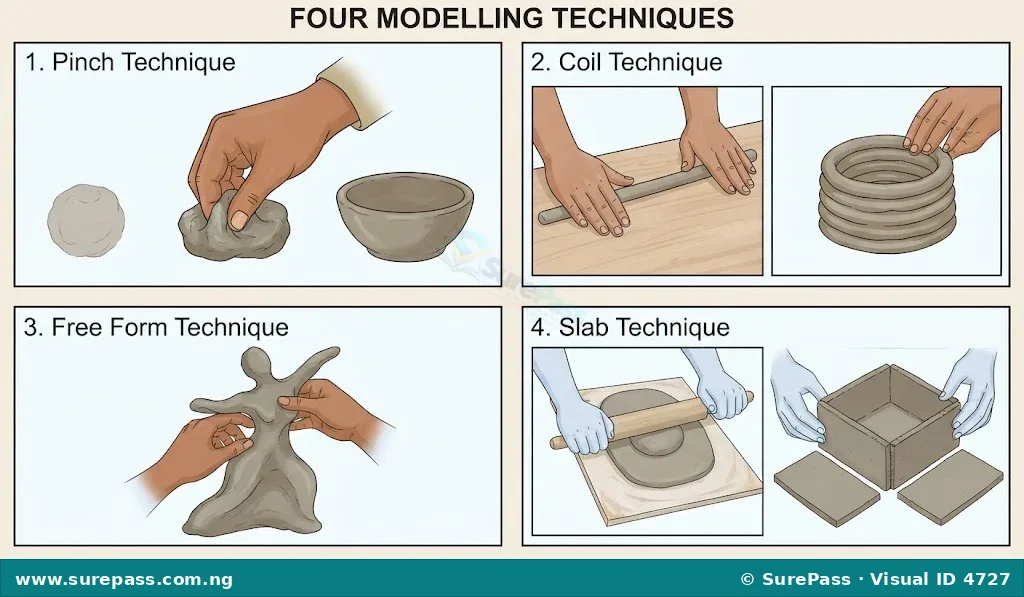
The main techniques of modelling are:
- Pinch Technique: This is one of the simplest techniques. It involves taking a lump of material and pinching it with the fingers and thumb to stretch and shape it. It is often used to create small bowls or hollow forms.
- Coil Technique: In this technique, the modelling material is rolled into long, snake-like ropes or coils. These coils are then stacked on top of each other and joined by smoothing the surfaces to build up a form, like a pot or a vase.
- Free Form Technique: This technique involves shaping the material freely with the hands, without following strict rules or patterns. It allows for creative and organic shapes to be made, often by squeezing, pulling, and pushing the material until the desired form appears.
- Slab Technique: The slab technique involves flattening the modelling material into thin, even sheets or slabs. These slabs are then cut into shapes and joined together to create boxes, walls, or other geometric forms. The edges are usually scored and slipped (roughened and coated with wet clay) to make them stick firmly.
Uses of Modelling Tools
While hands are the most important tools in modelling, other simple tools can help to shape, cut, smooth, and add details to modelled artworks.
Common tools and their uses include:
- Hands and Fingers: These are used for pinching, squeezing, rolling, smoothing, and joining pieces of material. They are essential for all modelling techniques.
- Plastic Knives or Wires: These are used for cutting the modelling material, especially when using the slab technique, or for trimming excess material.
- Rolling Pins: A rolling pin is used to flatten modelling materials into even sheets or slabs, which is important for the slab technique.
- Smoothing Tools: These can be simple flat pieces of wood, plastic, or even a wet sponge. They are used to make the surface of the modelled object smooth and remove finger marks or rough spots.
- Loop Tools: These tools have a wire loop at the end and are used for carving, trimming, or removing material from the surface of a sculpture.
- Texturing Tools: These are used to add patterns or textures to the surface of the modelled object, such as lines, dots, or rough surfaces. Examples include combs, toothpicks, or even leaves.
Making Shapes and Pottery by Modelling
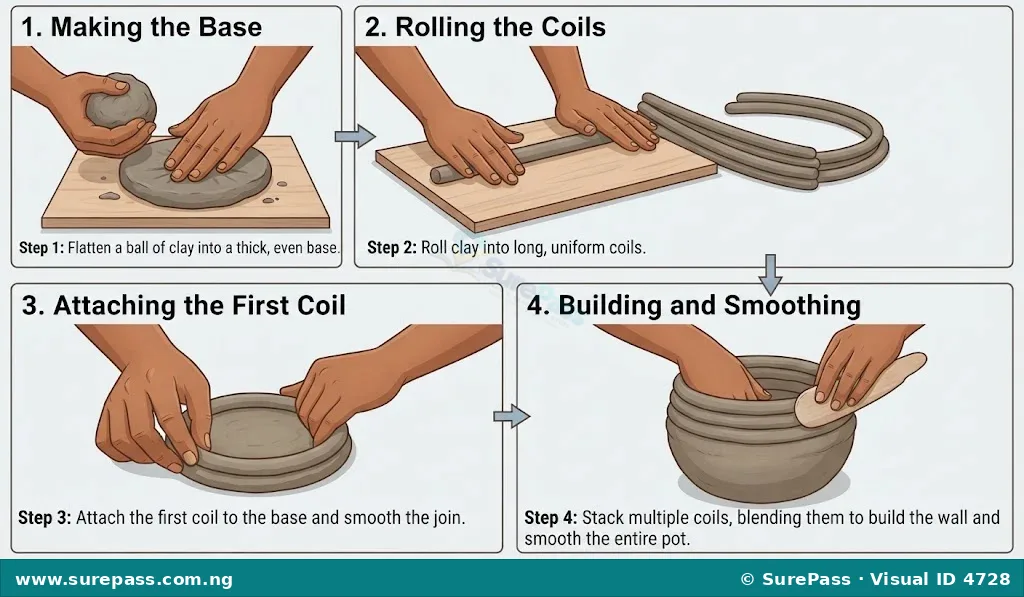
Modelling allows for the creation of many different objects, from simple shapes to more complex sculptures and pottery. This practical activity will guide you through making a simple pot using the coil technique with clay.
Materials Needed:
- A lump of modelling clay
- A flat surface (like a table or board)
- A small bowl of water
- A plastic knife or wire tool (optional)
- A smoothing tool or sponge (optional)
Procedure for Making a Simple Pot:
The procedure involves the following steps:
- Prepare the Clay: Take a lump of clay and knead it gently. Kneading helps to remove air bubbles and makes the clay more workable.
- Make the Base: Roll a small piece of clay into a ball. Then, flatten the ball into a circular disc to form the base of your pot. Make sure it is about 1 centimetre thick.
- Create the First Coil: Take another piece of clay and roll it between your palms or on the flat surface to form a long, even coil, like a snake. The coil should be about the thickness of your finger.
- Attach the First Coil: Place the first coil around the edge of the clay base. Gently press it down to make it stick. Use your fingers to smooth the inside and outside where the coil meets the base, joining them firmly.
- Add More Coils: Continue rolling more coils and stacking them on top of the previous one. Each time you add a new coil, make sure to smooth the clay where the coils join, both on the inside and outside of the pot. This makes the pot strong and prevents it from breaking apart.
- Shape the Pot: As you add coils, you can gently push them outwards to make the pot wider, or inwards to make it narrower. You can also make the rim of the pot straight or flared.
- Smooth the Surface: Once you are happy with the shape and height of your pot, use your fingers, a wet sponge, or a smoothing tool to smooth the entire surface of the pot. This will give it a neat and finished look.
- Dry the Pot: Place your finished pot in a safe place to dry slowly. Air drying can take several days, depending on the thickness of the clay and the weather. As it dries, the clay will become lighter in colour and harder.
- Safety Tip: Always wash your hands thoroughly with soap and water after working with clay or other modelling materials.


0 comments
Open the discussion when you need it. Comments stay collapsed until requested so the initial article remains light.