



ARTICLE CONTENTSOn this page 6 sections
Textile Design (Tie and Dye)
Performance Objectives
By the end of the lesson, students should be able to:
- explain the meaning of tie and dye;
- list the materials used in tie and dye;
- create a simple tie and dye work.
What is Tie and Dye?
Tie and dye is a method of creating patterns on fabric by tying, folding, or crumpling the fabric before dyeing it.
The parts of the fabric that are tied or covered do not absorb the dye, creating unique patterns when the ties are removed. This technique allows for a wide range of designs, from simple spots and lines to more complex abstract patterns.
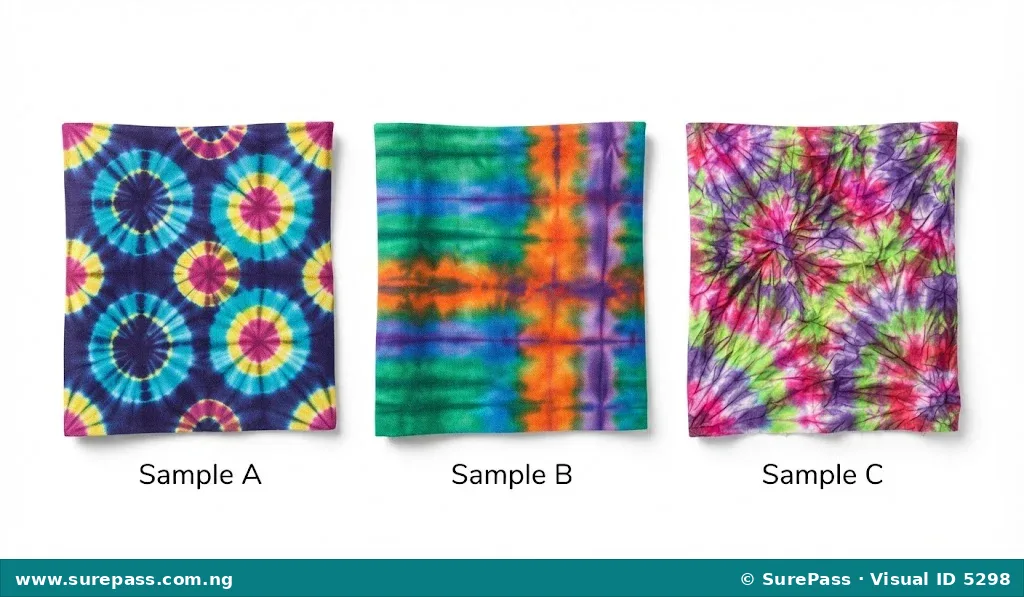
Common Tying Techniques in Tie and Dye
The patterns created in tie and dye depend on how the fabric is tied or folded before it is put into the dye. Different tying techniques produce different kinds of designs. Some common methods include:
Knotting
Knotting involves tying parts of the fabric into knots. When the fabric is dyed, the areas inside the knots resist the dye, resulting in circular or irregular patterns where the knots were formed. The size and tightness of the knots affect the final design.
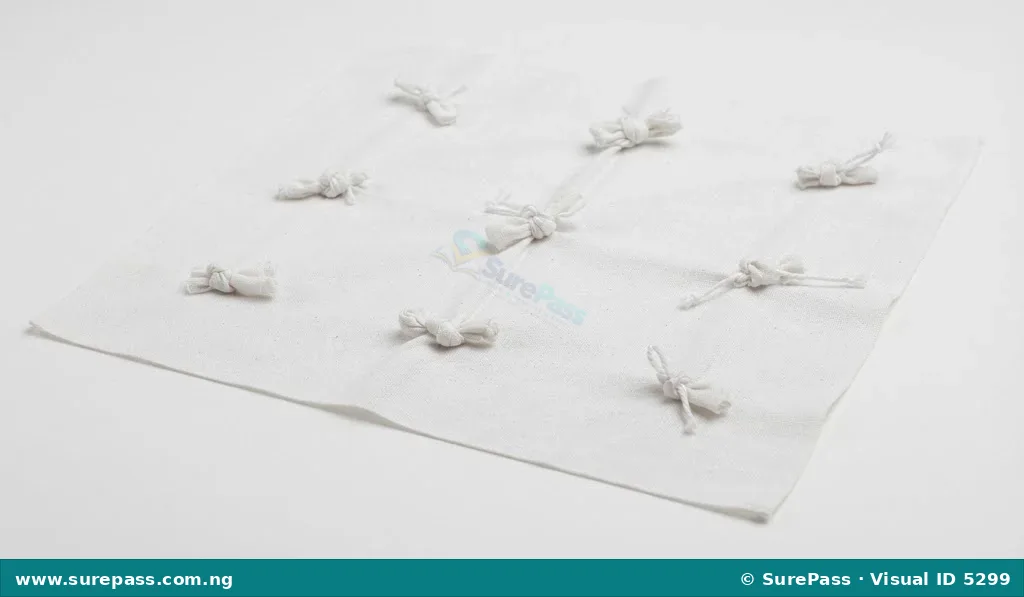
Folding
Folding involves carefully folding the fabric into specific shapes before tying. For example, folding the fabric like an accordion (back and forth) can create striped patterns. Different folding methods can produce squares, triangles, or other geometric shapes.
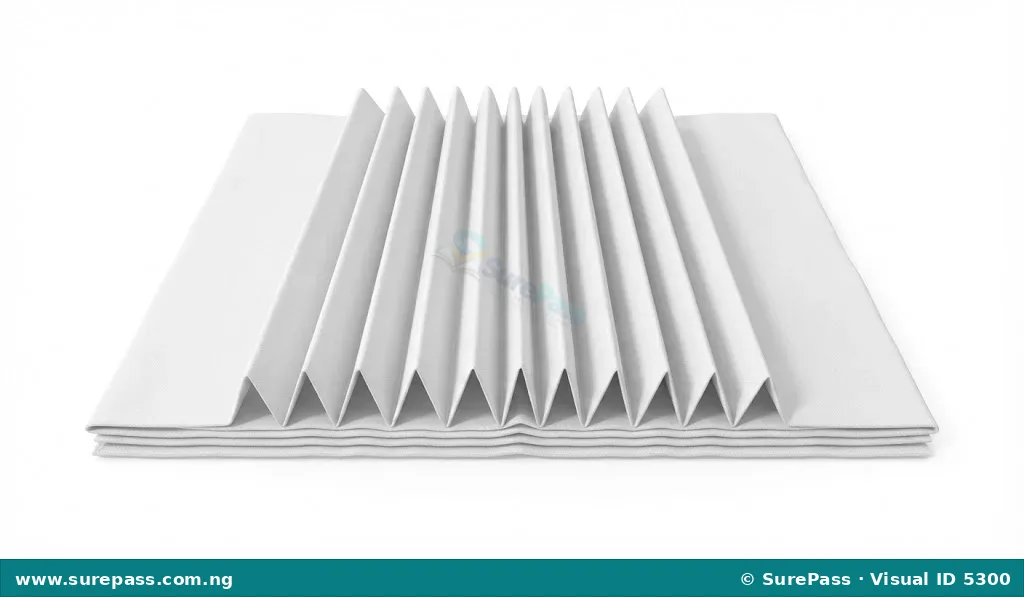
Pleating
Pleating is similar to folding but often involves gathering the fabric into small, regular folds that are then secured. This technique can create fine lines or textured patterns. The pleats are usually held in place by tying string tightly around them.
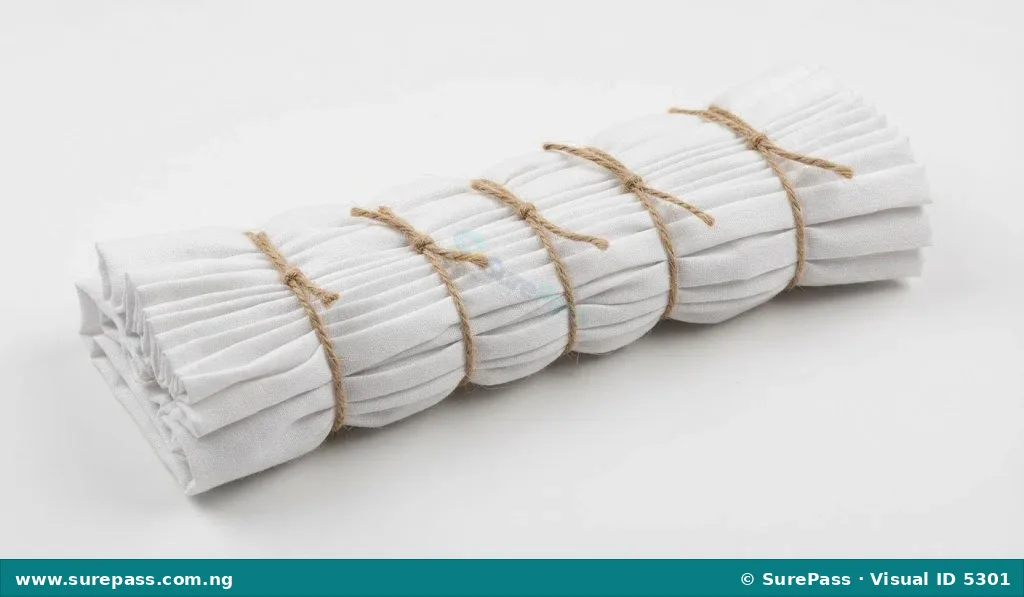
Tying with String or Rubber Bands
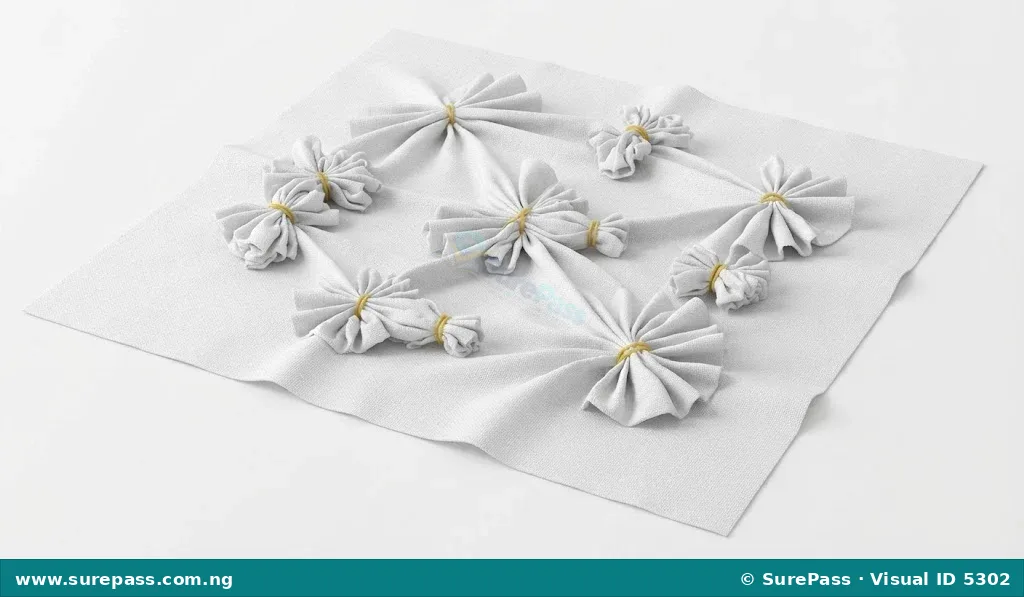
This is a very common method where sections of the fabric are gathered or bunched up and then tied tightly with string, twine, or rubber bands. The tied areas resist the dye, creating circular or irregular patterns. The tightness and placement of the ties determine the shape and size of the undyed areas.
Materials Used for Tie and Dye
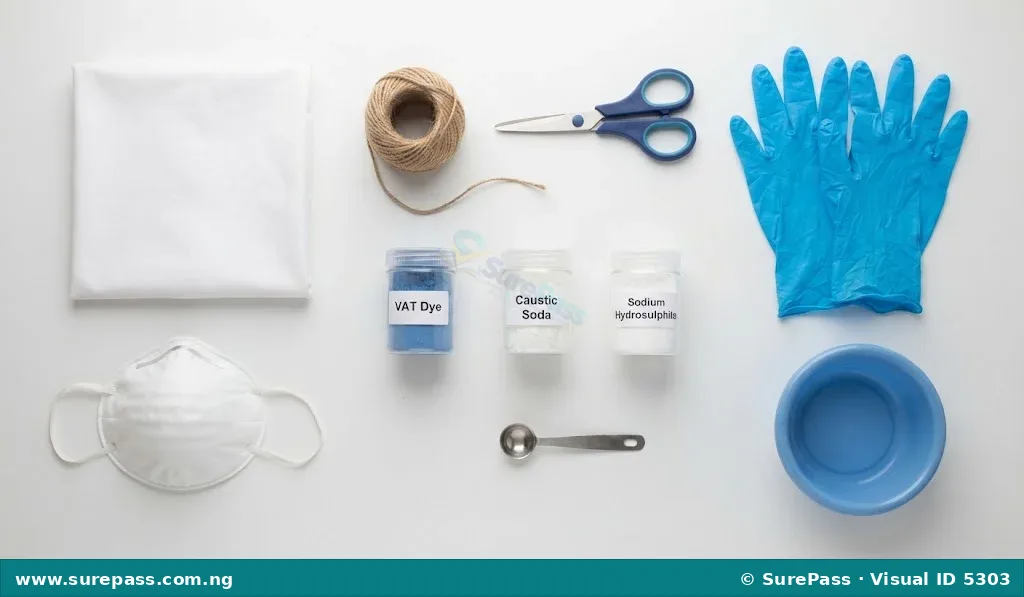
To create a tie and dye design, several materials are needed. These materials help in preparing the fabric, applying the dye, and ensuring safety during the process. The required materials are:
- Cotton Fabric: This is the material on which the tie and dye design will be made. Examples include calico or brocade. Cotton fabrics absorb dye well.
- Twine/String/Rubber Bands: These are used to tie, knot, or secure the folded or crumpled parts of the fabric, creating the resist patterns.
- Scissors: Used for cutting the fabric if needed, or for cutting the twine/string.
- Nose Mask: Worn to protect the nose and mouth from inhaling dye powders or chemical fumes.
- Gloves: Worn on the hands to protect the skin from direct contact with dyes and chemicals, which can stain or irritate the skin.
- VAT Dye: This is the colouring agent used to dye the fabric. VAT dyes are known for their bright colours and good fastness.
- Caustic Soda (Sodium Hydroxide): A chemical used with VAT dyes to make the dye solution alkaline, which helps the dye to attach to the fabric fibres. It must be handled with care.
- Sodium Hydrosulphite: Another chemical used with VAT dyes. It acts as a reducing agent, helping the dye to dissolve and become ready for the fabric to absorb it.
- Big Baths/Basins/Buckets: Large containers used for preparing the dye solution, soaking the fabric, and rinsing the dyed fabric.
- Stove (Gas) and Kettle/Pot: May be used to heat water for dissolving certain dye chemicals or for preparing the dye bath, though some VAT dyes can be used with cold water.
- Measuring Spoons: Used for accurately measuring the dye powders and chemicals to ensure the correct concentration for the dye bath.
- Cold Water Starch: Can be used after dyeing and rinsing to stiffen the fabric, giving it a firmer feel.
How to Make a Simple Tie and Dye Fabric
Creating a tie and dye fabric involves several steps, from preparing the fabric to dyeing and finishing. This procedure will guide you through making a simple tie and dye design.
Required Materials
Before starting, ensure you have the following materials:
- Cotton fabric (e.g., calico)
- Twine or rubber bands
- Scissors
- Nose mask
- Gloves
- VAT Dye (one colour)
- Caustic soda
- Sodium Hydrosulphite
- Two big basins or buckets
- Measuring spoons
- Water
Safety Precautions
Working with dyes and chemicals requires careful handling to ensure safety. Always follow these precautions:
- Wear gloves and a nose mask throughout the dyeing process to protect your skin and respiratory system.
- Work in a well-ventilated area to avoid inhaling chemical fumes.
- Avoid direct contact of chemicals with your skin and eyes. If contact occurs, rinse immediately with plenty of water and seek adult supervision.
- Keep all chemicals away from food and drinks.
- Ensure an adult supervises the use of the stove or any heating equipment.
- Clean up all spills immediately and dispose of waste materials properly.
Step-by-Step Procedure
The procedure for making a simple tie and dye fabric involves the following steps:
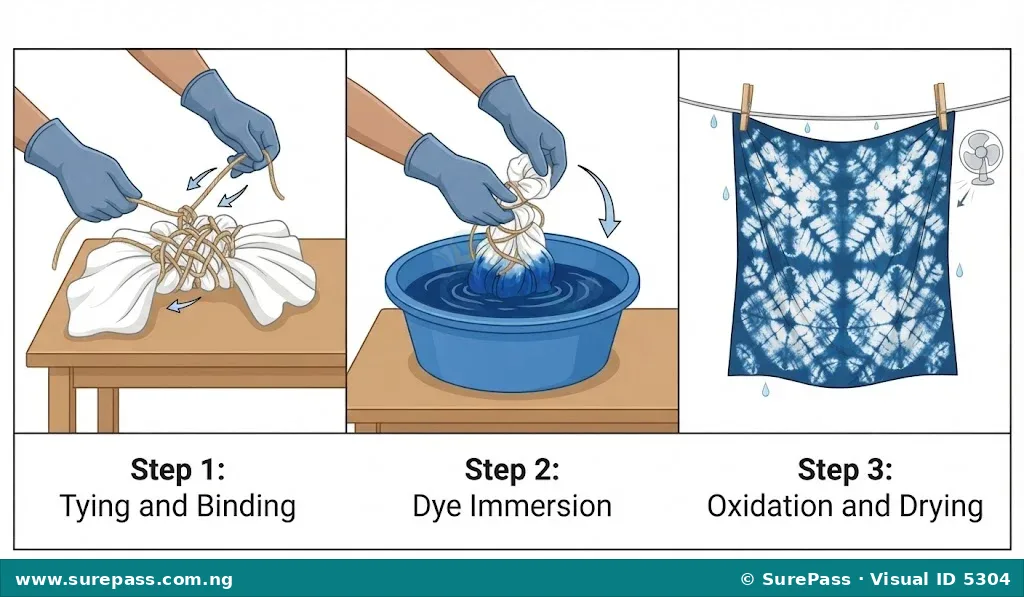
- Prepare the Fabric: Wash your cotton fabric thoroughly to remove any sizing or dirt. This helps the dye absorb evenly. Wring out the excess water so the fabric is damp but not dripping wet.
- Apply Tying Techniques: Choose a tying technique (e.g., knotting, folding, or gathering and tying with string/rubber bands). For a simple design, gather a section of the fabric and tie it tightly with twine or a rubber band. Repeat this in several places on the fabric to create multiple resist areas.
- Prepare the Dye Bath:
- In one of the big basins, add about 5 litres of cold water.
- Carefully measure and add the VAT dye powder according to the instructions on the dye packet (usually a few spoonfuls). Stir well until dissolved.
- In a separate small container, dissolve the caustic soda and sodium hydrosulphite in a small amount of warm water (if needed, use the kettle/pot and stove under adult supervision). Follow the dye packet instructions for quantities, as these chemicals are strong.
- Slowly add the dissolved caustic soda and sodium hydrosulphite mixture to the dye solution in the big basin. Stir thoroughly. The dye solution should change colour, indicating it is ready.
- Dye the Fabric:
- Carefully immerse the tied fabric completely into the dye bath.
- Gently agitate the fabric in the dye solution for about 30-60 minutes, or as recommended by the dye instructions. This ensures even dye absorption.
- The fabric may appear a different colour in the dye bath than its final colour.
- Oxidise the Fabric:
- After dyeing, carefully remove the fabric from the dye bath.
- Hang the fabric in the open air for about 15-30 minutes. The oxygen in the air will react with the dye, causing it to change to its final, vibrant colour.
- Rinse the Fabric:
- Once the colour has developed, rinse the fabric thoroughly under running cold water in the second basin or under a tap.
- Continue rinsing until the water runs clear and no more dye washes out.
- Untie and Wash:
- Carefully cut and remove all the twine or rubber bands from the fabric.
- Wash the fabric with mild soap and cold water to remove any remaining loose dye.
- Rinse again until the water is completely clear.
- Dry the Fabric: Hang the fabric to dry completely in a shaded area to prevent fading. Once dry, you can iron it. If desired, you can apply cold water starch before drying to give the fabric more body.



0 comments
Open the discussion when you need it. Comments stay collapsed until requested so the initial article remains light.