


ARTICLE CONTENTSOn this page 7 sections
Carving
Performance Objectives
By the end of the lesson, students should be able to:
- explain the meaning of carving;
- identify materials and tools used in carving;
- discuss procedure for carving
- carve simple objects using dried clay and soap as materials.
Meaning of Carving
Carving is a method of creating art by shaping a material, such as wood, stone, or clay, by cutting away parts of it. It involves removing unwanted portions of the material to reveal a desired form or design.
Carving is an ancient art form practised in many cultures around the world, including Nigeria. It allows artists to transform raw materials into beautiful and meaningful objects, sculptures, or decorative pieces.
Materials for Carving
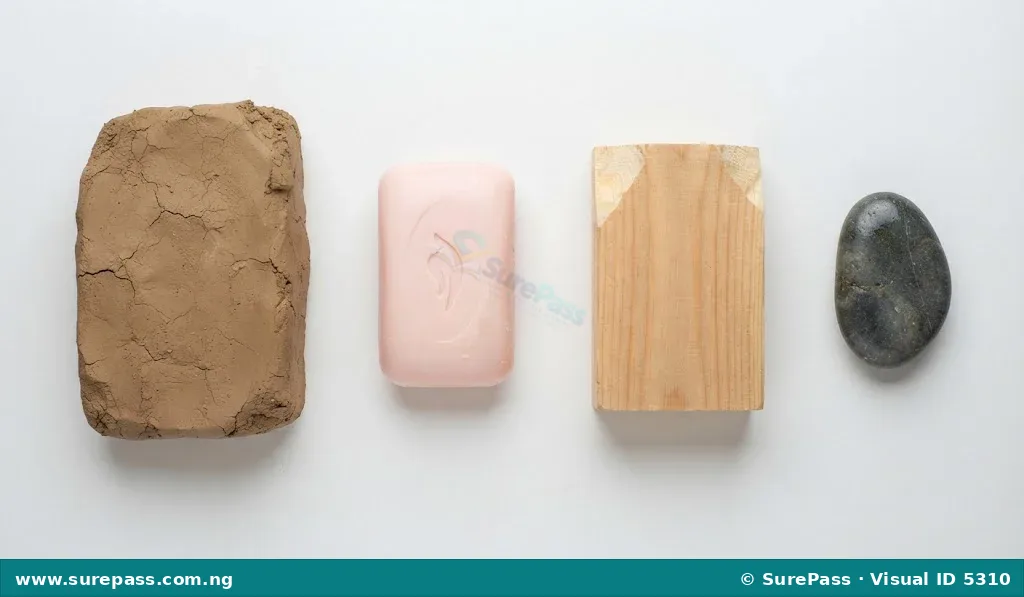
The choice of material for carving depends on the desired outcome, the tools available, and the skill of the carver. For beginners, softer materials are often preferred.
Common materials used in carving include:
- Clay: This is a soft, earthy material that can be easily moulded and carved when wet. Once dried, it becomes harder and can be carved with more detail. Dried clay is suitable for JSS1 learners because it is relatively easy to work with and safe.
- Soap: Bar soap is a very soft material that is excellent for beginners. It is easy to cut and shape with simple tools like a carving knife or spatula, making it safe for learners to practise basic carving techniques.
- Wood: Wood is a traditional carving material. Different types of wood have different hardness levels. Softer woods are easier to carve, while harder woods require more effort and specialised tools.
- Stone: Stone is a very hard and durable material. Carving stone requires strong tools and considerable skill and effort. It is used for creating long-lasting sculptures.
Tools for Carving
Carving tools are designed to cut, scrape, and shape the chosen material. The type of tool used depends on the material’s hardness and the detail required.
Important tools used in carving include:
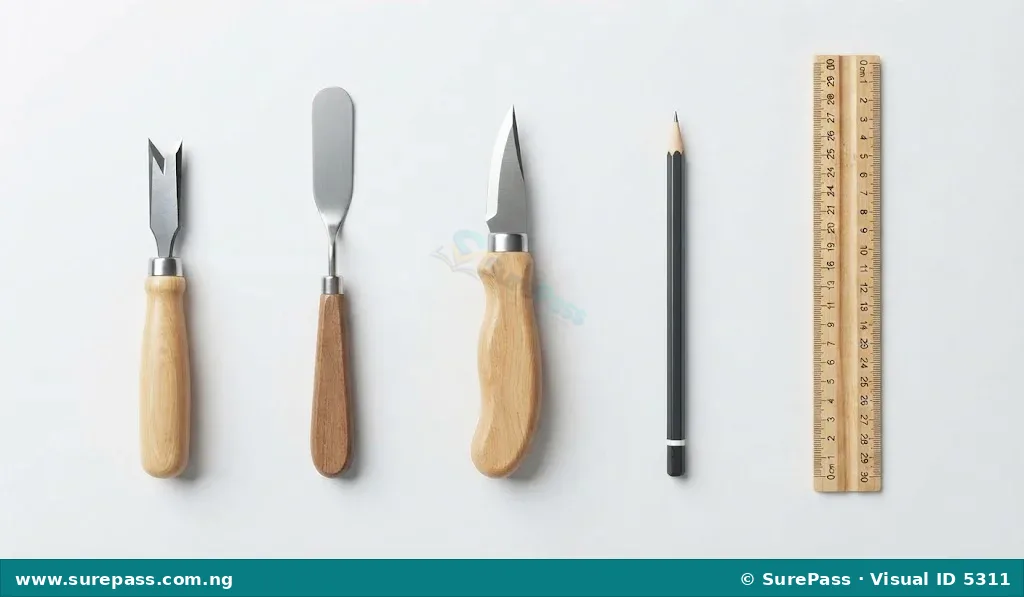
- Chisel: A chisel is a tool with a shaped cutting edge on its blade, used for carving or cutting hard materials like wood or stone. It is often used with a mallet to strike the handle, driving the blade into the material.
- Spatula: A spatula, especially one with a flat or pointed end, can be used for carving softer materials like clay or soap. It helps to scrape, smooth, and remove small pieces of material.
- Carving Knife: This is a sharp knife specifically designed for carving. It has a comfortable handle and a strong, pointed blade for precise cutting and shaping of materials like wood or soap. Carving knives must be handled with extreme care.
- Axe: An axe is a heavy tool with a sharp blade attached to a handle. It is used for rough shaping and removing large chunks of material, especially from wood or stone, at the initial stages of carving. Axes are dangerous and should only be handled by experienced adults.
- Adze: An adze is a cutting tool similar to an axe, but its blade is set at a right angle to the handle. It is used for shaping wood, especially for hollowing out forms or smoothing surfaces. Adzes are also dangerous and require adult handling.
- Marking Tools: These are tools used to draw or mark the design onto the carving material before cutting. Examples include pencils, markers, or charcoal.
- Measuring Tools: Tools like rulers, measuring tapes, and calipers are used to ensure accuracy in the dimensions and proportions of the carved object.
- Sharpening Tools: Tools such as whetstones or files are used to keep carving tools sharp. Sharp tools are safer and more effective for carving.
Procedure for Carving
Carving involves a series of steps, from planning the design to finishing the object. Following a procedure helps to create a well-made carved piece.
The general procedure for carving includes the following steps:
- Planning and Design: Before starting, decide what object or shape to carve. Sketch the design on paper from different angles. This helps to visualise the final product and plan the carving process.
- Material Preparation: Prepare the carving material. For clay, ensure it is firm but still workable. For soap, choose a fresh bar. For wood, ensure it is clean and stable.
- Marking the Design: Transfer the design from the sketch onto the carving material using a pencil or marking tool. Mark the main outlines and important features.
- Rough Shaping (Blocking Out): Begin by removing large, unnecessary portions of the material to get the basic shape of the object. This is called blocking out. Use larger tools for this stage, if available and safe.
- Detailed Carving: Once the rough shape is achieved, use smaller, more precise tools to refine the details. Carefully cut away smaller pieces to create the features, textures, and finer lines of the design.
- Smoothing and Finishing: After carving the details, smooth the surfaces of the object. This can be done by scraping with a spatula, rubbing with a damp cloth (for clay), or using sandpaper (for wood).
- Cleaning: Remove any dust or debris from the carved object.
How to Carve Simple Objects Using Dried Clay or Soap
Carving simple objects from dried clay or soap is an excellent way to learn basic carving skills. These materials are soft and safe for beginners.
The required materials and tools are:
- A block of dried clay or a bar of soap
- A carving knife (a blunt plastic knife or a butter knife can be used for soap for extra safety)
- A spatula or a blunt stick
- A pencil or marker
- A piece of paper for sketching
- A damp cloth (for clay)
The procedure involves the following steps:
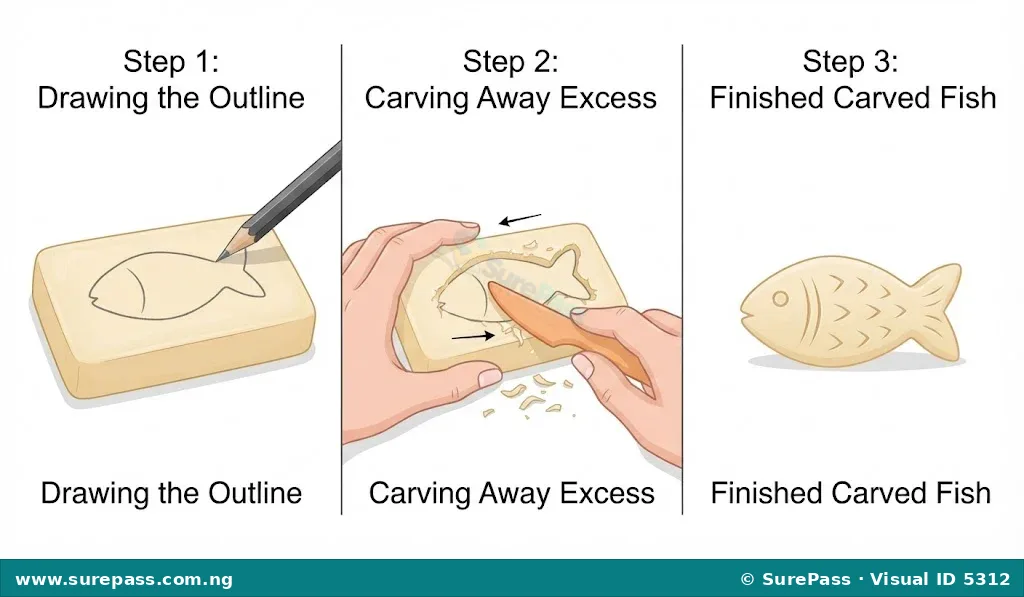
- Choose Your Design: Decide on a simple shape or object to carve, such as a fish, a leaf, a simple animal, or a geometric shape like a cube or sphere. Sketch your design on paper.
- Prepare the Material: If using dried clay, ensure it is hard enough to hold its shape but not too brittle. If using soap, ensure it is a fresh, firm bar.
- Mark the Outline: Use a pencil or marker to draw the main outline of your design onto the clay or soap block.
- Roughly Shape the Object: Using the carving knife (or blunt knife for soap), carefully cut away the large pieces of material around your outline. Always cut away from your body and fingers. For soap, you can use the blunt knife to scrape off layers. For clay, gently chip away pieces.
- Refine the Shape: Once the basic shape is formed, use the carving knife or spatula to refine the curves and edges. Slowly remove small pieces to get closer to your desired form.
- Add Details: Use the tip of the carving knife or a blunt stick to add smaller details like eyes, scales, or patterns. For clay, you can also use the spatula to create textures.
- Smooth the Surface: For soap, you can gently rub the surface with your fingers or a damp cloth to smooth out rough areas. For dried clay, use a damp cloth to gently rub and smooth the surface.
- Clean Up: Wipe away any loose crumbs or dust from your carved object and your workspace.
Important Safety Tips for Carving:
- Always cut away from your body and fingers.
- Use a stable surface for carving.
- Keep your tools sharp, as dull tools can slip easily.
- For sharp tools like carving knives and chisels, adult supervision is essential.
- Clean up your workspace after carving to avoid accidents.


0 comments
Open the discussion when you need it. Comments stay collapsed until requested so the initial article remains light.