



ARTICLE CONTENTSOn this page 7 sections
Skin Types and Conditions
Performance Objectives
By the end of the lesson, students should be able to:
- describe different skin type and conditions;
- inspect different skin types and condition for makeup; application
- perform patch testing.
Introduction to Skin Types and Conditions
The skin is the largest organ of the body and protects us from the outside world. Just like people have different hair colours or heights, their skin can also be different. These differences are called skin types. Sometimes, the skin can also have certain issues or problems, which are called skin conditions.
Understanding your skin type and any conditions it may have is very important, especially in beauty and cosmetology. It helps in choosing the right products and applying makeup correctly so that the skin looks healthy and beautiful.
Understanding Different Skin Types
Skin type refers to the natural characteristics of a person’s skin. These characteristics are often determined by genetics, but they can also be influenced by factors like diet, climate, and lifestyle. Knowing your skin type helps you care for your skin properly.
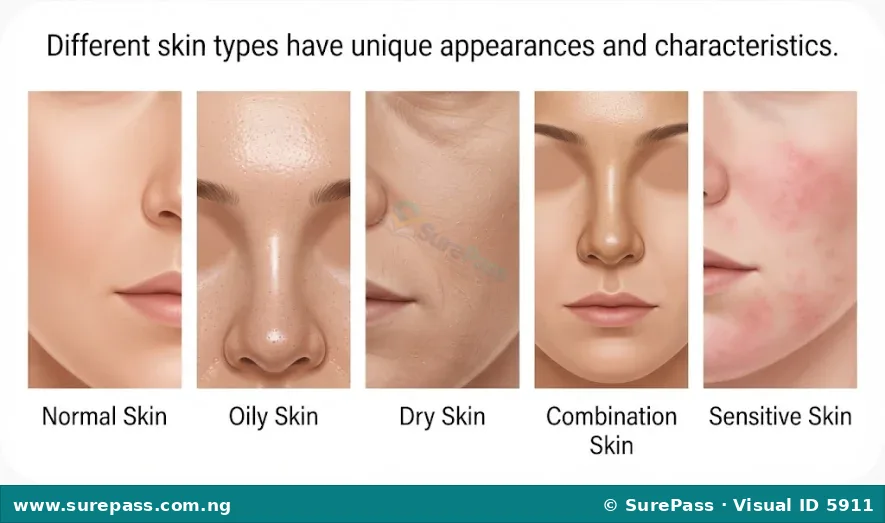
Normal Skin
Normal skin is well-balanced. It is neither too oily nor too dry. This skin type usually has a smooth texture, small pores, and a healthy glow. It rarely experiences breakouts or sensitivity.
People with normal skin often find that their skin feels comfortable throughout the day and does not react negatively to many products.
Oily Skin
Oily skin produces more sebum, which is the natural oil of the skin. This can make the skin look shiny or greasy, especially in the T-zone (forehead, nose, and chin). Oily skin often has larger, more visible pores and can be prone to blackheads, whiteheads, and pimples.
The excess oil can sometimes make makeup slide off easily or look cakey.
Dry Skin
Dry skin produces less sebum than normal skin. This lack of oil can make the skin feel tight, rough, or flaky. Dry skin may also look dull and can sometimes show fine lines more easily. It can feel itchy or irritated, especially after washing.
People with dry skin often need to use moisturising products to keep their skin comfortable and prevent it from cracking.
Combination Skin
Combination skin has areas that are oily and areas that are dry or normal. Typically, the T-zone (forehead, nose, and chin) is oily, with larger pores and shine, while the cheeks and other areas are dry or normal. This skin type requires different care for different parts of the face.
For example, an individual with combination skin might use products that control oil in the T-zone and moisturise the drier areas.
Sensitive Skin
Sensitive skin is easily irritated by certain products, environmental factors, or even stress. It can react with redness, itching, burning, or stinging sensations. This skin type may also be prone to rashes or allergic reactions.
People with sensitive skin need to be very careful about the products they use, often choosing those labelled “hypoallergenic” or “for sensitive skin.”
Common Skin Conditions
While skin types are generally constant, skin conditions can appear at different times and may affect any skin type. Some common skin conditions include acne, aging skin concerns, and redness or rosacea.
Acne Skin
Acne skin is characterised by the presence of pimples, blackheads, whiteheads, and sometimes cysts. It often occurs when hair follicles become clogged with oil and dead skin cells, leading to inflammation and bacterial growth. Acne is common during teenage years but can affect adults too.
Proper cleansing and specific treatments are often needed for acne-prone skin.
Aging Skin
Aging skin shows signs like wrinkles, fine lines, loss of firmness, and sometimes dark spots. These changes happen naturally over time as the skin produces less collagen and elastin, which keep it firm and elastic. Sun exposure and lifestyle choices can also speed up skin aging.
Caring for aging skin often involves products that help to hydrate and protect the skin.
Redness or Rosacea
Redness or rosacea is a chronic skin condition that causes redness, visible blood vessels, and sometimes small, red, pus-filled bumps on the face. It often affects the cheeks, nose, forehead, and chin. Triggers can include spicy foods, hot drinks, alcohol, stress, and sun exposure.
This condition requires gentle care and avoiding known triggers to reduce flare-ups.
Methods of Identifying Skin Types and Conditions
Identifying skin types and conditions accurately is the first step towards proper skin care and makeup application. There are several methods used to do this.
Inspecting Skin with a Magnifying Mirror
A magnifying mirror allows for a close-up view of the skin, making it easier to observe details that are not visible to the naked eye. This method helps in identifying characteristics like pore size, oiliness, dryness, flakiness, redness, and the presence of blemishes.
When inspecting the skin, look for the following:
- Pore Size: Large pores often indicate oily skin, while small, almost invisible pores suggest dry or normal skin.
- Shine or Oiliness: Observe if there is a greasy shine, especially on the forehead, nose, and chin.
- Dryness or Flakiness: Look for any dry patches, tightness, or visible flakes of skin.
- Redness: Note any areas of persistent redness, which could indicate sensitive skin or conditions like rosacea.
- Blemishes: Identify blackheads, whiteheads, pimples, or other breakouts.
- Texture: Feel the skin for smoothness, roughness, or unevenness.
Performing a Patch Test
A patch test is a simple and important procedure used to check if a person’s skin will react negatively to a new product before applying it all over the face or body. This is especially crucial for sensitive skin or when trying new makeup products.
Keeping a Record of Skin Characteristics, Concerns, and Product Reactions
Keeping a detailed record helps to track how the skin behaves over time and how it reacts to different products or environmental changes. This record can include:
- The identified skin type and any existing conditions.
- Daily observations of oiliness, dryness, redness, or breakouts.
- A list of products used and any reactions (e.g., itching, redness, breakouts) experienced after use.
- Changes in diet, stress levels, or weather that might affect the skin.
This information helps in making informed decisions about skin care routines and product choices, ensuring the skin remains healthy and well-managed.
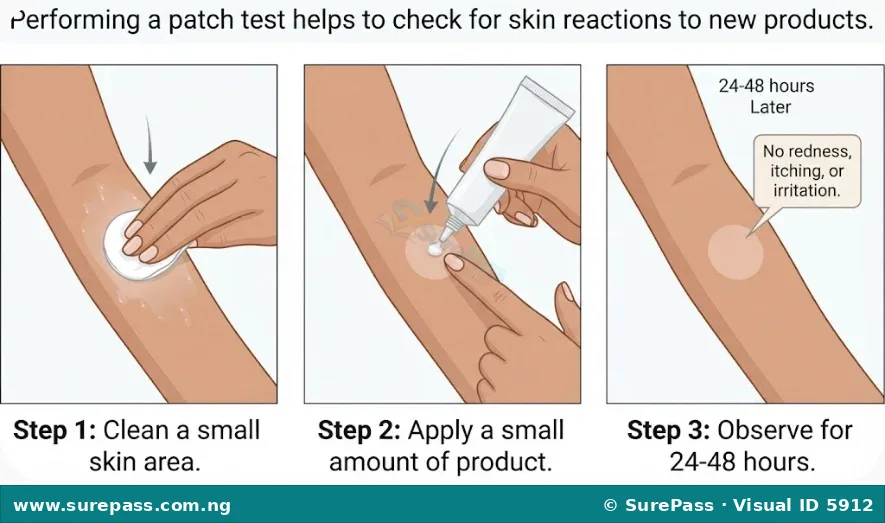
How to Perform a Patch Test
Performing a patch test is a simple procedure that can prevent severe skin reactions. It involves applying a small amount of a new product to a discreet area of the skin and observing for any adverse reactions.
The required materials are:
- The new product to be tested (e.g., a new foundation, moisturiser, or cleanser).
- A cotton swab or clean fingertip.
- A small, discreet area of skin (e.g., behind the ear, on the inner forearm, or on the side of the neck).
The procedure involves the following steps:
- Clean the Test Area: Wash a small, discreet area of skin with mild soap and water, then pat it dry. Common test areas include behind the ear, on the inner forearm, or on the side of the neck.
- Apply a Small Amount of Product: Using a cotton swab or a clean fingertip, apply a tiny amount of the new product to the cleaned test area.
- Leave the Product On: Allow the product to stay on the skin for at least 24 to 48 hours. Do not wash it off during this period.
- Observe for Reactions: During and after the test period, carefully observe the area for any signs of irritation.
- Check for Signs of Reaction: Look for redness, itching, burning, swelling, bumps, or any other discomfort.
- Interpret Results:
- If no reaction occurs, the product is likely safe for general use on the face or body.
- If any reaction occurs, immediately wash off the product with mild soap and water. Do not use the product on your face or other large areas of your body.



0 comments
Open the discussion when you need it. Comments stay collapsed until requested so the initial article remains light.