



ARTICLE CONTENTSOn this page 7 sections
Preparation of henna paste and designs
Performance Objectives
By the end of the lesson, students should be able to:
- explain the meaning and health benefits of henna;
- select ingredients for making henna paste;
- prepare henna paste;
- practice simple henna designs.
What is Henna?
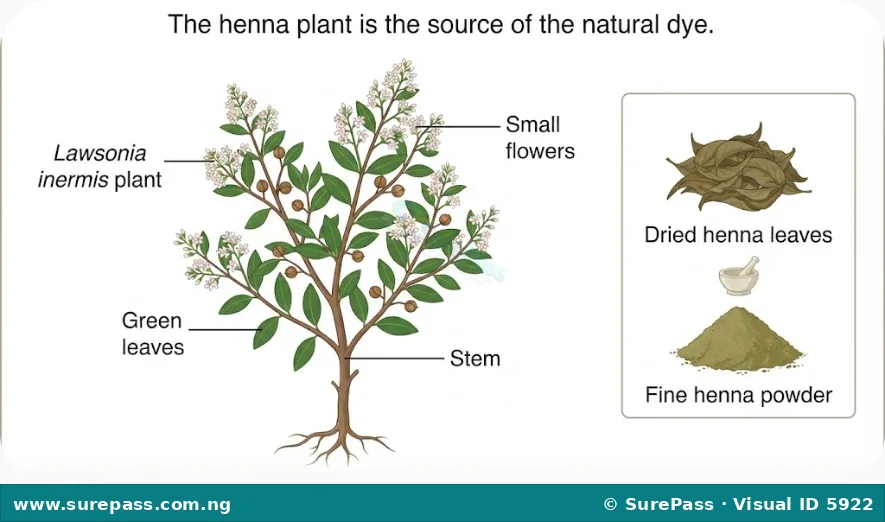
Henna is a natural dye made from the leaves of the henna plant (Lawsonia inermis).
This plant grows in hot, dry climates, especially in parts of Africa, Asia, and Australia. The leaves are dried and crushed into a fine powder, which is then mixed with other ingredients to create a paste. This paste is used to temporarily stain the skin, hair, and fingernails, creating beautiful patterns and colours.
Health Benefits of Henna
Beyond its use in beauty and art, henna has been traditionally valued for certain health benefits. These benefits are often linked to its natural properties when applied to the skin or hair.
The health benefits of henna include:
- Cooling Effect: Henna is known to have a natural cooling effect on the skin. Applying henna paste can help to reduce body temperature, especially in hot weather.
- Hair Conditioning: When used on hair, henna acts as a natural conditioner. It can make hair stronger, shinier, and healthier, and can also help to reduce dandruff.
- Skin Protection: Henna has some antiseptic properties that can help protect the skin from minor infections and soothe skin irritations.
- Nail Strengthening: Applying henna to fingernails can help to strengthen them and prevent breakage.
Ingredients for Making Henna Paste
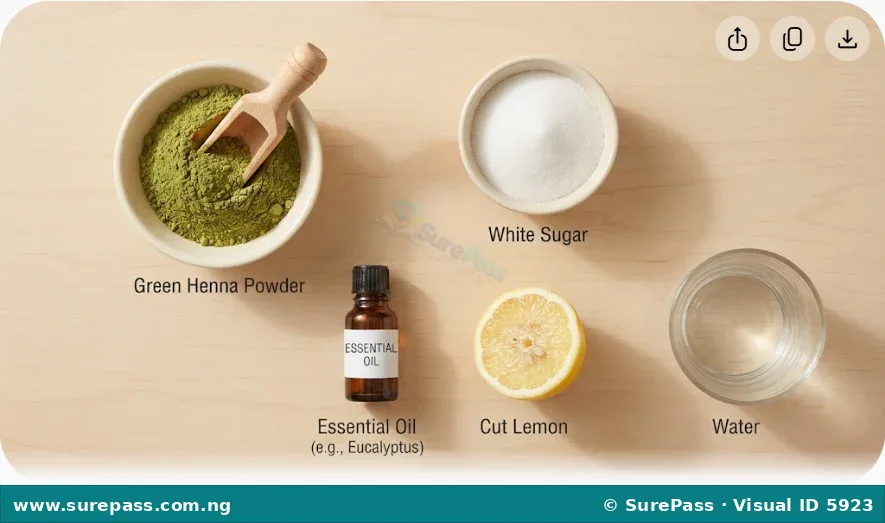
To make a good henna paste that creates a rich, long-lasting stain, specific ingredients are needed. Each ingredient plays an important role in the paste’s consistency, dye release, and final colour.
The main ingredients for making henna paste are:
- Henna Powder: This is the most important ingredient. It is the finely ground leaves of the henna plant. Good quality henna powder is green and has a fresh, earthy smell. It contains the natural dye molecule called lawsone, which stains the skin.
- Sugar: Sugar is added to the henna paste to help it stick better to the skin. It also makes the paste more flexible, preventing it from cracking and flaking off too quickly. This allows the dye to stay on the skin longer, resulting in a darker stain.
- Essential Oils: Certain essential oils are used to help the henna dye release better and create a darker, longer-lasting stain. Examples of suitable essential oils include eucalyptus oil, tea tree oil, and lavender oil. These oils also add a pleasant scent to the paste.
- Other Additives:
- Lemon Juice: Lemon juice is an acidic liquid that helps to activate the dye in the henna powder. The acid helps the lawsone molecule to be released, making the stain darker.
- Water: Water is used to mix the henna powder and other ingredients into a smooth, workable paste. The amount of water determines the consistency of the paste.
How to Prepare Henna Paste
Preparing henna paste involves mixing the ingredients carefully to achieve the right consistency for easy application and good staining results. This process requires patience to allow the dye to develop properly.
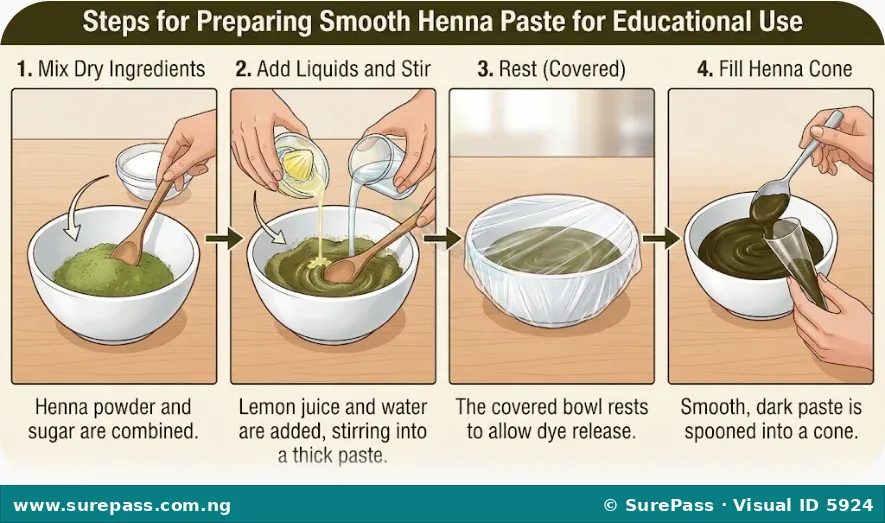
The procedure involves the following steps:
- Gather Materials: Collect all your ingredients: henna powder, sugar, essential oil, lemon juice, and water. You will also need a mixing bowl, a spoon or spatula, and plastic wrap.
- Mix Dry Ingredients: In the mixing bowl, combine the henna powder and sugar. Stir them well to ensure the sugar is evenly distributed throughout the powder.
- Add Liquids Gradually: Slowly add lemon juice and a few drops of essential oil to the dry mixture. Begin adding water gradually, stirring continuously.
- Achieve Right Consistency: Continue adding water little by little until the paste has a smooth, thick consistency, similar to mashed potatoes or thick yogurt. It should not be too runny or too stiff.
- Cover and Rest: Once the paste is mixed, cover the bowl tightly with plastic wrap. Make sure the wrap touches the surface of the paste to prevent it from drying out.
- Allow Dye Release: Let the paste rest in a warm place for about 6 to 12 hours. This resting period is crucial for the dye to release from the henna powder. You will notice a darker layer on top of the paste when it is ready.
- Check Consistency and Strain (Optional): After resting, stir the paste again. If it is too thick, add a tiny bit more water or lemon juice. If there are any lumps, you can strain the paste through a nylon stocking or a fine cloth to make it smoother for application.
- Fill Applicator: Carefully spoon the prepared henna paste into an applicator cone or a small plastic bottle with a fine tip. This makes it easier to create designs.
Creating Simple Henna Designs
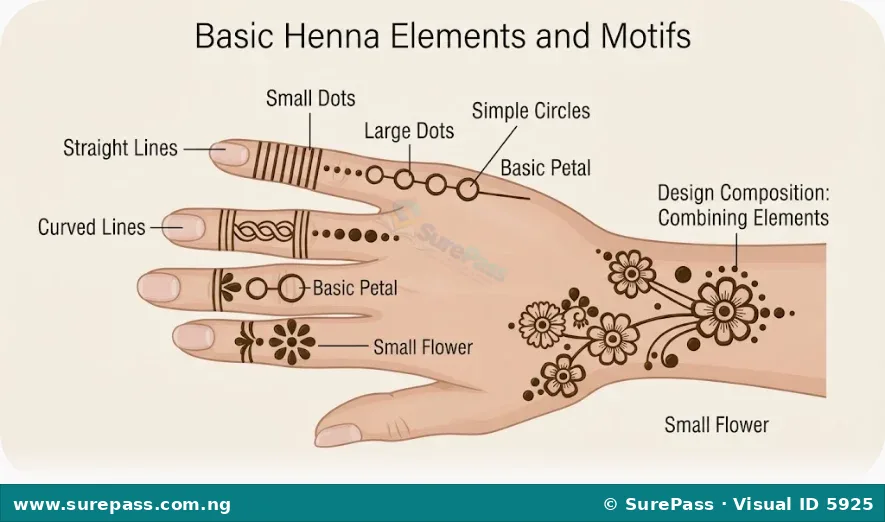
Once the henna paste is ready and loaded into an applicator, you can begin to create simple designs. Starting with basic elements like lines, dots, and shapes helps to build confidence and control.
To create simple henna designs, follow these guidelines:
- Hold the Applicator Correctly: Hold the henna cone or bottle like a pen, with a firm but relaxed grip. The tip should be close to the skin but not touching it directly. Apply gentle, steady pressure to release the paste.
- Practice Lines:
- Straight Lines: Practice drawing straight lines by moving your hand slowly and steadily across the skin. Try lines of different lengths and thicknesses.
- Curved Lines: Practice drawing curved lines by gently rotating your wrist as you apply the paste.
- Practice Dots:
- Small Dots: Apply a tiny bit of pressure and quickly lift the applicator to create small, neat dots.
- Larger Dots: Apply more pressure and hold the applicator slightly longer before lifting to create larger dots.
- Practice Basic Shapes:
- Circles: Draw a small dot and then carefully draw a line around it to form a circle.
- Petals: Draw a series of curved lines that meet at a point to form simple petal shapes. These can be combined to make flowers.
- Leaves: Draw two curved lines that meet at both ends to form a leaf shape.
- Combine Elements: Once you are comfortable with lines, dots, and shapes, try combining them. For example, you can draw a circle, add dots around it, and then draw small petals to create a simple flower design.
- Allow to Dry: After applying the design, allow the henna paste to dry completely on the skin. This can take several hours. The longer the paste stays on, the darker the stain will be.
- Remove Dried Paste: Once the paste is fully dry and has started to crack, gently scrape it off the skin. Do not wash it off with water immediately. The stain will appear orange at first and will darken over the next 24-48 hours.




0 comments
Open the discussion when you need it. Comments stay collapsed until requested so the initial article remains light.