


ARTICLE CONTENTSOn this page 8 sections
Vehicles
Performance Objectives
By the end of the lesson, students should be able to:
- explain the meaning of vehicle;
- identify different types of vehicles;
- identify the external parts of vehicles;
- state the uses of vehicles;
- draw and label external features of a vehicle;
- make a model of a vehicle.
What is a Vehicle?
A vehicle is a machine that is used for carrying people or goods from one place to another.
Vehicles help to make travel and transport easier and faster. They can move on land, in water, or in the air.
Uses of Vehicles
Vehicles are very important in daily life. They have many uses, including:
- Transporting people: Vehicles like cars, buses, and motorcycles carry people to school, work, market, or other places.
- Transporting goods: Vehicles like trucks and vans carry goods such as food, building materials, and other products from one place to another.
- Emergency services: Ambulances carry sick people to hospitals, and fire trucks carry firefighters and equipment to put out fires.
- Farming: Tractors and other farm vehicles help farmers to prepare land, plant seeds, and harvest crops.
- Construction: Vehicles like excavators and bulldozers are used to build roads, houses, and other structures.
Types of Vehicles
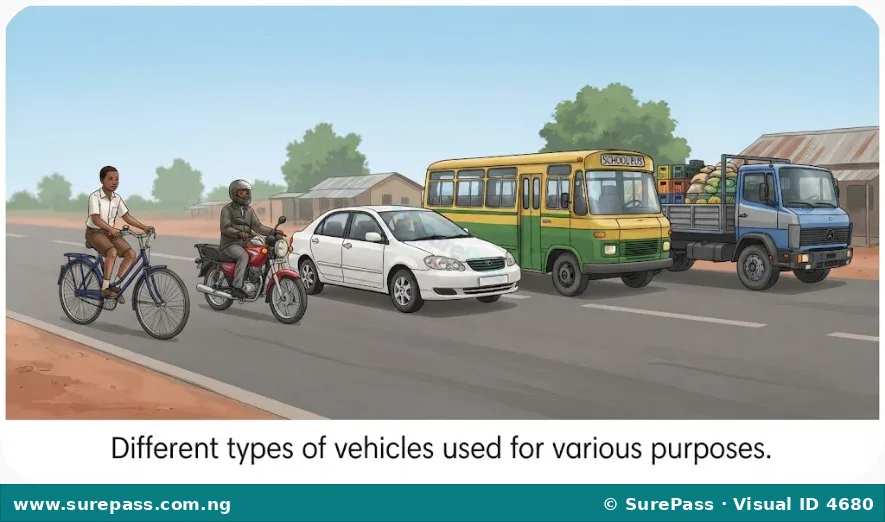
There are many different types of vehicles, each designed for specific purposes. Some common types of vehicles include:
- Bicycle: A bicycle is a vehicle with two wheels, powered by a person pedalling. It is used for short journeys, exercise, and recreation.
- Motorcycle: A motorcycle is a two-wheeled vehicle powered by an engine. It is faster than a bicycle and is used for personal transport and sometimes for carrying light goods.
- Car: A car is a four-wheeled vehicle powered by an engine, designed to carry a small number of people, usually between two and seven. Cars are widely used for personal and family transport.
- Bus: A bus is a large motor vehicle designed to carry many passengers, often on a fixed route. Buses are used for public transport, school transport, and long-distance travel.
- Truck: A truck is a large vehicle designed to carry heavy loads or goods. Trucks are essential for transporting goods across long distances, such as food, fuel, and construction materials.
External Parts of a Vehicle
Vehicles have many parts, both inside and outside. The external parts are those that can be seen from the outside of the vehicle. These parts help the vehicle to move, protect its occupants, and make it safe to use.
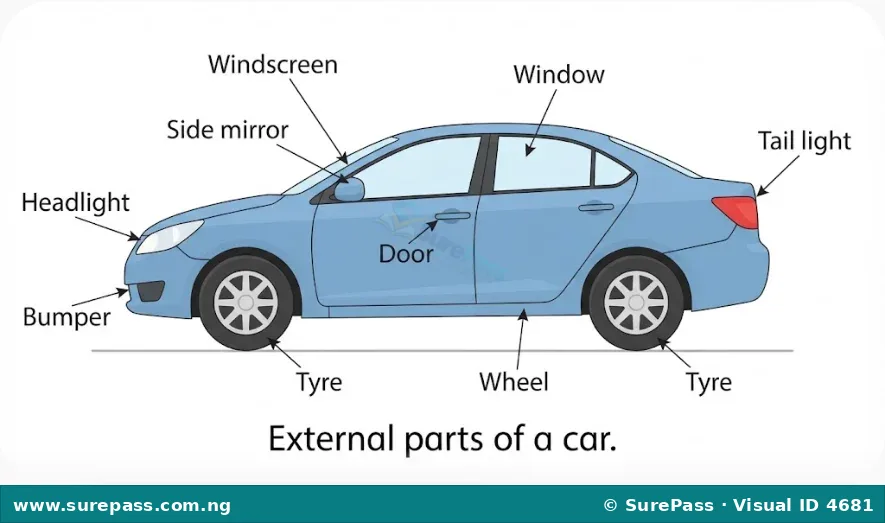
Common external parts of a car include:
- Body: This is the main outer shell of the vehicle, which gives it its shape and protects the passengers and internal parts.
- Wheels: These are round parts that allow the vehicle to roll and move.
- Tyres: These are rubber coverings around the wheels that provide grip on the road.
- Doors: These allow people to enter and exit the vehicle.
- Windows: These are transparent parts that allow people inside to see outside and let light in.
- Windscreen: This is the large front window that allows the driver to see the road clearly.
- Headlights: These are lights at the front of the vehicle that illuminate the road at night or in low visibility.
- Tail lights: These are lights at the back of the vehicle that make it visible to other drivers, especially at night.
- Side mirrors: These mirrors are on the sides of the vehicle and help the driver to see what is behind and beside the vehicle.
- Bumper: This is a bar at the front and back of the vehicle that protects it from damage during minor collisions.
Drawing and Labelling External Features of a Vehicle
Drawing and labelling the external features of a vehicle helps to understand its structure and parts. This activity allows for careful observation of how different parts fit together.
The procedure involves the following steps:
- Choose a vehicle: Select a simple vehicle like a car or a bus to draw. You can look at a toy vehicle, a picture, or a real vehicle in your school compound.
- Draw the basic shape: Start by drawing the main body shape of the vehicle. For a car, this might be a rectangular shape with rounded edges.
- Add the wheels: Draw two or four circles for the wheels at the bottom of the body.
- Draw the windows and doors: Add rectangles or squares for the windows and doors on the body.
- Include lights and mirrors: Draw the headlights at the front, tail lights at the back, and side mirrors.
- Add other details: Include a bumper at the front and back, and any other visible features like door handles or wipers.
- Label the parts: Use lines to point from each drawn part to its name. Write the name clearly next to each line (e.g., “Wheel,” “Door,” “Headlight”).
Constructing a Modelled Vehicle
Making a model of a vehicle helps to understand how its parts come together and how it might function. This activity uses simple materials to create a miniature version of a vehicle.
The required materials are:
- Cardboard or a small carton
- Bottle caps (four for wheels)
- Sticks or straws (for axles)
- Glue or strong tape
- Scissors (adult supervision required)
- Pencil or marker
The procedure involves the following steps:
- Prepare the body: Cut a rectangular shape from the cardboard or use a small carton for the body of your vehicle. This will be the main part of your car or truck.
- Make the axles: Take two sticks or straws. These will be the axles for your wheels.
- Attach the wheels: Carefully make a small hole in the centre of each bottle cap. Push the sticks or straws through the holes in two bottle caps to make one axle with two wheels. Repeat for the second axle.
- Attach axles to the body: Use glue or strong tape to attach the two axles to the underside of your cardboard body. Make sure the wheels can spin freely.
- Add details: Use a pencil or marker to draw windows, doors, and lights on the cardboard body. You can also cut out small pieces of cardboard to make a windscreen or a bumper and glue them on.
- Test your model: Gently push your vehicle to see if the wheels turn and if it rolls smoothly.


0 comments
Open the discussion when you need it. Comments stay collapsed until requested so the initial article remains light.