


ARTICLE CONTENTSOn this page 7 sections
Desoldering and Soldering Techniques
Performance Objectives
By the end of the lesson, students should be able to:
- analyze purpose of soldering and desoldering;
- identify materials and tools used in soldering;
- demonstrate proper soldering and Desoldering techniques;
- apply safety measures during soldering operation.
Concept and Purpose of Soldering and Desoldering
Soldering is a process in which two or more metal items are joined together by melting and flowing a filler metal into the joint.
The filler metal, known as solder, has a lower melting point than the adjoining metals. In computer hardware and GSM repairs, soldering is used to establish reliable electrical and mechanical connections on printed circuit boards (PCBs). This ensures that electrical current can flow smoothly between components such as resistors, capacitors, integrated circuits, and the board tracks.
Desoldering is the process of melting and removing solder from a joint to disconnect electrical components from a circuit board.
This process is essential when replacing faulty components, correcting assembly errors, or salvaging valuable parts from old electronic devices. It requires specialized tools to ensure that the delicate copper pads and tracks on the circuit board are not damaged during the removal process.
The primary purposes of soldering in electronic repairs are:
- Establishing electrical conductivity between electronic components and circuit tracks.
- Providing mechanical strength to hold components firmly in place on the board.
- Ensuring long-term reliability of electronic circuits by preventing loose connections.
The primary purposes of desoldering in electronic repairs are:
- Removing faulty or damaged components from a circuit board without damaging the board itself.
- Allowing the replacement of components during upgrades or repairs.
- Correcting mistakes made during the initial soldering process.
Materials and Tools for Soldering and Desoldering
Successful soldering and desoldering operations require specific tools and materials to ensure clean joints and prevent damage to sensitive electronic components.
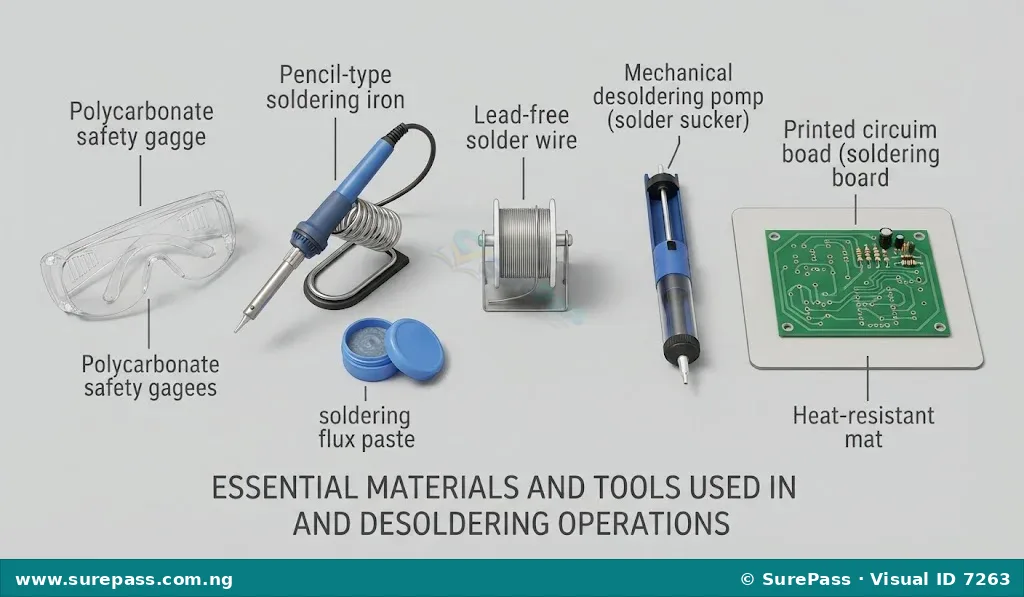
The essential materials and tools used for soldering and desoldering include:
- Soldering Iron: A handheld tool used to heat the metal parts to be joined and melt the solder wire. It consists of an insulated handle, a heating element, and a metal tip.
- Lead Wire (Solder Wire): An alloy wire, typically made of tin and lead (or lead-free alternatives), that melts at a low temperature to form the joint.
- Soldering Flux: A chemical cleaning agent applied to the metal surfaces before soldering. It removes oxides, prevents oxidation during heating, and helps the molten solder flow smoothly.
- Desoldering Pump (Solder Sucker): A manually operated vacuum device used to suck up molten solder from a joint during the desoldering process.
- Soldering Board (Printed Circuit Board – PCB): The base board made of non-conductive material with copper tracks where electronic components are mounted and soldered.
- Safety Goggles: Protective eyewear worn to shield the eyes from hot solder splashes, flying wire clippings, and irritating flux fumes.
- Soldering Iron Stand: A heavy metal holder used to safely rest the hot soldering iron when it is not in active use, preventing accidental burns or fires.
- Desoldering Wick (Solder Braid): A copper braid used to absorb molten solder from a joint through capillary action.
Safety Measures When Soldering
Soldering involves high temperatures and chemical substances that can pose health and safety hazards if not handled correctly. Maintaining a safe working environment is critical during hardware repairs.
Important safety measures to observe during soldering operations include:
- Wearing safety goggles to protect the eyes from hot solder splashes or flying wire leads.
- Working in a well-ventilated area or using a fume extractor to avoid inhaling toxic fumes produced by melting solder and flux.
- Placing the hot soldering iron in its stand when not in active use to prevent accidental burns, skin contact, or fires.
- Avoiding direct contact with the metallic tip of the soldering iron, which reaches temperatures exceeding 300 degrees Celsius.
- Washing hands thoroughly with soap and water after handling solder wire, as lead is a toxic substance that can be absorbed or ingested.
- Keeping flammable materials, such as paper, plastics, and chemical solvents, away from the soldering workstation.
- Ensuring that the electronic device being repaired is completely powered off and disconnected from any electrical source before starting.
- Never leaving a hot soldering iron unattended.
How to Solder Electronic Components
Soldering requires precision and control to create a strong electrical and mechanical connection. A poor soldering technique can result in a “cold joint,” which causes intermittent circuit failure.
The procedure for soldering a component onto a circuit board involves the following steps:
- Clean the component leads and the circuit board pads using a suitable cleaning agent or fine abrasive to remove dirt and oxidation.
- Insert the component leads through the designated holes on the printed circuit board from the top side, ensuring the component sits flat.
- Secure the circuit board in a holder or clamp to keep it stable during the operation.
- Plug in the soldering iron and allow it to reach its operating temperature.
- Apply a small amount of solder to the tip of the iron to clean and prepare it, then wipe off any excess on a damp sponge.
- Touch the tip of the soldering iron simultaneously to both the component lead and the circuit board pad to heat them both for two to three seconds.
- Apply the solder wire directly to the heated joint, not to the iron tip itself, allowing the solder to melt and flow smoothly around the joint.
- Remove the solder wire first once a sufficient amount has melted, then remove the soldering iron tip from the joint.
- Allow the joint to cool completely without moving the component to prevent a weak, fractured joint.
- Inspect the joint to ensure it has a shiny, concave, cone-like shape, and trim any excess lead using wire cutters.
How to Desolder Faulty Components
Desoldering is a critical skill used to remove damaged or faulty components from a circuit board without lifting the copper pads or damaging the surrounding circuitry.
The procedure for desoldering a faulty component using a desoldering pump involves the following steps:
- Secure the circuit board in a holder to keep it stable during the operation.
- Depress the plunger of the desoldering pump until it clicks into the locked position.
- Place the hot tip of the soldering iron directly onto the solder joint that needs to be removed.
- Wait for two to three seconds until the solder on the joint melts completely into a liquid pool.
- Position the nozzle of the desoldering pump directly over the melted solder, keeping it as close to the joint as possible without touching the iron tip directly.
- Press the release button on the pump to trigger the vacuum, which instantly sucks the molten solder into the chamber.
- Remove both the pump and the soldering iron from the joint.
- Gently wiggle the component lead using needle-nose pliers to ensure it is free from the pad, and repeat the process if any solder remains.
- Pull the faulty component out from the opposite side of the board once all leads are free.




0 comments
Open the discussion when you need it. Comments stay collapsed until requested so the initial article remains light.