


ARTICLE CONTENTSOn this page 9 sections
Workshop Organization
Performance Objectives
By the end of the lesson, students should be able to:
- adhere to proper arrangement of tools and materials;
- explain label and storage techniques;
- maintain a clean and hazard-free workspace;
- explain routine inspection of tools for defects.
Meaning of Workshop Organization
Workshop organization is the systematic arrangement, labeling, storage, and maintenance of tools, equipment, and materials within a workspace to ensure safety, efficiency, and productivity.
In a computer hardware and GSM (Global System for Mobile Communications) repairs workshop, precision is critical. Mobile phones and computer components consist of highly sensitive, miniature electronic parts. A disorganized workshop leads to lost components, damaged devices, electrical hazards, and reduced efficiency. Proper organization ensures that every tool has a designated place, safety hazards are minimized, and repairs are carried out smoothly.
Proper Arrangement of Tools and Materials
Arranging tools and materials systematically is the foundation of an efficient electronics workshop. It prevents physical damage to sensitive diagnostic equipment and ensures that technicians can locate items quickly without interrupting their workflow.
The primary principles of tool arrangement in a GSM and hardware repair workshop include:
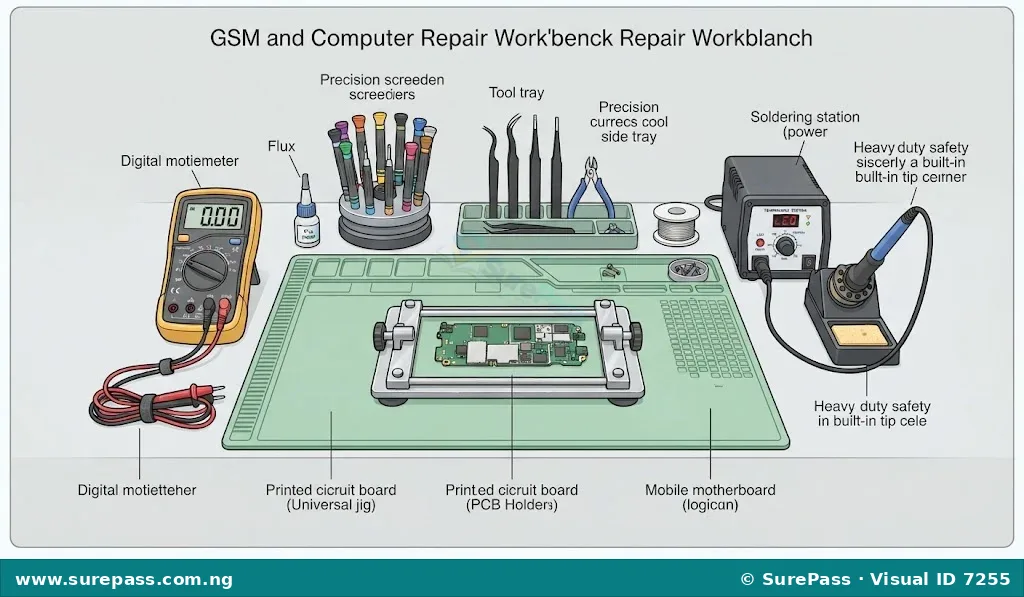
- Frequency of Use: Tools that are used constantly, such as precision screwdrivers, tweezers, and pliers, must be placed within immediate reach on the workbench. Diagnostic tools used occasionally, such as power supply unit (PSU) testers or multimeters, can be placed slightly further back on the bench or on an overhead shelf.
- Functional Grouping: Tools should be grouped according to their specific functions. For example, all diagnostic instruments (multimeters, testers) should be kept in one section, while hand tools (pliers, tweezers, cutters) are kept in another. Soldering equipment, including the soldering iron, hot air station, solder wire, and flux, must be grouped together in a dedicated heat-resistant zone.
- Safety and Stability: Heavy equipment, such as DC regulated power supplies and hot air rework stations, must be placed on flat, stable surfaces to prevent them from falling. Hot soldering irons must always be placed in their designated safety stands when not in immediate use to prevent accidental burns or fire hazards.
- Component Isolation: Delicate electronic components, such as printed circuit boards (PCBs), integrated circuits (ICs), and replacement screens, must be kept separate from heavy hand tools to prevent physical scratching or crushing.
Observe the image below to see a properly arranged workspace.
Labeling and Storage Techniques
Labeling is the process of identifying tools, components, and storage bins using written tags, color codes, or symbols to facilitate quick retrieval and return.
Storage techniques refer to the methods and containers used to keep tools and materials safe, clean, and protected from environmental damage when they are not in use.
In a GSM repair workshop, hundreds of tiny screws, capacitors, resistors, charging ports, and ICs are handled daily. Without proper labeling and storage, these parts can easily become mixed up or lost.
Effective storage techniques for an electronics workshop include:
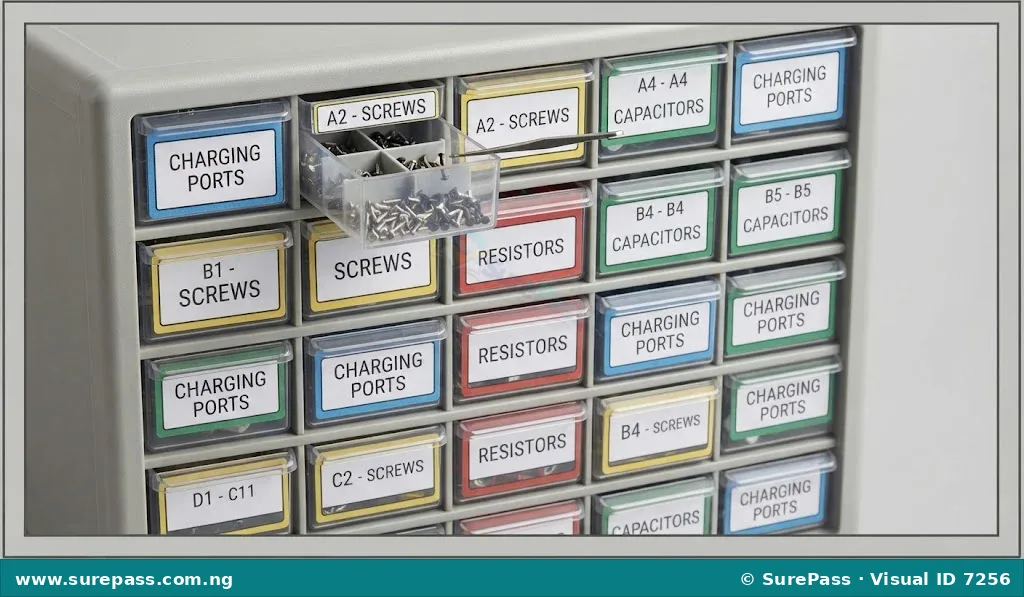
- Component Organizers and Drawers: Small plastic cabinets with multiple transparent drawers are ideal for storing tiny spare parts like screws, charging ports, microphones, and speakers. Each drawer should contain only one type of component.
- Electrostatic Discharge (ESD) Protective Packaging: Sensitive electronic components, such as computer RAM modules, processors, and mobile phone motherboards, must be stored in anti-static bags. This protects them from static electricity, which can permanently damage internal micro-circuits.
- Tool Racks and Shadow Boards: Hand tools like pliers, cutters, and precision screwdrivers should be stored on wall-mounted racks or shadow boards. A shadow board has the outline of each tool painted on it, making it obvious when a tool is missing.
- Vertical Stands: Precision screwdrivers should be kept in vertical rotating stands on the workbench to keep their tips protected and easily accessible.
Proper labeling techniques include:
- Alphanumeric Labeling: Assigning a combination of letters and numbers to storage bins (for example, Bin A1 for charging ports, Bin A2 for power ICs). This makes inventory tracking highly efficient.
- Color-Coding: Using different colored labels to categorize items. For example, red labels can indicate hazardous materials or high-voltage equipment, blue labels for computer hardware parts, and green labels for GSM repair parts.
- Clear Text Descriptions: Using a label maker or permanent marker to write clear, legible descriptions on the front of storage bins (for example, “iPhone 11 Screws” or “Multimeter Probes”).
Observe the diagram below to understand how storage bins are labeled.
Maintaining a Clean and Hazard-Free Workspace
A hazard-free workspace is an environment where physical, chemical, electrical, and environmental risks are minimized to protect both the technician and the equipment.
Maintaining cleanliness is directly linked to safety and repair quality. Dust and dirt can contaminate solder joints, clog cooling fans, and cause short circuits on delicate printed circuit boards.
Key practices for maintaining a clean and hazard-free workshop include:
- Regular Dusting and Cleaning: Workbenches should be wiped down daily using anti-static cloths and isopropyl alcohol (IPA). Isopropyl alcohol is preferred because it evaporates quickly and does not leave conductive residues that could damage electronics.
- Cable Management: Power cords for soldering stations, hot air guns, computers, and multimeters must be neatly bundled and routed away from walkways. Loose, dangling cables present serious tripping hazards and can lead to expensive equipment being pulled off benches.
- Electrostatic Discharge (ESD) Control: Technicians must work on grounded anti-static mats and wear ESD wrist straps. This prevents static electricity from building up on the technician’s body and discharging into sensitive phone or computer components.
- Chemical Safety: Chemical agents such as liquid flux, solder paste, and isopropyl alcohol must be stored in airtight, clearly labeled containers. Because these chemicals are highly flammable, they must be kept away from heat sources like soldering irons.
- Proper Waste Disposal: Solder dross (waste oxidized solder), cut wire clippings, damaged lithium-ion batteries, and broken screens must be disposed of in designated waste bins. Lithium-ion batteries require special care as they can catch fire if punctured or exposed to extreme heat.
Routine Inspection of Tools for Defects
Routine inspection is the regular, systematic examination of tools and equipment to detect wear, damage, or malfunction before they cause injury or damage to components.
Using defective tools can ruin expensive customer devices and pose physical dangers to the technician. For example, a worn screwdriver tip can strip a screw head, making it impossible to remove, while a damaged soldering iron cord can cause electrical shocks.
The methods for inspecting common workshop tools include:
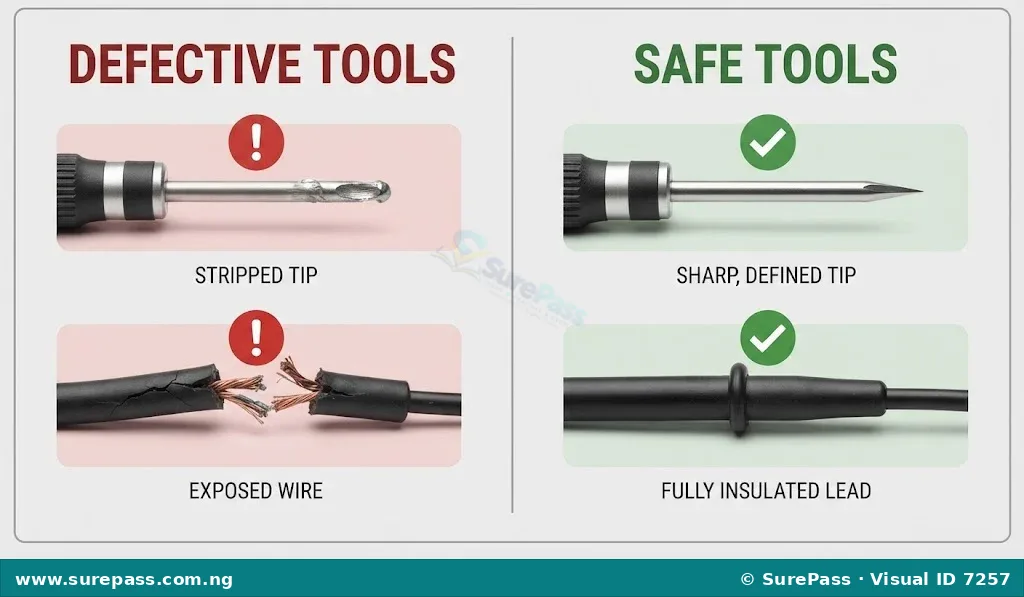
- Precision Screwdrivers: Inspect the tips regularly under a magnifying glass. If the tip is chipped, rounded, or stripped, the screwdriver must be replaced immediately to prevent damage to mobile phone screws.
- Pliers and Tweezers: Check the alignment of the jaws or tips. Tweezers used for holding tiny SMD (Surface Mount Device) components must meet perfectly at the tips. If they are bent or misaligned, they will drop components. Pliers should also be checked for rust and to ensure their insulated handles are intact.
- Multimeters and PSU Testers: Inspect the test leads (probes) for cracks, cuts, or exposed copper wires. Exposed wires can cause short circuits or deliver electrical shocks. Ensure the multimeter battery is strong, as a weak battery leads to inaccurate voltage and resistance readings.
- Soldering Irons and Hot Air Stations: Inspect the power cords for any signs of melting, burns, or cracks. Check the soldering iron tip for oxidation (black coating). Oxidized tips do not transfer heat properly and must be cleaned or replaced. Ensure the heating element reaches the correct temperature promptly.
- Flashlights and Magnifying Lamps: Check for flickering bulbs, cracked lenses, and battery leakage. Adequate lighting is essential for inspecting micro-solder joints.
- PCB Holders: Inspect the spring mechanisms and clamp grips to ensure they hold circuit boards firmly without slipping.
Look at the comparison shown below to identify defective tools.
How to Carry Out a Weekly Tool Inspection and Organization Session
This practical guide outlines the steps required to inspect, clean, and organize a GSM and computer hardware repair workstation at the end of a work week.
The required materials are:
- An anti-static cleaning cloth
- Isopropyl alcohol (99% concentration)
- A brass wire tip cleaner or soldering sponge
- A permanent marker and adhesive labels
- A tool inspection logbook
- A digital multimeter
The procedure involves the following steps:
- Clear the Workbench: Remove all mobile phones, computer parts, and loose components from the immediate work area and place them in temporary storage bins.
- Clean the Work Surface: Dampen the anti-static cloth with isopropyl alcohol and thoroughly wipe down the ESD mat to remove dust, flux residue, and grease.
- Inspect Hand Tools: Pick up each precision screwdriver, tweezer, and plier. Inspect the tips for physical damage, bending, or wear. Wipe the handles clean.
- Test Diagnostic Equipment: Turn on the digital multimeter. Set it to the continuity mode (beep test) and touch the two probes together to verify that the leads are working perfectly and there are no internal breaks.
- Maintain the Soldering Iron: Turn on the soldering iron to a moderate temperature, apply a small amount of solder to the tip, and clean it using the brass wire cleaner to remove carbon buildup. Turn off the station and inspect the power cable for physical damage once it cools down.
- Label and Sort Loose Parts: Gather any loose screws or small components left on the bench. Sort them by size or function, place them into the correct drawer bins, and update the labels if necessary.
- Log Defective Tools: Write down any defective tools found during the inspection in the workshop logbook. Label damaged tools with a red tag reading “DEFECTIVE – DO NOT USE” and place them in a separate quarantine bin for repair or replacement.
Review Questions
The following questions are designed to test the understanding of workshop organization:
- Explain how tools and materials should be arranged on a GSM repair workbench to ensure efficiency and safety.
- Describe two labeling techniques and two storage techniques used to manage small electronic components in a workshop.
- State four practical steps required to maintain a clean and hazard-free electronics workspace.
- Explain how to carry out a routine inspection on a digital multimeter and a precision screwdriver to detect defects.




0 comments
Open the discussion when you need it. Comments stay collapsed until requested so the initial article remains light.