



ARTICLE CONTENTSOn this page 9 sections
External Components and Peripherals of a computer
Performance Objectives
By the end of the lesson, students should be able to:
- explain common external peripherals of a computer and their functions;
- explain how to connect external peripherals of a computer;
- demonstrate caring and maintenance of external peripherals of a computer.
Meaning of External Peripherals
An external peripheral is any hardware device that connects to a computer from the outside to provide input, output, or storage capabilities.
These devices are not part of the core processing architecture inside the system unit, but they are essential for human-computer interaction. They allow users to input data, view processed information, listen to audio, and produce physical copies of digital documents.
Common External Peripherals and Their Functions
Computer peripherals are broadly classified into input devices, output devices, and input/output (I/O) devices depending on the direction of data flow. The most common external peripherals include:
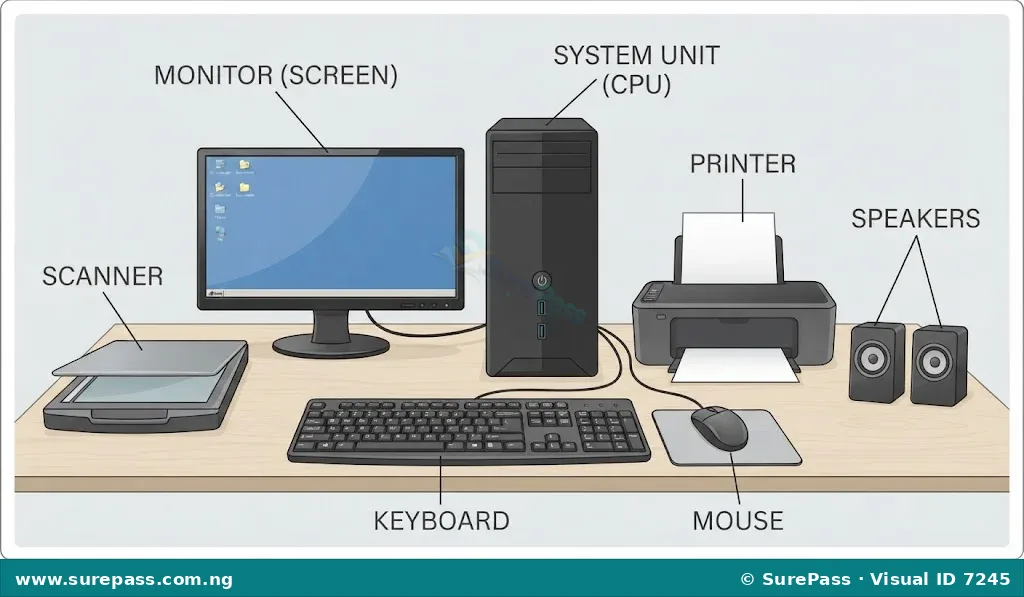
1. Monitor
The monitor is the primary visual output device of a computer system.
It displays the user interface, running applications, text, images, and video. Modern monitors use Liquid Crystal Display (LCD) or Light Emitting Diode (LED) technology to produce sharp, high-resolution images. The primary function of the monitor is to provide real-time visual feedback to the user as they interact with the computer.
2. Keyboard
The keyboard is the primary input device used for entering text, numbers, and commands into the computer.
It contains a layout of keys representing letters, numbers, punctuation marks, and special function keys. When a key is pressed, the keyboard sends a specific electronic signal to the system unit, which the operating system translates into characters or actions on the screen.
3. Mouse
The mouse is a handheld pointing device used to navigate the graphical user interface (GUI).
It detects two-dimensional motion relative to a flat surface. This motion is translated into the movement of a pointer or cursor on the monitor. By using buttons on the mouse, users can select, drag, open, and manipulate objects on the screen.
4. Printer
The printer is an output device that produces a hard copy of digital documents or images on paper.
Printers receive data from the computer and use various technologies, such as inkjet or laser printing, to transfer text and graphics onto physical media. They are essential for creating physical records, reports, and photographs.
5. Speakers
Speakers are audio output devices that convert electrical signals from the computer’s sound card into audible sound waves.
They allow users to listen to music, system notifications, video audio, and voice communications. Speakers can be connected via analog audio jacks, USB ports, or wireless connections.
6. Scanner
The scanner is an input device that optically reads physical images, printed text, or handwriting and converts it into a digital format.
It works by shining a light source onto the document and capturing the reflected light using light-sensitive sensors. The captured data is then sent to the computer as a digital image file, which can be edited, saved, or shared.
Observe the diagram below showing how these common external peripherals are arranged around a computer system unit.
Connection of External Peripherals
To function correctly, external peripherals must be physically or wirelessly linked to the computer system unit. This connection is established through specific ports located on the exterior of the system unit, usually at the back or front panel.
The primary connection interfaces include:
- USB (Universal Serial Bus) Ports: These are highly versatile ports used to connect keyboards, mice, printers, scanners, and external storage drives. USB connections support “plug-and-play” technology, allowing devices to be connected and used without restarting the computer.
- HDMI (High-Definition Multimedia Interface) Ports: These ports transmit high-definition digital video and audio signals through a single cable. They are commonly used to connect modern monitors, projectors, and television screens.
- VGA (Video Graphics Array) Ports: An older analog video interface used to connect monitors. VGA ports are typically blue with 15 pinholes and use thumbscrews to secure the cable connector.
- Audio Jacks (3.5mm): These color-coded ports are used for audio devices. The green port is for audio output (speakers and headphones), while the pink port is for audio input (microphones).
- Power Ports: These connect the system unit and monitor to electrical outlets using power cables to supply the necessary operating voltage.
The diagram below shows the typical layout of ports on the back panel of a computer system unit.
How to Connect External Peripherals
Connecting peripherals requires care to avoid damaging the pins, connectors, or ports. The process must be carried out systematically.
The procedure for connecting basic external peripherals involves the following steps:
- Ensure the computer system unit and all peripherals are powered off and unplugged from the electrical mains before making any connections.
- Connect the monitor to the system unit by plugging the video cable (HDMI or VGA) into the corresponding video port on the back of the system unit. Secure the VGA thumbscrews gently if using a VGA cable.
- Connect the keyboard and mouse to any available USB ports on the system unit.
- Connect the printer and scanner to the system unit using their respective USB cables.
- Plug the speaker audio cable (usually a green 3.5mm jack) into the green audio output port on the back of the system unit. If the speakers require USB power, plug the USB cable into a USB port.
- Connect the power cables of the monitor, printer, and system unit to their respective power ports, and then plug them into a surge protector or Uninterruptible Power Supply (UPS).
- Turn on the power outlet, switch on the peripherals, and finally power on the system unit.
Care and Maintenance of External Peripherals
Proper care and maintenance of external peripherals prevent hardware failure, extend the lifespan of the equipment, and ensure optimal performance.
The core principles of peripheral maintenance include:
- Dust and Dirt Prevention: Dust acts as an insulator, trapping heat and causing mechanical parts to wear out. Regular cleaning prevents dust accumulation.
- Liquid Avoidance: Spilling liquids on electronic components causes short circuits, corrosion, and permanent hardware damage. Drinks should be kept away from computer workstations.
- Proper Cable Management: Cables should not be tightly bent, pulled, or stepped on. Cable ties should be used to keep wires organized and prevent tripping hazards.
- Safe Disconnection: USB storage devices should be safely ejected from the operating system before physical removal to prevent data corruption. Cables should be pulled by the connector plug, not by the wire itself.
- Environmental Protection: Peripherals should be kept in cool, dry, well-ventilated rooms away from direct sunlight and extreme moisture.
How to Maintain External Peripherals
Regular maintenance routines keep peripherals clean and functional. Below are the specific procedures for maintaining different devices.
The required materials for basic maintenance are:
- A soft, lint-free microfiber cloth
- Isopropyl alcohol (90% or higher) or specialized screen cleaning solution
- A can of compressed air or a soft brush
- Cotton swabs
Procedure for Cleaning a Monitor
The procedure involves the following steps:
- Turn off the monitor and unplug it from the power source.
- Wipe the screen gently with a dry, soft microfiber cloth in circular motions to remove dust.
- Dampen the microfiber cloth slightly with water or specialized screen cleaner for stubborn smudges. Never spray liquid directly onto the screen.
- Wipe the plastic outer bezel of the monitor with the damp cloth.
- Allow the screen to dry completely before plugging it back in and turning it on.
Procedure for Cleaning a Keyboard and Mouse
The procedure involves the following steps:
- Disconnect the keyboard and mouse from the system unit.
- Turn the keyboard upside down and tap it gently to dislodge loose crumbs, dust, and debris.
- Use a can of compressed air or a soft brush to blow out dust from between the keys.
- Moisten a microfiber cloth with a small amount of isopropyl alcohol and wipe the surfaces of the keys and the mouse body to sanitize them.
- Use a cotton swab moistened with isopropyl alcohol to clean tight spaces around the mouse sensor and scroll wheel.
Procedure for Maintaining a Printer
The procedure involves the following steps:
- Turn off the printer and unplug it from the power source.
- Open the printer cover and gently wipe the interior dust using a dry, lint-free cloth.
- Remove any stuck paper gently in the direction of the paper path to avoid damaging the rollers.
- Run the printer’s built-in printhead cleaning utility from the computer software if printouts show streaks or missing lines.
Summary of Care and Maintenance Rules
The table below summarizes the key maintenance actions and what to avoid for each peripheral.
| Peripheral | Key Maintenance Action | What to Avoid |
|---|---|---|
| Monitor | Wipe gently with a dry microfiber cloth. | Do not spray liquids directly on the screen; do not touch with sharp objects. |
| Keyboard | Blow out dust with compressed air; wipe keys with isopropyl alcohol. | Do not eat or drink near the keyboard; do not hit keys with excessive force. |
| Mouse | Clean the optical sensor area with a cotton swab. | Do not drop the mouse; do not use it on rough or dirty surfaces without a mouse pad. |
| Printer | Remove paper jams gently; run printhead cleaning software. | Do not force jammed paper out; do not let the printer sit unused for months (ink may dry). |



0 comments
Open the discussion when you need it. Comments stay collapsed until requested so the initial article remains light.