



ARTICLE CONTENTSOn this page 8 sections
Essential Hardware and Software for Computer and Mobile Phone Repairs
Performance Objectives
By the end of the lesson, students should be able to:
- identify common tools and equipment for hardware repairs;
- identify common software tools for repairs;
- state the uses of the tools identified above;
- use tools to repair computer/mobile phone.
Introduction to Repair Tools and Equipment
Computer and mobile phone repairs require specialized instruments to diagnose faults, disassemble devices, replace damaged components, and restore functionality. These instruments are divided into hardware tools and software tools.
Hardware repair tools are physical instruments used to assemble, disassemble, test, and fix the mechanical and electronic components of computers and mobile phones.
Repair software consists of computer programs and applications used to diagnose, configure, flash, or unlock the operating systems and firmware of mobile phones and computers.
Understanding the correct identification, function, and safe handling of these tools is the first step in establishing a successful repair workshop. Using the wrong tool can cause permanent damage to sensitive electronic circuits.
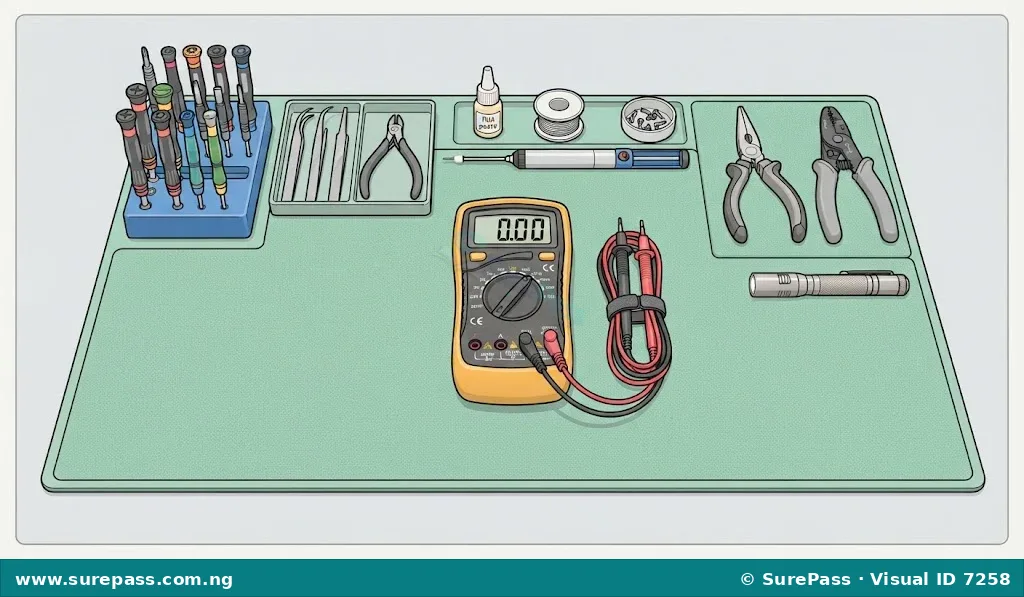
Common Hardware Repair Tools and Their Uses
Hardware tools are categorized into hand tools, diagnostic instruments, and workstation equipment. Each tool has a specific design suited for the delicate nature of modern micro-electronics.
Pliers
Pliers used in electronic workshops are smaller than those used in heavy carpentry. The most common types are long-nose pliers and side-cutting pliers.
The main uses of pliers in repairs include:
- gripping small metal shields, brackets, and internal structural components;
- bending thin wires or metal tabs into place;
- cutting copper wires, component leads, and plastic cable ties.
Tweezers
Tweezers are fine-tipped, scissor-like gripping tools. They are often coated with an anti-static material to prevent Electrostatic Discharge (ESD) from damaging sensitive integrated circuits.
The main uses of tweezers in repairs include:
- picking up and placing tiny surface-mount components (SMD) on a circuit board;
- holding small screws during disassembly and reassembly;
- manipulating delicate ribbon cables and connectors inside mobile phones.
Flashlight
A flashlight or a focused LED work light provides high-intensity illumination over a small area.
The main uses of a flashlight in repairs include:
- illuminating the dark, compact interior of computer casings and mobile phone housings;
- inspecting printed circuit boards for hairline cracks, burnt components, or broken solder joints;
- helping the technician align tiny connectors during reassembly.
Multimeters (Analogue and Digital)
A multimeter is an electronic measuring instrument that combines several measurement functions into one unit. It features a rotary dial, a display screen (or needle scale), and two test probes (red for positive, black for negative).
Analogue multimeters use a microammeter with a moving pointer to indicate readings on a printed scale. They are highly responsive to rapid changes in voltage but require careful reading to avoid errors.
Digital multimeters display readings as numerical values on a Liquid Crystal Display (LCD) screen. They are highly accurate, easier to read, and often include auto-ranging features.
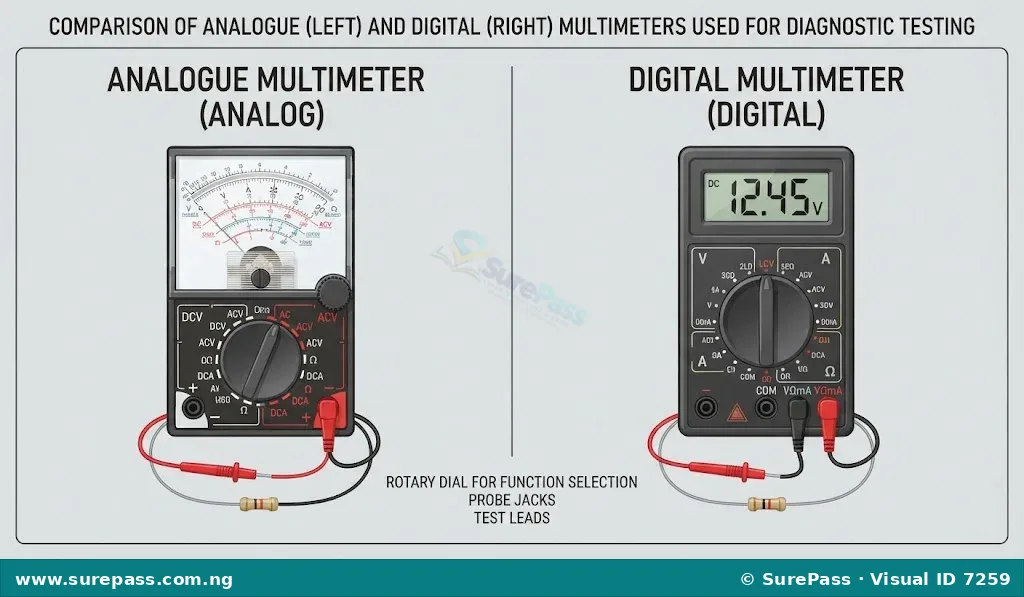
The main uses of multimeters in repairs include:
- measuring Direct Current (DC) voltage to check battery levels and power rails;
- testing continuity to locate broken traces, blown fuses, or short circuits on a motherboard;
- measuring resistance of resistors and checking the health of diodes and transistors.
Power Supply Unit (PSU) Testers
A PSU tester is a specialized diagnostic tool designed to test the functionality of a computer’s power supply unit without connecting it to a motherboard.
The main uses of PSU testers in repairs include:
- verifying that the power supply outputs the correct voltages (+12V, +5V, +3.3V, and -12V);
- checking the Power-Good (PG) signal delay to ensure the PSU starts up safely;
- preventing damage to a working motherboard by testing a suspected faulty PSU first.
Screwdrivers and Precision Sets
Standard screwdrivers are too large for mobile devices and modern laptops. Technicians use precision screwdriver sets, which feature a single driver handle with multiple interchangeable magnetic bits.
Common bit profiles found in a precision set include:
- Phillips (cross-shaped) bits for standard internal computer and phone screws;
- Torx (star-shaped) bits, commonly used in Nokia, Motorola, and various laptop brands;
- Pentalobe (five-point star) bits, specifically used to open Apple iPhones and MacBooks;
- Flathead (slotted) bits for older computer cases and basic prying tasks.
The main use of screwdrivers is to loosen and tighten screws during the disassembly and assembly of device housings and internal brackets.
Workstation Equipment
A repair workstation is a dedicated physical space equipped with tools for soldering, desoldering, and holding circuit boards. Key components of a workstation include the soldering iron, hot air rework station, and PCB holder.
A Printed Circuit Board (PCB) holder, or stand, is a heavy metal base with adjustable clamps designed to grip a motherboard securely.
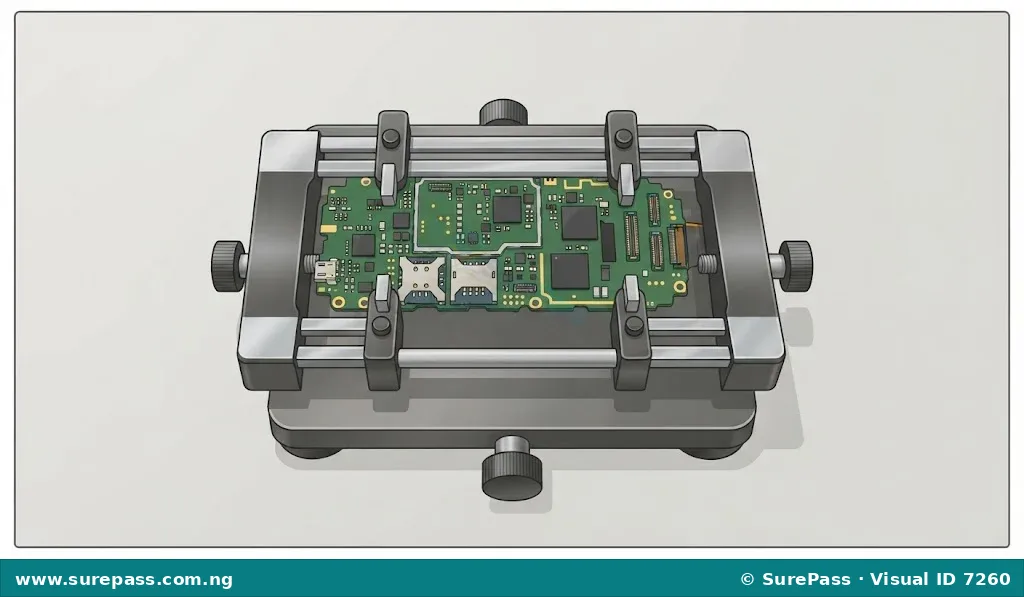
The main uses of workstation equipment in repairs include:
- holding the motherboard steady using the PCB holder to prevent movement during delicate soldering operations;
- melting solder wire with a soldering iron to join electronic components to the board;
- applying controlled hot air from a rework station to desolder multi-pin chips and charging ports.
Flasher (Hardware Box or Dongle)
A flasher is a hardware interface device (such as a Miracle Box, Z3X Box, or UMT Dongle) that connects a mobile phone to a computer set.
The main uses of a flasher box include:
- acting as a secure bridge to allow deep-level communication between the computer and the phone’s flash memory;
- bypassing security protocols to write firmware directly to the device’s storage chip;
- providing hardware-level diagnostic access to dead or bricked mobile phones.
Computer Set
A complete computer set (desktop or laptop) is an indispensable tool in a modern repair workshop.
The main uses of a computer set in repairs include:
- running flashing, unlocking, and diagnostic software;
- downloading firmware files, device drivers, and schematic diagrams from the internet;
- storing backup files of user data and device operating systems.
Common Software Tools for Repairs
When a computer or mobile phone experiences software crashes, boot loops, network locks, or forgotten passwords, physical tools cannot resolve the issue. Technicians must use specialized software tools.
Flashing Software
Flashing software is used to write or overwrite the firmware (operating system) of a device. This process is known as “flashing.”
Common examples of flashing software include:
- Odin: Used exclusively for flashing official firmware on Samsung Android devices;
- SP Flash Tool (Smart Phone Flash Tool): Used to flash firmware on devices powered by MediaTek (MTK) processors, which are very common in Nigeria;
- iTunes / 3uTools: Used for flashing, restoring, and diagnosing Apple iOS devices;
- Rufus: Used on computers to create bootable USB flash drives for installing operating systems like Windows or Linux.
The main uses of flashing software include restoring bricked devices that refuse to boot, upgrading or downgrading operating systems, and fixing severe system file corruption.
Unlocking and Repair Software
Unlocking and repair software is designed to bypass security restrictions, remove user locks, and repair system configuration parameters.
Common examples of unlocking and repair software include:
- Miracle Box Software: A versatile multi-brand tool used to read codes, reset user locks, and repair software faults on various mobile chipsets;
- Octoplus / Z3X Shell: Specialized software suites used for network unlocking, IMEI repair, and factory resets on specific brands;
- Android Multi-Tools: A utility program used to reset pattern locks, PIN locks, and Google Factory Reset Protection (FRP) on Android devices.
The main uses of unlocking and repair software include removing forgotten screen locks, unlocking phones restricted to specific network providers, and restoring corrupted IMEI numbers to regain network signal.
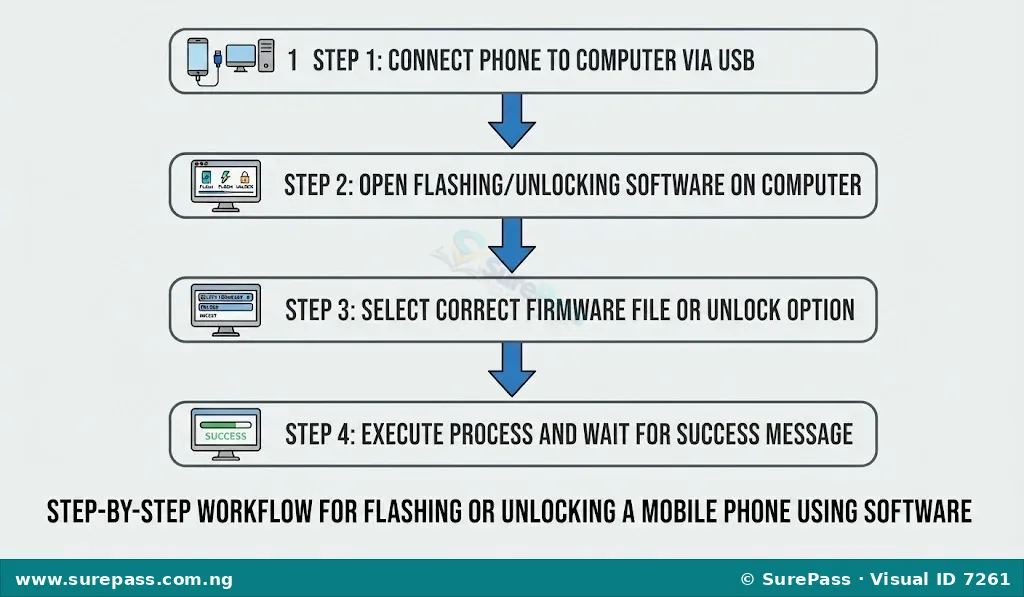
Summary of Tools and Their Functions
The table below summarizes the primary functions of the essential hardware and software tools used in repairs.
| Tool Category | Tool Name | Primary Function in Repair |
|---|---|---|
| Hardware (Hand Tool) | Pliers | Gripping, bending, and cutting wires or metal shields. |
| Hardware (Hand Tool) | Tweezers | Handling tiny components, screws, and delicate ribbon cables. |
| Hardware (Hand Tool) | Precision Screwdriver Set | Loosening and tightening small, specialized screws. |
| Hardware (Diagnostic) | Multimeter | Measuring voltage, resistance, and testing circuit continuity. |
| Hardware (Diagnostic) | PSU Tester | Verifying the voltage outputs of a computer power supply. |
| Hardware (Workstation) | PCB Holder | Clamping and holding circuit boards steady during repairs. |
| Hardware (Interface) | Flasher Box | Connecting a phone to a computer for deep-level firmware writing. |
| Software | Flashing Software (e.g., Odin) | Reinstalling or upgrading device operating systems. |
| Software | Unlocking Software | Bypassing screen locks, network locks, and FRP. |
Practical Guide: Using Tools to Repair Computers and Mobile Phones
This section outlines the step-by-step procedures for performing basic diagnostic and repair tasks using the tools discussed.
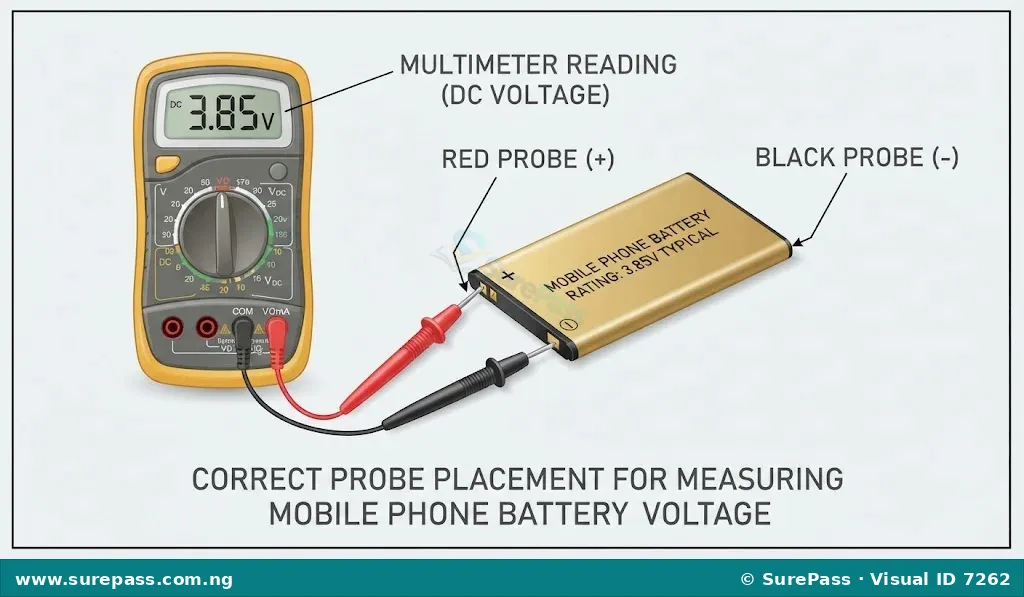
How to Test a Mobile Phone Battery Using a Digital Multimeter
This procedure is used to determine if a mobile phone battery has enough charge to power on the device, or if the battery is completely dead and defective.
The required materials are:
- A digital multimeter with test probes
- A removable mobile phone battery (lithium-ion)
The procedure involves the following steps:
- Turn on the digital multimeter by rotating the dial to the DC Voltage setting, indicated by a “V” with a straight line. Select the 20V range.
- Locate the positive (+) and negative (-) terminals on the mobile phone battery. These are usually marked clearly on the battery label.
- Hold the red (positive) probe of the multimeter against the positive terminal of the battery.
- Hold the black (negative) probe of the multimeter against the negative terminal of the battery.
- Observe the reading on the multimeter screen. A healthy, charged battery should read between 3.7V and 4.2V. If the reading is below 3.4V, the battery is discharged and needs boosting. If it reads 0V, the battery’s internal protection circuit may be damaged.
How to Disassemble a Mobile Phone Safely
Disassembly is required to access internal components like the screen, charging port, or motherboard.
The required materials are:
- A mobile phone
- A precision screwdriver set
- Plastic prying tools (spudgers)
- Tweezers
- A small container or magnetic mat for screws
The procedure involves the following steps:
- Power off the mobile phone completely and remove the SIM card tray using a SIM ejector tool.
- Examine the phone housing to identify the screw types. Select the matching bit from the precision screwdriver set (e.g., Torx T5 or Pentalobe).
- Remove the external screws carefully. Place them immediately into the magnetic container to prevent loss.
- Insert a plastic prying tool into the seam between the screen assembly and the back cover. Gently slide the tool along the edges to release the plastic clips or adhesive. Do not use metal tools to pry, as they can crack the screen or scratch the housing.
- Lift the back cover slowly. Do not pull it away quickly, as there may be a fingerprint sensor ribbon cable attached to the motherboard.
- Use plastic tweezers to gently disconnect any visible ribbon cables by lifting their connectors straight up from the board.
- Remove the internal screws holding the motherboard in place, disconnect the antenna cable, and lift the motherboard out. Place it securely on a PCB holder for inspection.
How to Test a Computer Power Supply Unit (PSU) Using a PSU Tester
This test helps determine if a computer’s failure to power on is caused by a faulty power supply unit.
The required materials are:
- A computer power supply unit (installed in a PC or standalone)
- A digital PSU tester with an LCD screen
- A mains power cable
The procedure involves the following steps:
- Ensure the computer is powered off and unplugged from the wall outlet.
- Open the computer case and locate the main 24-pin ATX power connector plugged into the motherboard. Press the release clip and pull the connector out.
- Plug the 24-pin ATX connector firmly into the matching 24-pin port on the PSU tester.
- If testing auxiliary power rails, plug the 4-pin or 8-pin CPU power connector into the corresponding port on the side of the tester.
- Connect the mains power cable to the back of the PSU and plug it into a wall outlet. Turn on the PSU switch (if available).
- Observe the PSU tester. The tester will power on, and its LCD screen will display the voltage readings for +12V, +5V, +3.3V, and the Power-Good (PG) delay in milliseconds. If any voltage is missing, or if the tester emits a continuous beeping sound, the power supply is faulty and must be replaced.
Workshop Safety and Best Practices
Working with electronic devices involves risks such as electrical shock, burns, and damage to expensive components. Adhering to safety guidelines is mandatory in any school or professional workshop.
Important safety rules include:
- Avoid Static Electricity: Always wear an anti-static wrist strap or work on an ESD-safe mat to prevent static electricity from destroying sensitive microchips.
- Disconnect Power Sources: Always remove the battery from a mobile phone or unplug a computer from the mains power supply before starting any disassembly or hardware repair.
- Use the Correct Tool: Never force a screw with the wrong screwdriver size. This strips the screw head, making it extremely difficult to remove.
- Maintain Ventilation: Soldering irons and hot air stations produce chemical fumes from solder flux. Always work in a well-ventilated room or use a fume extractor.
- Handle Batteries with Care: Lithium-ion batteries are highly volatile. Do not puncture, bend, or apply direct heat to a mobile phone battery, as this can cause a chemical fire.





0 comments
Open the discussion when you need it. Comments stay collapsed until requested so the initial article remains light.