



ARTICLE CONTENTSOn this page 9 sections
Cleaning and Simple Maintenance
Performance Objectives
By the end of the lesson, students should be able to:
- identify liquids used to service a computer/mobile phone;
- follow appropriate methods to service a computer/mobile phone;
- carryout servicing of computer and mobile phones using cleaning aids.
Introduction to Servicing Computers and Mobile Phones
Servicing is the regular process of cleaning, inspecting, repairing, and maintaining a device to ensure it remains in optimal working condition.
Computers and mobile phones operate in environments where they are constantly exposed to dust, moisture, lint, and grease. Over time, these particles accumulate inside the devices. Dust blocks cooling fans and ventilation ports, leading to overheating. Overheating degrades hardware components and reduces processing speed. Moisture and grease can cause corrosion on electronic circuits, leading to short circuits and system failure. Regular cleaning and simple maintenance prevent these issues and extend the lifespan of the hardware.
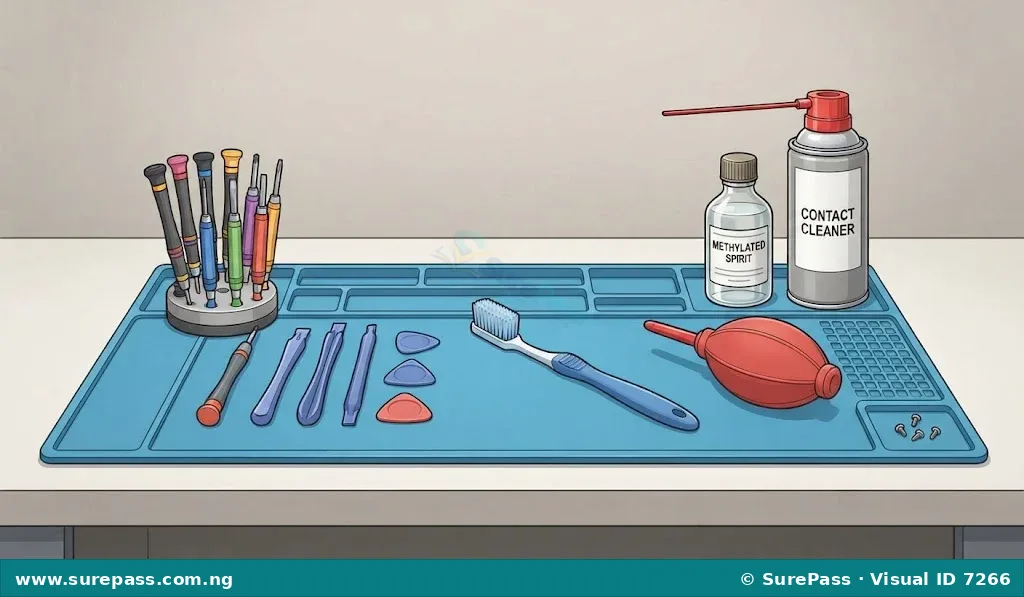
Tools and Materials for Servicing
To carry out effective servicing of computers and mobile phones, specific tools and materials are required. Using the correct tools prevents physical damage to the delicate components of the devices.
The essential tools and materials used during servicing include:
- Screwdrivers: Precision screwdrivers of various sizes (such as Phillips, Torx, and flathead) are used to loosen and tighten the screws holding the device casing and internal components together.
- Pry Tools: Plastic opening tools, guitar picks, or spudgers are used to separate clipped plastic casings without scratching or denting the device.
- Soft Brushes: Clean, soft-bristled brushes, such as toothbrushes or anti-static brushes, are used to gently sweep away loose dust from circuit boards, ports, and fans.
- Air Blowers: Manual rubber squeeze blowers or cans of compressed air are used to blow dust out of hard-to-reach areas like heat sinks, vents, and charging ports.
- Magnetic Screw Mats: These magnetic mats hold loose screws and small metal parts in place, preventing them from rolling away or getting lost during disassembly.
- Cleaning Fluids: Chemical solvents are used to dissolve grease, remove corrosion, and clean electrical contacts.
Liquids Used to Service Computers and Mobile Phones
Cleaning liquids are essential for removing stubborn dirt, grease, and oxidation from electronic components. However, not all liquids are safe for electronic devices. Using the wrong liquid can permanently damage plastic parts, dissolve adhesive glues, or cause electrical short circuits.
Methylated spirit is a form of industrial alcohol used as a solvent for cleaning electronic components because it evaporates quickly without leaving water residue.
It is highly effective for cleaning printed circuit boards (PCBs), keypad contacts, and metal connectors. It dissolves grease and removes light corrosion without damaging the copper tracks on the board.
Contact cleaner is a specialized chemical solvent designed to clean electrical contacts, switches, and connectors by removing dirt, oxidation, and grease.
It is usually packaged in pressurized aerosol cans with a thin straw nozzle, allowing technicians to spray the fluid directly into tight spaces like charging ports, headphone jacks, and power switches. It evaporates almost instantly and leaves no residue.
Thinner is a strong chemical solvent primarily used to dilute oil-based paints, but it is sometimes used in workshops to clean heavy corrosion off bare metal parts.
Thinner must be used with extreme caution. It is highly aggressive and will melt plastic casings, dissolve rubber seals, and strip protective coatings off circuit boards if applied incorrectly.
Fuel, such as petrol, is a highly volatile hydrocarbon liquid that can dissolve grease and oil.
While fuel is occasionally used as a cheap cleaning alternative in informal workshops, it is highly discouraged. Fuel is extremely flammable, leaves a greasy residue that attracts dust, emits toxic fumes, and can damage plastic and rubber components.
The properties and safety levels of these liquids are summarized below:
- Methylated Spirit: High safety level. Excellent for PCBs and metal contacts. Evaporates quickly. Safe for most plastics.
- Contact Cleaner: High safety level. Excellent for ports, switches, and connectors. Evaporates instantly. Safe for electronics.
- Thinner: Low safety level. Highly destructive to plastics and rubber. Should only be used on bare metal components with extreme care.
- Fuel (Petrol): Very low safety level. Highly flammable. Leaves a residue that attracts dust. Damaging to plastics. Avoid using for electronics.
Safety Precautions When Applying Cleaning Fluids
Working with chemical solvents requires strict adherence to safety rules to protect both the technician and the electronic equipment.
Important safety guidelines include:
- Power Down the Device: Always turn off the computer or mobile phone and remove the battery (if removable) before applying any liquid. Never apply fluids to a powered device.
- Avoid Direct Pouring: Never pour or spray cleaning liquids directly onto circuit boards or screens. Dampen a soft brush, cotton swab, or lint-free cloth with the liquid first, then apply it to the component.
- Ensure Adequate Ventilation: Work in a well-ventilated room or near an open window to avoid inhaling toxic fumes from methylated spirit, contact cleaner, or thinner.
- Keep Away from Fire: All cleaning solvents are highly flammable. Keep them away from open flames, soldering irons, and hot air stations.
- Allow Complete Drying: Ensure the cleaned components are completely dry before reassembling and powering on the device. Even fast-evaporating liquids can cause short circuits if power is applied while they are still wet.
Procedure for Servicing a Computer
Servicing a computer involves disassembling the casing, removing accumulated dust from cooling systems, cleaning the ports, and testing the system to ensure it runs cool and quiet.
Step 1: Disassembly
The procedure for disassembling a computer involves the following steps:
- Shut down the computer completely and unplug the power cable from the wall outlet.
- Disconnect all external peripherals, including the monitor, keyboard, mouse, and network cables.
- Place the computer tower on a clean, flat workstation.
- Use the appropriate screwdriver to remove the screws securing the side panel of the computer case.
- Place the removed screws on a magnetic screw mat to keep them organized.
- Gently slide off the side panel to expose the internal components, such as the motherboard, CPU fan, RAM modules, and power supply unit.
Step 2: Cleaning Fans, Vents, and Ports
The procedure for cleaning the internal parts involves the following steps:
- Locate the CPU cooling fan and the system exhaust fans.
- Hold the fan blades stationary with a finger or a plastic tool to prevent them from spinning rapidly, which can damage the fan motor.
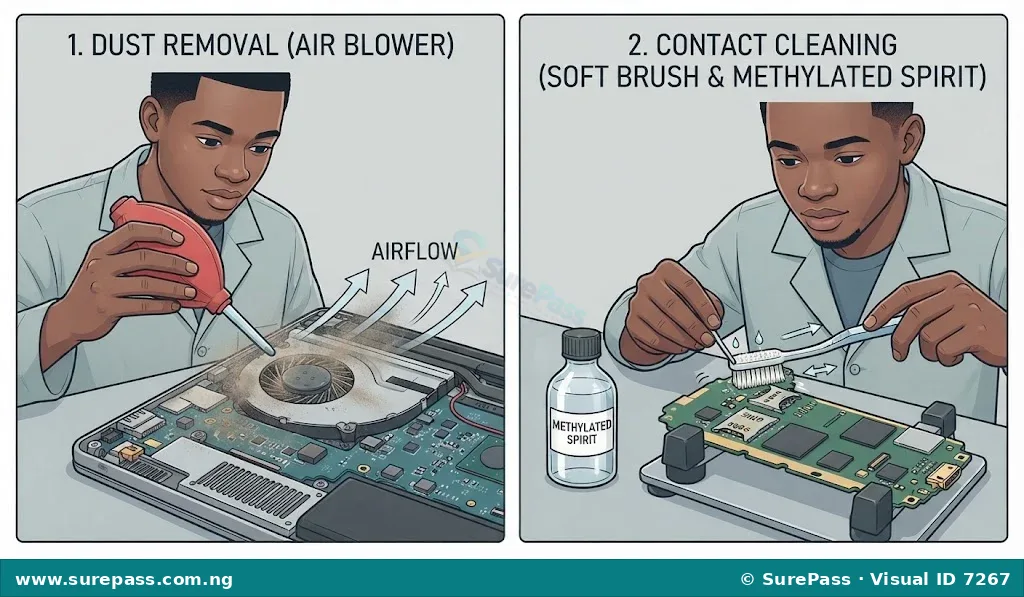
- Use a manual air blower or a can of compressed air to blow dust out from between the fan blades and the metal heat sink fins beneath the fan.
- Use a soft-bristled brush to sweep away stubborn dust clumps from the fan blades and the ventilation grilles on the computer case.
- Direct the air blower into the external ports (USB ports, HDMI ports, and audio jacks) to clear out lint and loose dirt.
- Dampen a soft brush with a small amount of methylated spirit and gently scrub the metal contacts of the RAM slots and expansion card slots if they appear dirty or oxidized.
Step 3: Reassembly
The procedure for reassembling the computer involves the following steps:
- Inspect the inside of the case to ensure no loose brush bristles, dust clumps, or tools are left behind.
- Align the side panel of the computer case back onto the chassis.
- Retrieve the screws from the magnetic screw mat and tighten them to secure the side panel.
- Reconnect the external peripherals, including the monitor, keyboard, and mouse.
- Plug the power cable back into the wall outlet.
Step 4: Testing Functionality
The procedure for testing the serviced computer involves the following steps:
- Press the power button to turn on the computer.
- Listen closely to the cooling fans to ensure they spin smoothly and quietly without making grinding or rattling noises.
- Observe the monitor screen to verify that the operating system boots up successfully without errors.
- Insert a USB drive into each cleaned USB port to confirm that the computer detects external storage devices properly.
- Monitor the system temperature using diagnostic software to verify that the CPU is running at a safe, cool temperature.
Procedure for Servicing a Mobile Phone
Mobile phones are highly compact and delicate. Servicing them requires precision, patience, and gentle handling to avoid tearing flexible ribbon cables or cracking the screen.
Step 1: Disassembly
The procedure for disassembling a mobile phone involves the following steps:
- Power off the mobile phone completely.
- Remove the SIM card tray and any external memory cards using a SIM ejector tool.
- If the phone has a removable back cover, pry it open gently using a plastic pry tool. If the back cover is glued, apply mild heat to soften the adhesive before prying it open.
- Locate and remove the small screws securing the internal plastic mid-frame or shield plates, placing them carefully on the magnetic screw mat.
- Disconnect the battery connector from the motherboard first using a plastic spudger to cut off electrical power.
- Disconnect any visible ribbon cables (such as the display cable, charging port flex cable, and camera connectors) by gently lifting them off their sockets.
- Carefully lift the motherboard out of the phone housing.
Step 2: Cleaning Internal Boards, Ports, and Contacts
The procedure for cleaning the mobile phone components involves the following steps:
- Place the motherboard on an anti-static work pad.
- Inspect the board under a magnifying glass or bright light to identify areas with dirt, corrosion, or liquid damage.
- Dip a clean toothbrush into a small container of methylated spirit, shaking off any excess liquid so the brush is only damp.
- Gently scrub the corroded areas, gold-plated keypad contacts, and battery terminal connectors on the motherboard.
- Spray a small amount of contact cleaner directly into the charging port and headphone jack to dissolve accumulated pocket lint and grease.
- Use a fine plastic pick or a dry toothbrush to sweep out the loosened dirt from inside the charging port.
- Use a manual air blower to dry the motherboard and ports completely.
Step 3: Reassembly
The procedure for reassembling the mobile phone involves the following steps:
- Carefully place the motherboard back into its position within the phone housing.
- Reconnect all ribbon cables by aligning them with their sockets and pressing down gently until they click into place.
- Reconnect the battery connector to the motherboard.
- Place the plastic mid-frame or shield plates back over the board.
- Retrieve the screws from the magnetic screw mat and tighten them back into their original positions.
- Snap the back cover back onto the phone housing, ensuring all clips are securely locked.
- Reinsert the SIM card tray and memory card.
Step 4: Testing Functionality
The procedure for testing the serviced mobile phone involves the following steps:
- Press and hold the power button to turn on the mobile phone.
- Verify that the screen lights up and the touch interface responds accurately across the entire display.
- Plug in a compatible charger to confirm that the phone detects the charger and displays the charging icon.
- Make a test phone call to verify that the microphone, earpiece, and loudspeaker are working clearly.
- Insert a SIM card to check if the phone successfully connects to the mobile network.
- Test the volume buttons and power button to ensure they click and function properly.
Summary of Maintenance Practices
Regular cleaning and simple maintenance prevent major hardware failures. Technicians must always match the correct cleaning fluid to the specific component being serviced. Using methylated spirit and contact cleaner safely ensures that delicate electronic circuits remain free of dust and corrosion without suffering chemical damage. Following systematic disassembly, cleaning, reassembly, and testing procedures guarantees that both computers and mobile phones remain fully functional and reliable.




0 comments
Open the discussion when you need it. Comments stay collapsed until requested so the initial article remains light.