



ARTICLE CONTENTSOn this page 8 sections
Guidelines for taking body measurement
Performance Objectives
By the end of the lesson, students should be able to:
- state reasons for taking body measurements;
- identify the essential body parts to be measured;
- discuss guidelines and principles of taking body measurements for garment construction;
- take and record body measurements.
Reasons for Taking Body Measurements
Body measurement is the process of taking precise physical dimensions of a human body using a measuring tool to facilitate garment design and construction.
In fashion design and garment making, taking accurate body measurements is the foundational step that determines the success of the finished apparel. Guessing or estimating sizes often leads to poorly fitting clothes that require extensive corrections.
The main reasons for taking body measurements include:
- Ensuring a Perfect Fit: Accurate measurements guarantee that the finished garment conforms comfortably to the unique shape and proportions of the wearer’s body without being too tight or too loose.
- Facilitating Accurate Pattern Drafting: Pattern drafting relies on mathematical calculations based on specific body dimensions. Correct measurements ensure that the drafted paper patterns are structurally sound.
- Estimating Fabric Requirements: Knowing the exact dimensions of the client helps the designer calculate the precise yardage of fabric needed for the style, thereby preventing fabric wastage or shortage.
- Guiding Style Selection: Body measurements reveal the figure type and proportions of the individual, which helps the designer recommend garment styles that enhance the wearer’s appearance.
- Minimizing Alterations: Getting the measurements right at the beginning saves time, energy, and resources by reducing the need to adjust, rip apart, or re-sew finished garments.
- Maintaining Professional Standards: Keeping accurate records of client measurements builds trust and ensures consistency in custom tailoring and commercial clothing production.
Essential Body Parts and Landmarks for Measurement
Anatomical landmarks are specific, identifiable points on the human body used as reference markers to ensure measuring tapes are placed consistently and accurately.
To obtain reliable measurements, a garment maker must identify specific body parts and their corresponding landmarks. The essential body parts and their landmarks are:
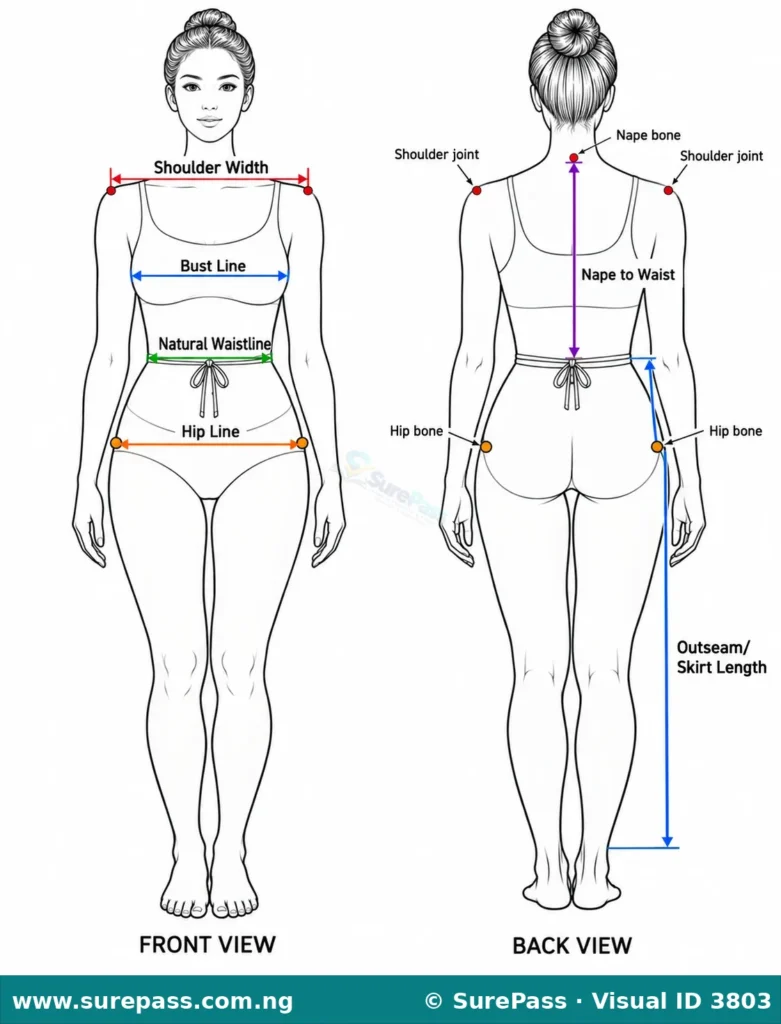
- Bust or Chest: This is measured horizontally around the body. The landmark is the fullest part of the bust in females, or the broadest part of the chest in males, keeping the tape straight across the shoulder blades at the back.
- Waist: This is measured horizontally around the torso. The landmark is the natural waistline, which is the narrowest part of the torso, usually located slightly above the belly button.
- Hips: This is measured horizontally around the lower body. The landmark is the fullest part of the buttocks, which is typically 18 to 23 centimetres below the natural waistline.
- Shoulder Width: This is measured horizontally across the upper back. The landmark is the distance from one shoulder joint (the prominent bone at the outer edge of the shoulder) to the other.
- Back Width (Across Back): This is measured horizontally between the armhole seams. The landmark is located approximately 10 centimetres below the nape of the neck, measuring from one arm crease to the other.
- Nape to Waist: This is a vertical measurement. The landmark starts from the prominent bone at the base of the neck (the seventh cervical vertebra) down to the natural waistline.
- Sleeve Length: This is measured along the arm. The landmark starts from the shoulder joint, passes over a slightly bent elbow, and ends at the wrist bone or the desired sleeve hemline.
- Garment Length: This is a vertical measurement that varies by style. For skirts and trousers, the landmark starts from the natural waistline down to the desired hem. For gowns and shirts, the landmark starts from the shoulder-neck point down to the desired length.
Observe the diagram below to identify the correct placement of measurement lines and anatomical landmarks on the human body.
Guidelines and Principles of Taking Body Measurements
To achieve high accuracy and avoid errors during garment construction, certain professional guidelines and principles must be followed. Adhering to these rules ensures that the measurements reflect the true dimensions of the body.
The essential guidelines and principles include:
- Wear Appropriate Undergarments: The person being measured should wear the exact type of undergarments or close-fitting clothing they plan to wear with the finished garment. Bulky clothes, thick sweaters, or heavy jeans distort the measurements.
- Maintain Correct Posture: The subject must stand upright, relaxed, and natural, with feet together and weight evenly distributed on both legs. Slouching, breathing in excessively, or stiffening the body will result in incorrect measurements.
- Use a High-Quality Tape Measure: A flexible, non-stretch fiberglass or plastic tape measure with clear markings in both centimetres and inches should be used. Metal tips must be secure.
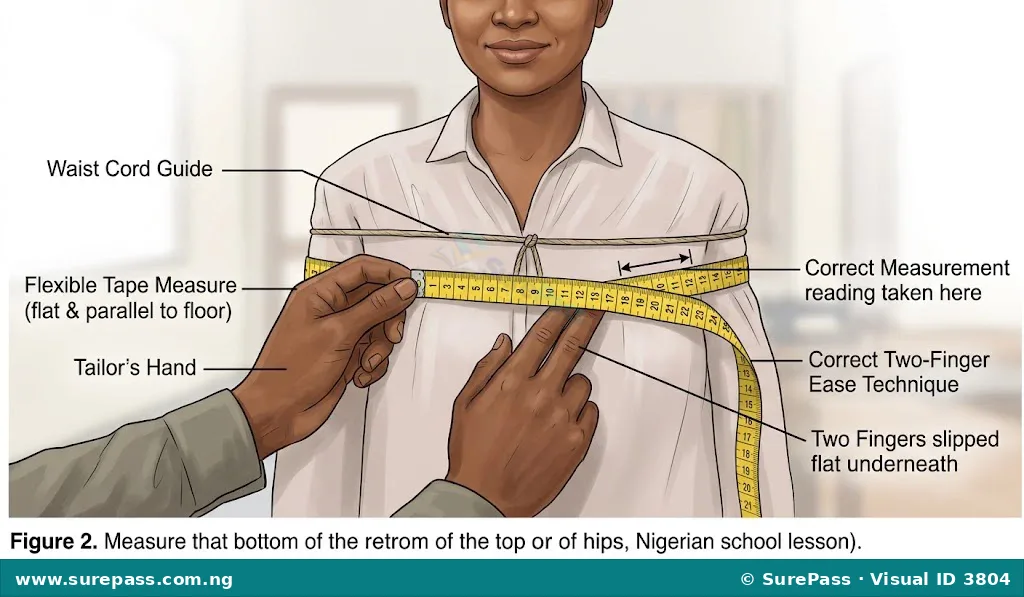
- Identify and Mark the Waistline: Before taking any measurements, tie a narrow cord, elastic band, or tape firmly but comfortably around the natural waistline. This establishes a fixed reference point for both horizontal and vertical measurements.
- Position the Tape Measure Correctly: Keep the tape measure parallel to the floor for all horizontal measurements (bust, waist, hips). Ensure the tape does not sag at the back.
- Allow for Ease: Do not pull the tape too tight or let it sag. Insert two fingers flat under the tape measure to allow for breathing and movement ease, unless drafting a highly fitted stretch garment.
- Measure in a Systematic Order: Start with horizontal measurements from the top of the body downward, followed by vertical measurements. This systematic approach prevents omissions and saves time.
- Work with a Partner: A person cannot measure themselves accurately. Always have a trained partner or tailor take the measurements while the subject stands still.
The diagram below illustrates the correct method of holding the tape measure and applying the ease rule.
How to Take and Record Body Measurements
This practical procedure outlines the steps required to measure a client and record the dimensions systematically in a measurement chart.
The required tools and materials are:
- A flexible, non-stretch tape measure
- A narrow cord or elastic band
- A measurement notebook or chart
- A pencil or pen
Step-by-Step Measurement Procedure
The procedure involves the following steps:
- Prepare the Subject: Ask the subject to stand in a natural, upright posture. Tie the narrow cord or elastic band around the natural waistline. Let the cord settle into the natural crease of the waist.
- Measure the Shoulder Width: Stand behind the subject. Place the tape measure at the outer edge of one shoulder joint. Stretch the tape horizontally across the back to the outer edge of the opposite shoulder joint. Record the value.
- Measure the Bust/Chest: Stand to the side of the subject. Pass the tape measure around the fullest part of the bust or chest. Ensure the tape is horizontal and parallel to the floor all the way around. Slide two fingers flat under the tape for ease before reading the measurement.
- Measure the Waist: Wrap the tape measure around the waistline, directly over the tied cord. Keep the tape snug but not tight. Read and record the measurement.
- Measure the Hips: Wrap the tape measure around the fullest part of the hips and buttocks. Ensure the tape remains parallel to the floor. Slide two fingers flat under the tape and record the measurement.
- Measure the Nape to Waist: Stand behind the subject. Place the start of the tape measure at the prominent bone at the base of the neck. Extend the tape vertically down the spine to the cord tied at the waist. Record the measurement.
- Measure the Sleeve Length: Ask the subject to bend their elbow slightly. Place the tape at the shoulder joint, pass it over the elbow, and extend it down to the wrist bone. Record the measurement.
- Measure the Skirt or Trouser Length: Place the start of the tape at the waist cord. Extend the tape vertically down the side of the body to the desired hemline (knee, calf, or ankle). Record the measurement.
Recording Body Measurements
Measurements must be recorded immediately and clearly in a structured table to avoid confusion during pattern drafting. The table below shows a standard format for recording measurements.
| S/N | Body Part / Measurement Type | Measurement (Inches) | Measurement (Centimetres) | Remarks / Style Notes |
|---|---|---|---|---|
| 1 | Shoulder Width | 15 | 38 | Standard shoulder |
| 2 | Bust / Chest | 34 | 86 | Measured with two-finger ease |
| 3 | Waist | 28 | 71 | Measured over waist cord |
| 4 | Hips | 38 | 96 | Measured at fullest part |
| 5 | Nape to Waist | 14 | 35.5 | Vertical back measurement |
| 6 | Sleeve Length | 22 | 56 | Long sleeve, elbow slightly bent |
| 7 | Skirt Length | 24 | 61 | Knee-length skirt |
Summary of Key Measurement Principles
To maintain accuracy, always double-check every measurement before writing it down. Ensure the client does not look down while being measured, as bending the neck alters vertical back and front measurements. Finally, keep the tape flat against the body without twisting it at any point during the process.
Evaluation Exercises
Answer the following questions to review the unit:
- State four reasons why accurate body measurements are necessary in garment construction.
- Define anatomical landmarks and explain their importance in tailoring.
- Identify the specific anatomical landmarks used for measuring the waist, hips, and shoulder width.
- Discuss four guidelines that must be followed to ensure accuracy when taking body measurements.
- Explain the “two-finger ease” rule and state when it should be applied.
- Draft a blank measurement recording table suitable for taking a client’s dress measurements.





0 comments
Open the discussion when you need it. Comments stay collapsed until requested so the initial article remains light.