



ARTICLE CONTENTSOn this page 9 sections
Methods of cutting out fabrics for sewing garments.
Performance Objectives
By the end of the lesson, students should be able to:
- state the procedure involved in sewing garment;
- identify different methods of cutting out fabrics for sewing garments;
- describe the principles and techniques involved in freehand method;
- discuss the advantages and disadvantages of freehand method of cutting out;
- practice how to measure directly on fabrics for cutting out;
- Cut and stitch simple baby dress.
Procedure for Sewing Garments
Garment construction is a systematic process that requires careful planning and execution. Following a logical sequence ensures that the finished garment fits well, looks professional, and is durable.
The standard procedure for sewing a garment consists of several sequential steps:
- Design Selection: Choosing the style, sketch, or model of the garment to be made, keeping in mind the wearer’s figure and the purpose of the clothing.
- Fabric Selection: Selecting a suitable fabric that matches the chosen design in terms of weight, drape, texture, and color.
- Taking Body Measurements: Measuring the wearer accurately using a flexible measuring tape to obtain the dimensions required for the garment.
- Fabric Preparation: Preparing the fabric before cutting. This includes pre-shrinking (washing cottons), straightening the grainline, and pressing out all wrinkles with an iron.
- Pattern Drafting or Direct Marking: Creating paper patterns based on the measurements, or marking the measurements directly onto the fabric using tailor’s chalk.
- Laying Out and Cutting: Placing the pattern pieces on the fabric according to the grainline, pinning them securely, and cutting the fabric pieces using sharp shears.
- Assembling and Tacking: Joining the cut fabric pieces temporarily using hand-basting or tacking stitches to check the fit.
- Fitting and Adjustment: Trying the basted garment on the wearer or a dress form to make necessary adjustments to the seams and ease.
- Permanent Stitching: Sewing the seams permanently using a sewing machine, finishing the raw edges, and attaching fasteners such as zippers, buttons, or hooks.
- Final Pressing and Finishing: Pressing the completed garment thoroughly to flatten seams and give it a neat, professional appearance.
Methods of Cutting Fabrics
Cutting out is the process of transferring a design shape onto fabric and using shears to cut the individual pieces needed to assemble a garment.
There are two primary methods used to cut out fabrics in garment making:
- The Freehand Method
- The Pattern Method
The Freehand Method
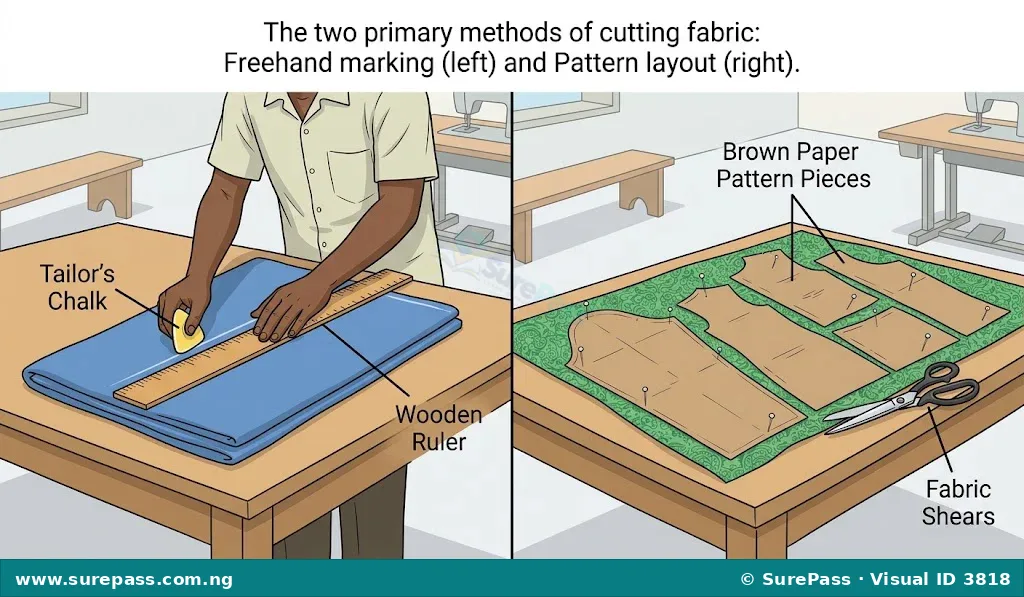
The freehand method is a technique where body measurements are calculated and drawn directly onto the fabric using tailor’s chalk and rulers, without the use of paper patterns.
In this method, the garment maker relies on mental calculations, experience, and geometric guidelines to draft the garment shapes directly onto the folded fabric before cutting.
The Pattern Method
The pattern method is a technique where paper templates, representing different parts of a garment, are laid onto the fabric, pinned, and used as a guide for cutting.
These patterns can be commercial patterns purchased from shops, or flat-pattern drafts created on brown paper using specific body measurements.
Observe the comparison of the two cutting methods below.
Principles and Techniques of the Freehand Method
Successful freehand cutting requires a deep understanding of body proportions, fabric behavior, and basic geometry. Because there is no paper pattern to act as a safety net, specific principles must be strictly followed.
The core principles of the freehand method include:
- Fabric Alignment and Grainline: Fabric must be folded straight along the grainline (selvage to selvage). Cutting off-grain causes the finished garment to twist, drape poorly, or stretch unevenly.
- Folding for Symmetry: Fabric is usually folded in half with the right sides facing inward. This ensures that left and right pieces (such as sleeves, front panels, or trouser legs) are cut symmetrically and that chalk markings remain on the wrong side of the fabric.
- Accurate Measurement Division: Since body measurements represent the total circumference of the body, they must be divided mathematically to fit the folded fabric. For example, bust, waist, and hip measurements are divided by four when drafting on a four-fold fabric layout.
- Inclusion of Allowances: Seam allowances (usually 1.5 cm to 2.5 cm) and ease allowances (for movement and comfort) must be added directly to the measurements during the marking stage. Forgetting to add these allowances results in a garment that is too tight.
- The “Measure Twice, Cut Once” Rule: All marked lines must be re-measured and verified against the measurement chart before the scissors touch the fabric.
The techniques used in freehand cutting involve:
- Establishing Base Lines: Drawing a straight horizontal line near the top edge of the fabric to act as the shoulder line, from which all vertical measurements are taken.
- Marking Vertical Construction Lines: Measuring down from the shoulder line to mark the chest line, waistline, hip line, and full length of the garment.
- Marking Horizontal Widths: Measuring horizontally along the construction lines to mark the divided bust, waist, and hip widths, plus allowances.
- Shaping Curves: Using curved rulers or freehand drawing to connect the marked points for armholes, necklines, and hip curves.
The diagram below illustrates how construction lines are mapped directly onto fabric.
Advantages and Disadvantages of the Freehand Method
The freehand method is widely used by custom tailors and fashion designers in Nigeria. While it offers speed and flexibility, it also carries risks that require high skill to manage.
The advantages of the freehand method are:
- Time-Saving: It eliminates the time spent drafting, cutting, and transferring paper patterns, allowing the tailor to cut the fabric immediately.
- Cost-Effective: It saves money because there is no need to purchase pattern paper, commercial patterns, or tracing wheels.
- Custom Fit: It allows the designer to easily adapt the cutting lines to accommodate unique body shapes and physical irregularities directly on the fabric.
- Space Efficiency: It requires less storage space because there are no physical paper patterns to store, organize, or preserve.
- Design Flexibility: It allows the designer to make spontaneous creative changes to the style, neckline, or length during the marking process.
The disadvantages of the freehand method are:
- High Risk of Fabric Waste: Any mistake made during marking or cutting is made directly on the fabric, which can ruin expensive material.
- Difficulty in Replication: It is very difficult to recreate the exact same garment with identical dimensions at a later date, as no permanent paper pattern exists.
- Requires High Skill: It demands excellent mental calculation, a strong grasp of geometry, and extensive experience to avoid fitting errors.
- Unsuitable for Mass Production: It cannot be used in industrial garment factories where hundreds of identical garments must be cut simultaneously using cutting machines.
Practical Guide: Transferring Body Measurements Directly onto Fabric
This practical exercise demonstrates how to transfer basic upper-body measurements onto fabric to prepare for cutting.
The required tools and materials are:
- Cotton fabric (at least 1 meter)
- Flexible tape measure
- Tailor’s chalk (in a color that contrasts with the fabric)
- Long straight ruler (T-square or L-square)
- Curved ruler (French curve)
- Pins
- Fabric shears
The procedure involves the following steps:
- Prepare the Fabric: Iron the fabric to remove all creases. Fold the fabric in half lengthwise, right sides facing inside, matching the selvages. Lay it flat on a clean cutting table.
- Draw the Starting Line: Place the straight ruler near the top raw edge of the fabric and draw a straight horizontal line. This is the shoulder line.
- Mark the Neckline: Along the shoulder line, measure from the folded edge and mark the neck width (typically 7 cm for standard adult sizes). Measure down along the fold to mark the neck depth, then use the curved ruler to draw the neckline curve.
- Mark the Shoulder Width: From the folded edge along the shoulder line, measure and mark half of the shoulder-to-shoulder measurement. Drop this point down by 1.5 cm to create the shoulder slope, and draw a slanted line from the neck width point to this new point.
- Mark Vertical Depths: From the shoulder line, measure vertically down along the fold and mark the chest depth (armhole depth) and the shoulder-to-waist length. Draw horizontal lines across the fabric at these points.
- Apply Horizontal Widths: On the chest line, measure from the fold and mark one-quarter of the chest circumference plus 2 cm for ease and 2 cm for seam allowance. Repeat this on the waistline using one-quarter of the waist circumference plus allowances.
- Draw the Armhole and Side Seam: Draw a vertical line down from the shoulder slope point to the chest line. Use the curved ruler to draw the armhole curve from the shoulder slope to the chest width point. Use the straight ruler to connect the chest width point to the waist width point to form the side seam.
- Secure and Cut: Place pins inside the marked lines to hold the two layers of fabric together. Cut carefully along the marked outer lines, keeping the shears flat on the table.
Practical Project: Cutting and Stitching a Simple Baby Dress
A simple A-line baby dress is an excellent project for practicing freehand cutting and basic stitching. It requires minimal fabric and simple seams.
The required materials are:
- 1 yard of lightweight cotton fabric
- Matching sewing thread
- Tape measure
- Tailor’s chalk
- Pins
- Fabric shears
- Sewing machine or hand-sewing needle
- Bias binding tape (for finishing the neck and armholes)
The cutting procedure involves the following steps:
- Fold the Fabric: Fold the fabric into four layers. First, fold it in half lengthwise, then fold it in half crosswise. The double-folded corner will represent the center-front and center-back neck point.
- Mark the Neckline: From the double-folded corner, measure 5 cm horizontally for the neck width and 5 cm vertically for the front neck depth. Draw a curve. (For the back neck depth, mark only 2 cm down on the back layer later).
- Mark the Shoulder and Armhole: From the folded edge, measure 10 cm along the top fold for the shoulder. From that point, measure 12 cm straight down for the armhole depth.
- Mark the Chest and Flare: At the bottom of the armhole depth, measure 16 cm from the fold (this includes ease and seam allowance) to establish the chest line. From this chest point, draw a diagonal line slanting outwards to the bottom hem of the fabric to create the A-line flare.
- Cut the Dress: Cut along the marked neckline, armhole, and slanted side seam. Separate the front and back pieces, and deepen the front neckline slightly as marked.
Look at the pattern layout for the baby dress below.
The stitching procedure involves the following steps:
- Join the Shoulders: Place the front and back dress pieces with right sides facing together. Pin the shoulder seams, then sew them using a flat seam (1 cm seam allowance). Press the seams open.
- Finish the Neckline: Unfold the dress. Pin bias binding tape around the raw edge of the neckline on the right side. Stitch along the fold of the tape, fold it over to the wrong side of the fabric, pin, and topstitch to create a clean finish.
- Finish the Armholes: Apply bias binding tape to both armhole edges in the same manner as the neckline.
- Sew the Side Seams: Fold the dress inside out, matching the front and back side seams. Pin from the underarm down to the hem. Stitch both side seams using a 1 cm seam allowance and finish the raw edges with a zigzag stitch or overcasting.
- Hem the Bottom: Fold the bottom raw edge up by 0.5 cm, then fold it again by 1 cm to conceal the raw edge. Pin, press, and stitch the hem in place.
- Final Press: Press the completed baby dress thoroughly to set all the seams.
Summary of Cutting Methods
The table below summarizes the key differences between the freehand and pattern methods of cutting fabric.
| Feature | Freehand Method | Pattern Method |
|---|---|---|
| Drafting Medium | Marked directly on the fabric. | Drafted first on paper templates. |
| Speed | Very fast; cuts out intermediate steps. | Slower; requires pattern preparation. |
| Risk Level | High; mistakes can ruin the fabric. | Low; mistakes are corrected on paper. |
| Reusability | Cannot be reused easily. | Patterns can be stored and reused. |
| Skill Requirement | Requires advanced mental calculation. | Suitable for beginners and mass production. |




0 comments
Open the discussion when you need it. Comments stay collapsed until requested so the initial article remains light.