




ARTICLE CONTENTSOn this page 7 sections
Textiles II
Performance Objectives
By the end of the lesson, students should be able to:
- practice the fundamentals of knitting and crocheting to create items like throws or other furnishings;
- embellish fabric through embroidery or applique techniques;
- practice using sewing machines for straight stitches and learn basic hand-sewing techniques for repairs and embellishments;
- sew simple garments from a pattern, focusing on skills like attaching facings and fastenings neatly.
Fundamentals of Knitting and Crocheting
Knitting is a method of constructing fabric by interlocking loops of yarn using two or more pointed needles.
This technique produces elastic, flexible fabrics suitable for garments and household furnishings. The process can be done by hand or with knitting machines.
Crocheting is a method of creating fabric from yarn or thread using a single hooked needle called a crochet hook.
Unlike knitting, where multiple active loops are held on needles simultaneously, crocheting typically involves securing each stitch before moving on to the next, with only one active loop remaining on the hook.
Tools and Materials for Knitting and Crocheting
The successful creation of knitted or crocheted items depends on selecting the correct tools and materials.
The essential tools and materials include:
- Knitting needles: These are long, pointed rods made of plastic, wood, aluminum or bamboo, used in pairs to hold and manipulate yarn loops.
- Crochet hooks: These are single rods with a curved hook at one end, made of metal, plastic or wood, used to catch and pull yarn through loops.
- Yarn: This is a continuous strand of spun fibers, which can be made from wool, cotton, acrylic or blended fibers, available in various thicknesses or weights.
- Scissors: These are sharp cutting tools used to trim yarn cleanly.
- Tape measure: This is a flexible measuring tool used to check the dimensions of the work.
- Tapestry needle: This is a blunt needle with a large eye used for weaving in loose yarn ends and sewing knitted or crocheted pieces together.
Basic Knitting Stitches
Knitting relies on two fundamental stitches to create various patterns and textures.
The basic stitches and techniques in knitting are:
- Casting on: This is the initial process of creating the first row of loops on the knitting needle.
- Knit stitch: This is the primary stitch made by inserting the right needle from front to back through the loop on the left needle, wrapping the yarn, and pulling a new loop through.
- Purl stitch: This is the reverse of the knit stitch, made by inserting the right needle from back to front through the loop on the left needle, wrapping the yarn, and pulling a new loop through.
- Casting off: This is the final process of securing the active loops at the end of the project to prevent the fabric from unravelling.
Basic Crochet Stitches
Crochet patterns are built from combinations of a few foundational stitches.
The basic stitches in crocheting are:
- Chain stitch: This is the starting stitch formed by wrapping yarn over the hook and pulling it through the active loop to create a chain of loops.
- Slip stitch: This is a short stitch used to join chains into rings or to move yarn across a row without adding height.
- Single crochet: This is a tight, dense stitch made by inserting the hook into a stitch, wrapping the yarn, pulling it through, wrapping the yarn again, and pulling it through both loops on the hook.
- Double crochet: This is a taller, looser stitch made by wrapping the yarn over the hook before inserting it into a stitch, pulling a loop through, and then wrapping and pulling through two loops at a time.
How to Create a Simple Knitted or Crocheted Throw
A throw is a small decorative blanket that can be placed over chairs, sofas or beds.
The required materials are:
- Two skeins of thick acrylic yarn
- A pair of size 8mm knitting needles or a 10mm crochet hook
- A tape measure
- A pair of scissors
- A large tapestry needle
The procedure for knitting a simple throw involves the following steps:
- Cast on 80 stitches onto one of the knitting needles.
- Knit every stitch in the row from left to right to create the first row of garter stitch.
- Turn the work and knit every stitch in the second row.
- Repeat this knitting process for every subsequent row until the piece measures approximately 120 centimeters in length.
- Cast off all 80 stitches carefully to secure the edge of the throw.
- Cut the yarn, leaving a tail of about 15 centimeters.
- Thread the yarn tail into the tapestry needle and weave it neatly into the edges of the throw to hide it.
Fabric Embellishment Techniques
Fabric embellishment is the process of adding decorative details, designs or patterns to the surface of a fabric to improve its appearance.
These techniques can be used to decorate new garments, household linens or to cover stains and tears on old fabrics.
Embroidery
Embroidery is the art of decorating fabric or other materials using a needle and thread or yarn.
It can be done by hand or machine, using different types of embroidery threads, such as stranded cotton or silk, to create beautiful designs.
Common hand embroidery stitches include:
- Stem stitch: This is a thin, rope-like stitch used for outlining shapes, stems of flowers, and fine lines.
- Chain stitch: This is a looped stitch that forms a continuous chain-like pattern, useful for outlining or filling shapes.
- Satin stitch: This is a series of flat, parallel stitches worked closely together to completely fill a design area with a smooth, satin-like texture.
- French knot: This is a decorative knot stitch made by wrapping the thread around the needle several times before inserting it back into the fabric, used for flower centers or textured details.
- Lazy daisy: This is a single, detached chain stitch shaped like a petal, commonly grouped together to form simple flower designs.
Applique
Applique is a decorative technique where pieces of fabric are sewn or fastened onto a larger piece of background fabric to form designs or patterns.
The edges of the applied fabric pieces are usually finished with decorative stitches to prevent fraying and to secure them firmly.
The procedure for applying applique involves the following steps:
- Draw the desired design on a piece of paper to create a template.
- Cut out the paper template and pin it onto the embellishing fabric.
- Cut the fabric along the edges of the template, leaving a small margin if the edges are to be folded under, or cutting exactly on the line if using non-fraying fabric.
- Position the cut-out fabric design onto the background fabric and secure it with pins or fabric glue.
- Tack the design in place with temporary running stitches to prevent shifting during final sewing.
- Stitch around the edges of the design using a close blanket stitch, satin stitch or zigzag machine stitch to secure it permanently.
- Remove the temporary tacking stitches and press the completed applique with a warm iron.
Sewing Machine Operations and Hand-Sewing Techniques
Garment construction and repairs require a combination of machine sewing skills and hand-sewing techniques.
Using Sewing Machines for Straight Stitches
The straight stitch is the most common and fundamental stitch produced by a sewing machine, used for joining seams, topstitching, and basting.
The procedure for sewing straight stitches on a sewing machine involves the following steps:
- Place the sewing machine on a flat, sturdy table and ensure it is properly threaded.
- Adjust the stitch length regulator to the desired setting, usually between 2 and 2.5 millimeters for standard seams.
- Raise the needle to its highest position and lift the presser foot.
- Place the fabric pieces together, aligning the raw edges, and slide them under the presser foot.
- Align the edge of the fabric with the seam guide line on the needle plate to ensure a consistent seam allowance.
- Lower the presser foot onto the fabric.
- Turn the handwheel slowly toward you to lower the needle into the fabric at the starting point.
- Gently press the foot pedal or turn the handwheel to begin sewing, guiding the fabric lightly with both hands without pulling or pushing it.
- Sew two or three stitches forward, then press the reverse lever to sew backward over the stitches to secure the seam end.
- Continue sewing forward in a straight line, keeping the fabric edge aligned with the guide.
- At the end of the seam, sew backward for two or three stitches to lock the seam, then raise the needle and presser foot.
- Pull the fabric gently to the back of the machine and cut the threads using the thread cutter or scissors.
Basic Hand-Sewing Techniques for Repairs and Embellishments
Hand-sewing is essential for quick repairs, delicate finishes, and decorative embellishments that cannot be easily done by machine.
Common hand-sewing stitches include:
- Running stitch: This is a simple stitch made by passing the needle in and out of the fabric at regular intervals, used for temporary basting, gathering, and simple decorative lines.
- Backstitch: This is a strong, secure stitch made by taking a stitch backward and then bringing the needle out a stitch length ahead, used for repairing seams that require strength.
- Hemming stitch: This is a slanted stitch used to secure folded edges, such as garment hems, making the stitches almost invisible on the right side of the fabric.
- Slip stitch: This is an invisible stitch worked through folded edges, used for securing linings, facings, and delicate hems.
Sewing Simple Garments from a Pattern
Sewing a garment from a commercial pattern ensures that the finished item fits correctly and is constructed in the proper sequence.
Understanding Sewing Patterns
A sewing pattern is a template made of paper or cardboard from which the parts of a garment are traced onto fabric before being cut out and assembled.
Patterns contain markings that guide the cutting and sewing process. These markings include:
- Grainline: A straight line with arrows at both ends, indicating how the pattern piece must be aligned parallel to the selvage of the fabric.
- Place on fold line: A bracketed line indicating that the edge of the pattern piece must be placed exactly on the folded edge of the fabric.
- Notches: Diamond-shaped or triangular symbols along the cutting line used to match corresponding garment pieces accurately.
- Seamline: A dashed line indicating where the stitches should be placed, usually 1.5 centimeters from the cutting edge.
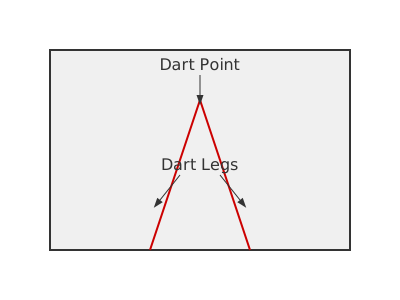
- Dart markings: V-shaped or diamond-shaped lines indicating where fabric should be folded and stitched to shape the garment to the body curves.
Attaching Facings Neatly
A facing is a piece of fabric used to finish the raw edges of a garment, such as at the neckline, armholes or front openings.
Facings are cut to match the shape of the edge they are finishing, providing a clean, professional appearance on the inside of the garment.
The procedure for attaching a facing neatly involves the following steps:
- Apply fusible interfacing to the wrong side of the facing piece to provide structure and support.
- Finish the outer raw edge of the facing using a zigzag stitch, overcasting stitch or a narrow turned hem.
- Place the facing and the garment piece together, with right sides facing each other, matching the raw edges and notches.
- Pin the facing to the garment edge securely.
- Stitch along the seamline using a straight machine stitch.
- Trim the seam allowance to about 6 millimeters to reduce bulk.
- Clip curved edges by making small cuts into the seam allowance up to, but not through, the stitching line to allow the curve to lie flat.
- Press the seam allowance toward the facing.
- Understitch the facing by sewing a straight line of stitches on the facing, very close to the seamline, catching the seam allowance underneath to prevent the facing from rolling to the outside of the garment.
- Turn the facing completely to the inside of the garment and press the edge flat with an iron.
Attaching Fastenings Neatly
A fastening is a device used to open and close a garment securely.
Fastenings must be attached neatly and securely to ensure they function properly and do not pull out of the fabric during use.
The procedure for sewing a flat button involves the following steps:
- Mark the exact position of the button on the garment using a fabric marker or chalk.
- Thread a hand-sewing needle with double thread and tie a small knot at the end.
- Bring the needle up from the wrong side of the fabric through the marked position.
- Pass the needle through one hole of the button and slide the button down to the fabric.
- Place a pin or matchstick across the top of the button, between the holes, to create a shank (space for the buttonhole fabric to sit under the button).
- Pass the needle down through the opposite hole of the button and through the fabric to the wrong side.
- Repeat this up-and-down stitching process through the holes 4 to 6 times to secure the button.
- Remove the pin or matchstick and pull the button slightly away from the fabric.
- Bring the needle up to the right side of the fabric, underneath the button, and wrap the thread tightly around the stitches 3 to 4 times to form a sturdy thread shank.
- Pass the needle to the wrong side of the fabric, make several small backstitches to secure the thread, and cut the thread close to the fabric.
The procedure for sewing a hook and eye involves the following steps:
- Mark the positions of the hook and the eye on the overlapping edges of the garment opening.
- Place the hook on the wrong side of the overlapping edge, slightly back from the edge so it remains hidden.
- Secure the hook by sewing closely spaced buttonhole stitches or overcasting stitches around the two circular loops at the base of the hook.
- Pass the needle through the fabric layers to the top of the hook and sew several stitches across the bill of the hook to hold it flat against the fabric.
- Place the eye on the right side of the underlapping edge, aligning it with the hook.
- Sew closely spaced buttonhole stitches or overcasting stitches around the two circular loops of the eye.
- Fasten the hook and eye together to check the alignment and fit before securing the thread with a knot on the wrong side of the fabric.
Summary of Textile Construction and Embellishment
The table below summarizes the key textile construction and embellishment techniques, their primary uses, and the essential tools required for each.
| Technique | Primary Use | Essential Tools Required |
|---|---|---|
| Knitting | Creating elastic fabrics for garments, throws, and furnishings | Knitting needles, yarn, tapestry needle |
| Crocheting | Creating textured fabrics, lace, and decorative borders | Crochet hook, yarn, scissors |
| Embroidery | Surface decoration using decorative stitches | Embroidery needle, embroidery hoop, stranded thread |
| Applique | Applying fabric shapes onto a background fabric for design | Scissors, pins, sewing needle, sewing machine |
| Machine Stitching | Joining seams and constructing garments quickly | Sewing machine, machine needle, sewing thread |
| Hand Sewing | Delicate finishes, repairs, and attaching fastenings | Hand-sewing needle, sewing thread, thimble |


0 comments
Open the discussion when you need it. Comments stay collapsed until requested so the initial article remains light.