


ARTICLE CONTENTSOn this page 8 sections
Textiles I
Performance Objectives
By the end of the lesson, students should be able to:
- state the meaning and types of textile;
- identify the characteristics/ properties of textile;
- create a fabric swatch book or mood board, labelling each fabric with its fiber content, origin, and suggested use;
- carryout a simple tests on different fabrics to measure properties like absorbency and shrinkage;
- use fabric paints to create designs or learn techniques like batik, tie-dye, or screen printing on fabric;
- embark on a field trip to a local textile manufacturer, weaving center, or dry-cleaning center to obtain more physical practical skills and an understanding of the textile industry.
Meaning of Textiles
A textile is any material made of interlacing fibres, including yarns, threads, and fabrics woven, knitted, crocheted, or felted together.
The study of textiles involves understanding the raw materials, how they are processed into yarns, how those yarns are constructed into fabrics, and the finishes applied to the final products. To understand textiles, one must first understand the basic unit of all textile materials, which is the fibre.
A fibre is the smallest hair-like unit that forms the basic building block of all textile yarns and fabrics.
Fibres are spun together to form continuous strands called yarns. These yarns are then woven or knitted to produce the fabrics used for clothing, household linens, and industrial purposes. In Nigeria, textiles play a major role in cultural expression, economic activities, and daily household management.
Origin and Classification of Textile Fibres
Textile fibres are classified based on their origin or source. The two main categories are natural fibres and man-made (synthetic) fibres.
Natural Fibres
Natural fibres are obtained from plants, animals, or mineral sources. The most common natural fibres used in home management include:
- Plant (Vegetable) Fibres: These are obtained from various parts of plants. Examples include cotton, which comes from the seed pod (boll) of the cotton plant, and linen, which is obtained from the stem of the flax plant. Other plant fibres include jute, hemp, and coir.
- Animal (Protein) Fibres: These are obtained from animal sources. Examples include wool, which is sheared from the fleece of sheep, and silk, which is spun by silkworms to form their cocoons.
- Mineral Fibres: These are obtained from natural mineral deposits. An example is asbestos, which is used for fireproof materials but is not used for regular clothing due to health hazards.
Man-Made (Synthetic) Fibres
Man-made fibres are manufactured through chemical processes. They are divided into two main groups:
- Regenerated Cellulose Fibres: These are made by chemically processing natural cellulose materials, such as wood pulp or cotton linters. The most common example is rayon (viscose).
- Synthetic (Non-Cellulose) Fibres: These are made entirely from chemical substances, mostly derived from petroleum and coal. Examples include nylon, polyester, acrylic, and spandex.
The diagram below shows the systematic classification of textile fibres based on their origin.
Characteristics and Properties of Textiles
Different textile fabrics possess distinct physical and chemical properties. These properties determine how a fabric behaves during wear, washing, ironing, and sewing.
Key Physical and Chemical Properties
The performance of any textile fabric depends on the following properties:
- Absorbency: This is the ability of a fibre to take in and retain moisture. Highly absorbent fibres, like cotton and linen, are comfortable to wear in hot, humid climates like Nigeria because they absorb sweat from the body.
- Strength (Tensile Strength): This is the ability of a fabric to resist tearing or breaking under tension. Nylon and polyester are extremely strong, while wool is relatively weak when wet.
- Elasticity and Resiliency: Elasticity is the ability of a fibre to stretch and return to its original length. Resiliency is the ability of a fabric to spring back to shape after being crushed or wrinkled. Wool and silk have high resiliency, whereas linen and cotton wrinkle easily.
- Heat Conductivity: This refers to how easily heat passes through a fabric. Cotton and linen are good conductors of heat, making them cool to wear. Wool is a poor conductor of heat, which helps it trap body heat and keep the wearer warm.
- Shrinkage: This is the reduction in the dimensions of a fabric when exposed to moisture, heat, or agitation during washing. Cotton and wool are highly prone to shrinkage if not treated or washed carefully.
- Reaction to Heat and Flame: Natural fibres generally burn to ash when exposed to fire, while synthetic fibres melt and form hard, plastic-like beads.
Comparison of Common Textile Fibres
The table below outlines the specific characteristics of the most common textile fibres used in the home:
| Fibre Type | Absorbency | Strength | Resiliency (Wrinkle Resistance) | Heat Conductivity | Shrinkage Tendency |
|---|---|---|---|---|---|
| Cotton | High | Strong (stronger when wet) | Poor (wrinkles easily) | Good (cool to wear) | High (unless pre-shrunk) |
| Linen | Very High | Very Strong | Very Poor (creases heavily) | Excellent (very cool) | Moderate |
| Wool | High | Weak (weaker when wet) | Excellent (resists wrinkles) | Poor (warm to wear) | Very High (felts and shrinks) |
| Silk | Moderate to High | Strong | Good | Moderate | Low |
| Nylon | Low | Extremely Strong | Excellent | Poor | Very Low |
| Polyester | Very Low | Very Strong | Excellent (wash-and-wear) | Poor | Very Low |
Tests for the Identification of Fibres
Identifying the fibre content of a fabric is essential for proper garment care, laundry, and sewing. Two simple, reliable methods used in the laboratory or home are the feeling test and the burning test.
The Feeling (Tactile) Test
This test relies on the sense of touch to identify fabric characteristics. The observations for different fibres include:
- Cotton: Feels soft, cool, and slightly absorbent to the touch.
- Linen: Feels smooth, stiff, cool, and has a distinct leathery texture.
- Wool: Feels warm, springy, dry, and sometimes scratchy.
- Silk: Feels exceptionally smooth, soft, warm, and slippery.
- Synthetics (Nylon/Polyester): Feel smooth, slippery, and may generate static electricity (cling to the skin).
The Burning Test
The burning test is a scientific method of identifying fibres by observing how they behave when brought near a flame, how they burn, the smell they produce, and the residue they leave behind.
The table below details the burning characteristics of major textile fibres:
| Fibre Group | Behavior in/near Flame | Odor/Smell | Residue/Ash |
|---|---|---|---|
| Vegetable Fibres (Cotton, Linen) | Burns quickly with a yellow flame; continues to burn after removing from flame. | Smells like burning paper or leaves. | Light, fluffy, grey ash. |
| Protein Fibres (Wool, Silk) | Burns slowly; self-extinguishes when removed from flame. | Smells like burning hair or feathers. | Dark, crushable, irregular bead or ash. |
| Synthetic Fibres (Nylon, Polyester) | Melts first, then burns with a smoky flame; drips while burning. | Chemical, sweetish, or celery-like smell. | Hard, round, uncrushable black bead. |
The diagram below illustrates the distinct burning behaviors and residues of vegetable, protein, and synthetic fibres.
Practical Skills and Fabric Design Techniques
Developing practical skills in textiles allows for the creation of beautiful household articles, clothing decoration, and the preservation of cultural crafts. Below are step-by-step procedures for key textile practicals.
How to Create a Fabric Swatch Book
A fabric swatch book is a reference tool containing small samples of different fabrics, labelled with their properties and uses.
The required materials are:
- A cardboard sheet or a drawing book
- Fabric samples (at least 5 cm by 5 cm each) of cotton, linen, wool, silk, nylon, and polyester
- Scissors or pinking shears
- Fabric glue or double-sided tape
- A pen and ruler
The procedure involves the following steps:
- Cut each fabric sample into a neat square of 5 cm by 5 cm using pinking shears to prevent fraying.
- Arrange the samples neatly on the pages of the drawing book or cardboard.
- Glue each sample securely, leaving space below or beside it for writing.
- Label each sample with the following information: Fabric Name, Fibre Content (e.g., 100% Cotton), Origin (e.g., Plant/Natural), Key Properties (e.g., high absorbency, wrinkles easily), and Suggested Uses (e.g., school uniforms, bedsheets).
How to Carry Out Absorbency and Shrinkage Tests
These simple tests measure how fabrics react to water.
The required materials are:
- Fabric samples of cotton, polyester, and wool (10 cm by 10 cm each)
- A ruler and fabric chalk
- A bowl of water and a dropper
- A stopwatch or clock
- An iron and ironing board
The procedure for the absorbency test involves the following steps:
- Place the dry fabric samples flat on a clean, dry table.
- Using the dropper, place exactly three drops of water onto the center of each fabric sample simultaneously.
- Use the stopwatch to record how many seconds it takes for each fabric to completely absorb the water drops.
- Note which fabric absorbs water fastest (highest absorbency) and which resists water (lowest absorbency).
The procedure for the shrinkage test involves the following steps:
- Measure each dry fabric sample precisely and record the initial dimensions (10 cm by 10 cm).
- Soak the fabric samples in warm water for 30 minutes.
- Remove the fabrics, squeeze gently without wringing, and lay them flat to dry.
- Once dry, iron the samples flat to remove wrinkles.
- Measure the dimensions of each sample again and calculate the percentage of shrinkage using the formula: (Original Length – New Length) / Original Length multiplied by 100.
Fabric Design: Tie-Dye (Adire) Technique
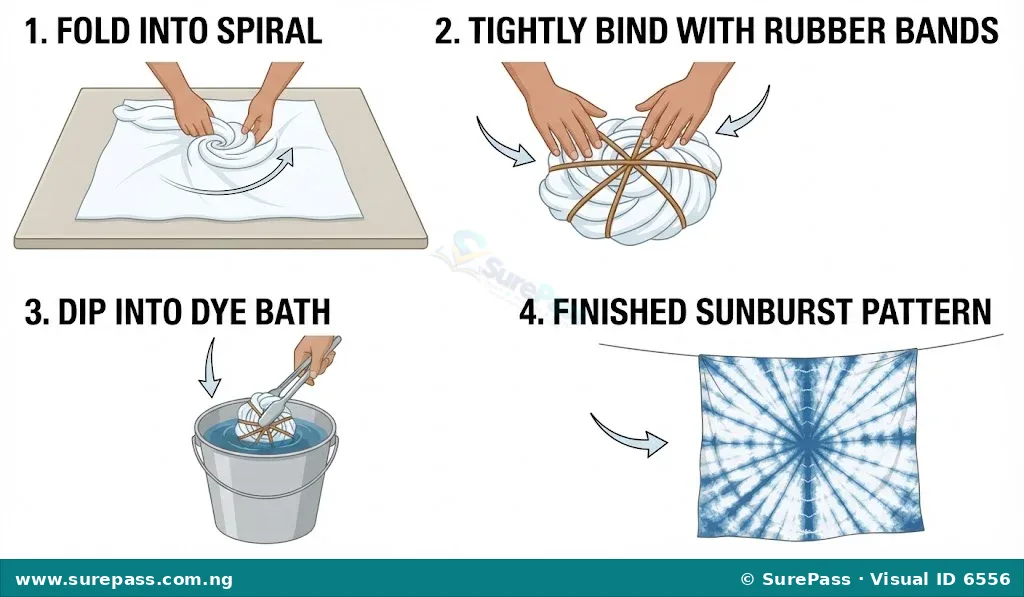
Tie-dye is a traditional resist-dyeing technique where sections of fabric are tightly bound with twine or rubber bands to prevent dye from penetrating, creating beautiful patterns.
The required materials are:
- 100% white cotton fabric (pre-washed to remove starch)
- Fabric dyes (cold-water dyes or reactive dyes)
- Chemicals (caustic soda and sodium hydrosulphite, or soda ash, depending on the dye type)
- Raffia, twine, or strong rubber bands
- Plastic buckets, wooden stirrers, and rubber gloves
The procedure involves the following steps:
- Fold, pinch, or pleat the dry cotton fabric according to the desired pattern (e.g., spiral, marble, or stripes).
- Bind the folded sections tightly with twine, raffia, or rubber bands. The bound areas will resist the dye and remain white.
- Prepare the dye bath in a plastic bucket by dissolving the dye and fixing chemicals in water according to the manufacturer’s instructions. Wear rubber gloves for safety.
- Submerge the bound fabric completely into the dye bath and stir continuously for 20 to 30 minutes to ensure even dye penetration.
- Remove the fabric from the dye bath and squeeze out excess dye.
- Rinse the bound fabric in clean, cold water until the water runs clear.
- Carefully cut the bindings, unfold the fabric to reveal the pattern, and hang it in a shady place to dry.
The illustration below shows common folding and binding techniques used to create different tie-dye patterns.
Fabric Design: Batik (Wax-Resist) Technique
Batik is a resist-dyeing method where melted wax is applied to fabric in specific designs. The wax blocks the dye from coloring those areas.
The required materials are:
- White cotton fabric
- Paraffin wax or beeswax
- A heat source (stove) and a metal pot to melt the wax
- Tjanting tools, brushes, or wooden stamps for applying wax
- Cold-water fabric dye and chemical fixatives
- An iron and old newspapers for wax removal
The procedure involves the following steps:
- Stretch the pre-washed cotton fabric flat on a worktable.
- Melt the wax in a metal pot over low heat. Caution must be taken as hot wax is highly flammable.
- Apply the melted wax onto the fabric using a brush or tjanting tool to draw the desired design. The waxed areas will resist the dye.
- Allow the wax to cool and harden completely.
- Immerse the fabric in a cold-water dye bath. Do not use hot water, as it will melt the wax resist.
- Remove the fabric from the dye, rinse in cold water, and allow it to dry.
- To remove the wax, place the dry fabric between sheets of clean newspaper and iron over it. The heat of the iron melts the wax, which is absorbed by the newspaper. Repeat with fresh paper until all wax is removed.
Fabric Design: Screen Printing Technique
Screen printing involves forcing fabric paint through a prepared mesh screen onto fabric to create a clean, repeated design.
The required materials are:
- A wooden screen printing frame with fine mesh stretched tightly over it
- A squeegee (a rubber-bladed tool used to spread paint)
- Fabric paint or textile ink
- Stencil paper or masking tape to create the design on the screen
- Plain fabric stretched flat on a padded printing table
The procedure involves the following steps:
- Cut out a design stencil from paper and attach it securely to the flat underside of the mesh screen, or block out areas of the screen using masking tape.
- Place the screen frame flat on top of the fabric, ensuring the stencil is in direct contact with the fabric surface.
- Pour a line of fabric paint along one edge of the screen inside the frame.
- Hold the frame firmly with one hand. Using the squeegee at a 45-degree angle, pull the paint firmly across the screen mesh in a single, smooth stroke. This forces the paint through the open areas of the stencil onto the fabric.
- Carefully lift the screen frame straight up to avoid smudging the printed design.
- Allow the printed fabric to dry completely, then heat-set the paint by ironing the reverse side of the fabric.
Guidelines for the Textile Field Trip
A field trip to a local textile manufacturer, traditional weaving center (such as an Aso-Oke or Akwete weaving center), or a professional dry-cleaning facility provides valuable real-world insights into the textile industry.
To maximize the educational value of the field trip, learners should observe and document the following:
- Raw Materials: Identify the types of fibres or yarns being processed or cleaned.
- Machinery and Tools: Observe the operation of looms, spinning machines, industrial washers, presses, or printing screens.
- Processes: Note the sequence of production (e.g., spinning, warping, weaving, dyeing, finishing) or professional stain removal and dry-cleaning steps.
- Safety Measures: Observe the safety gear worn by workers, ventilation systems, and waste disposal methods.
Following the field trip, a comprehensive report must be written, detailing the observations, lessons learned, and how the industrial processes relate to classroom textile theories.


0 comments
Open the discussion when you need it. Comments stay collapsed until requested so the initial article remains light.