



ARTICLE CONTENTSOn this page 8 sections
Fabric Construction
Performance Objectives
By the end of the lesson, students should be able to:
- explain the concept of garment construction;
- differentiate between various fabric types and their properties;
- describe the fundamental processes of fabric construction;
- explain the limitations of different fabric constructions and the appropriate uses for each;
- recognize common problems with sewing machines;
- attach facings and fastenings like zippers or buttons neatly;
Concept of Fabric and Garment Construction
Fabric construction is the process of turning raw fibers or spun yarns into finished textile fabrics.
This process forms the foundation of the textile and clothing industry. Before a garment can be made, the appropriate fabric must be constructed using specific methods that determine its strength, appearance, and texture.
Garment construction is the systematic process of cutting, sewing, and assembling fabric pieces to create wearable clothing or household articles.
Garment construction requires a combination of technical skills, precise measurements, and specialized tools. To achieve a well-finished garment, several key areas of knowledge must be mastered:
- Basic Stitches: These are the fundamental hand and machine stitches used to join fabric pieces temporarily or permanently, finish raw edges, and decorate garments.
- Garment Making: This is the complete sequence of assembling a garment, which includes taking body measurements, preparing the fabric, cutting out pieces, stitching them together, and applying finishes.
- Machine Skills: This involves the ability to operate, control, and maintain a sewing machine safely and efficiently to produce neat, strong seams.
- Pattern Drafting: This is the process of drawing templates or blueprints of garment parts on paper based on accurate body measurements, which are then used as guides to cut the fabric.
Types of Fabric
Fabrics are classified based on the method used to construct them from yarns. The two primary types of fabric construction are woven and knitted fabrics.
Woven Fabrics
Woven fabrics are textiles created by interlacing two sets of yarns at right angles to each other on a machine called a loom.
The vertical yarns that run lengthwise along the fabric are called the warp yarns. The horizontal yarns that run crosswise across the fabric are called the weft yarns. The finished edge of a woven fabric that prevents unraveling is known as the selvage.
Knitted Fabrics
Knitted fabrics are textiles created by interlocking loops of one or more continuous yarns using knitting needles or specialized knitting machines.
Instead of crossing at right angles, the yarn in a knitted fabric forms rows of loops that catch into the loops of the preceding row. This structure gives knitted fabrics their characteristic stretch and flexibility.
Properties of Fabrics
The method of construction directly influences the physical characteristics and behavior of the fabric. Understanding these properties helps in selecting the right fabric for specific garments.
The main properties of woven fabrics include:
- Firmness and Stability: Woven fabrics have a tight, structured grid that holds its shape well, making them easy to cut and sew.
- Low Elasticity: Woven fabrics generally do not stretch along the warp or weft directions, though they may have a slight diagonal stretch known as the bias.
- Fraying: The cut edges of woven fabrics unravel easily because the interlaced yarns can slip out of place. These edges must be finished to prevent fraying.
- Crease Retention: Woven fabrics can hold sharp creases and pleats when pressed with an iron.
The main properties of knitted fabrics include:
- High Elasticity: Knitted fabrics can stretch significantly in both width and length, allowing them to conform closely to the shape of the body.
- Wrinkle Resistance: Due to the flexible loop structure, knitted fabrics resist creasing and recover quickly from wrinkling.
- Unraveling and Running: If a loop in a knitted fabric breaks, it can cause a run or ladder down the fabric, which can ruin the garment. However, the cut edges do not fray in the same way as woven fabrics.
- Softness and Drape: Knitted fabrics are generally softer and conform more easily to body movements than woven fabrics.
Limitations and Appropriate Uses of Fabric Constructions
Each fabric construction method has specific limitations regarding durability and stretch, which dictate how the fabrics should be used in garment making.
Limitations of Woven Fabrics
Woven fabrics are highly durable against friction and wear, but they lack flexibility. Under high tension or sudden movement, tight woven garments can rip at the seams because the fabric does not stretch to accommodate the body’s movement. Consequently, woven garments must be designed with ease or loose fits to allow comfortable movement.
Limitations of Knitted Fabrics
Knitted fabrics offer excellent stretch and comfort, but they are generally less durable than woven fabrics. They are prone to snagging on sharp objects, which can break the loops and cause the fabric to unravel. Over time, knitted garments can also lose their shape, stretch out permanently, or sag at areas of high stress such as the elbows and knees.
Appropriate Uses for Woven and Knitted Fabrics
The selection of fabric depends on the function and design of the garment.
Common uses for woven fabrics include:
- School uniforms and formal shirts
- Trousers, jeans, and structured skirts
- Bed sheets, pillowcases, and tablecloths
- Heavy-outwear jackets and coats
Common uses for knitted fabrics include:
- T-shirts and polo shirts
- Sweaters, cardigans, and socks
- Sportswear and activewear
- Baby clothes and undergarments
Common Sewing Machine Problems and Troubleshooting
Operating a sewing machine efficiently requires the ability to recognize and resolve minor mechanical faults that occur during stitching.
Machine Skipping Stitches
Skipping stitches occurs when the needle thread fails to lock with the bobbin thread, leaving gaps in the line of stitching.
The common causes and troubleshooting steps for skipped stitches include:
- Blunt or Bent Needle: A damaged needle cannot penetrate the fabric correctly. The solution is to replace the needle with a new, sharp one.
- Incorrect Needle Insertion: If the needle is inserted backward or is not pushed fully into the needle bar, it will skip stitches. The solution is to loosen the needle clamp screw, insert the needle with the flat side facing the correct direction, push it up as far as it will go, and tighten the screw.
- Wrong Needle Size: Using a needle that is too fine or too thick for the fabric type can cause stitching errors. The solution is to select the correct needle size for the weight of the fabric.
Tangled Thread
Tangled thread, often called “bird’s nesting,” occurs when a bunch of tangled loops forms on the underside of the fabric, causing the machine to jam.
The common causes and troubleshooting steps for tangled thread include:
- Incorrect Upper Threading: If the thread misses the take-up lever or tension discs, the upper tension drops to zero, causing loops underneath. The solution is to raise the presser foot, unthread the machine completely, and rethread it carefully following the correct thread path.
- Incorrect Bobbin Placement: If the bobbin is wound unevenly or inserted backward into the bobbin case, the lower thread will not feed smoothly. The solution is to remove the bobbin, check that the thread unwinds in the correct direction, and re-insert it securely.
- Failure to Hold Thread Tails: Starting to sew without holding the needle and bobbin thread tails can pull the loose ends down into the bobbin mechanism. The solution is to hold both thread tails behind the presser foot for the first two or three stitches.
Practical Skills in Fabric Construction
Developing practical skills in sewing, attaching components, and designing is essential for successful garment construction.
How to Practice Sewing Straight Stitches and Seams
A seam is the line of stitching that joins two or more pieces of fabric together.
The required materials are:
- Two pieces of woven fabric scraps (approximately 15cm by 10cm each)
- Sewing machine or hand sewing needle
- Sewing thread of a contrasting color
- Tailor’s chalk and a ruler
- Scissors
The procedure involves the following steps:
- Use the ruler and tailor’s chalk to draw a straight line 1.5cm away from the long edge of one fabric scrap. This line represents the seam line.
- Place the two fabric scraps together with the right sides facing each other, aligning the raw edges.
- Pin the fabrics together perpendicular to the seam line to hold them in place.
- Place the fabric under the presser foot of the sewing machine, aligning the needle with the start of the chalk line.
- Lower the presser foot and turn the handwheel toward you to lower the needle into the fabric.
- Sew forward for three stitches, then press the reverse lever to sew backward for three stitches to secure the thread (backtacking).
- Sew slowly along the straight chalk line, guiding the fabric gently with both hands without pulling or pushing it. Remove pins before the needle reaches them.
- At the end of the seam, sew backward for three stitches to secure the end of the seam.
- Raise the needle, raise the presser foot, pull the fabric gently to the back, and cut the threads close to the fabric.
How to Attach Facings
A facing is a shaped piece of fabric applied to finish and reinforce raw edges of a garment, such as necklines, armholes, or waistbands.
The required materials are:
- A garment piece with a curved edge (such as a neckline)
- A matching facing piece cut to the same curve
- Pins and thread
- An iron and ironing board
The procedure involves the following steps:
- Place the facing piece on top of the garment piece with the right sides facing each other, matching the curved raw edges.
- Pin the facing to the garment along the curve.
- Stitch a 1cm seam along the pinned curve, removing pins as you sew.
- Clip small V-shaped notches into the seam allowance along the curve, taking care not to cut through the stitches. This allows the seam to lie flat without puckering when turned.
- Turn the facing over to the inside of the garment.
- Press the seam flat with a warm iron so that the seam line lies slightly inside the edge, making the facing invisible from the right side of the garment.
- Secure the loose edge of the facing to the garment seam allowances with small hand stitches.
How to Attach Fastenings
Fastenings are devices used to open and close garments easily. Common examples include buttons and zippers.
The procedure for sewing a flat button involves the following steps:
- Mark the exact position of the button on the fabric using tailor’s chalk.
- Thread a hand sewing needle with double thread and tie a knot at the end.
- Bring the needle up from the wrong side of the fabric through the marked point and through one hole of the button.
- Place a pin or matchstick across the top of the button between the holes to act as a spacer. This creates a shank, which allows space for the buttonhole fabric to fit underneath.
- Pass the needle down through the second hole of the button and through the fabric to the wrong side.
- Repeat this process 5 to 6 times to secure the button.
- Bring the needle up to the right side of the fabric, but under the button. Remove the pin or matchstick.
- Wind the thread tightly around the stitches under the button 3 to 4 times to form a firm shank.
- Pass the needle to the wrong side of the fabric, make two small securing stitches, and cut the thread.
The procedure for attaching a zipper using the centered method involves the following steps:
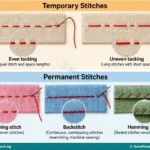
- Stitch the garment seam up to the zipper opening, then baste (temporary long stitches) the zipper opening closed. Press the seam open.
- Place the closed zipper face down on the inside of the pressed seam allowance, centering the zipper teeth directly over the basted seam line.
- Pin and baste the zipper tape to the seam allowances on both sides.
- Turn the garment to the right side.
- Attach a zipper foot to the sewing machine.
- Stitch on the right side of the garment, starting at the top left, sewing down parallel to the zipper teeth, pivoting at the bottom, sewing across the bottom of the zipper, pivoting again, and sewing up the right side to the top.
- Remove the temporary basting stitches from the seam line to open the zipper.
Sketching Fashion Ideas and Applying Design Concepts
Fashion sketching is the visual representation of garment designs on paper before they are constructed from fabric.
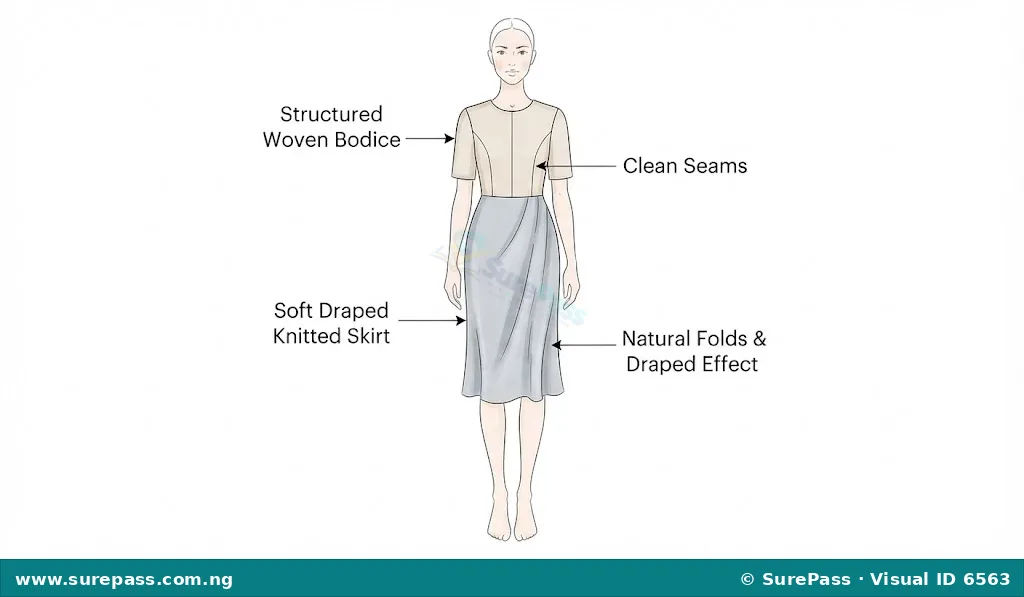
To apply design concepts to fabrics, designers must consider how the properties of woven and knitted fabrics affect the silhouette of a garment. Woven fabrics are ideal for structured, tailored designs with sharp lines, pleats, and collars. Knitted fabrics are suited for casual, body-conforming, or draped designs with soft folds.
When sketching fashion ideas, designers use specific lines and shading techniques to represent fabric textures. For example, horizontal parallel lines can represent the ribs of a knitted fabric, while clean, straight lines represent the crisp edges of woven garments.




0 comments
Open the discussion when you need it. Comments stay collapsed until requested so the initial article remains light.