


ARTICLE CONTENTSOn this page 13 sections
Openings and Fasteners
Performance Objectives
By the end of the lesson, students should be able to:
- identify different types of openings and fasteners on garments;
- discuss the functions of openings and fasteners on garments;
- state the guidelines for choosing openings and fasteners when sewing;
- cut and sew different types of openings;
- attach suitable fasteners on openings.
Meaning of Garment Openings
A garment opening is an intentional cut, slit or gap made in a garment to allow it to be put on and taken off easily.
Without openings, garments made from non-stretch fabrics would be difficult or impossible to pass over the head, shoulders or hips. Openings are usually finished neatly along the edges to prevent fraying and to maintain the shape of the garment.
Types of Garment Openings
Garment openings are classified based on their construction method and where they are applied on a garment. The main types of openings include:
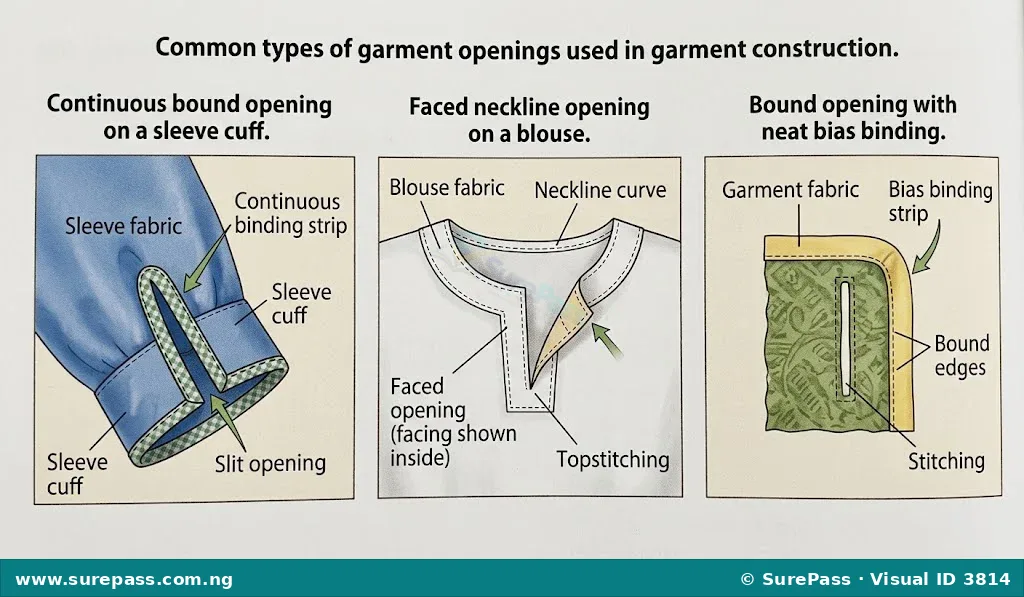
- Continuous Bound Opening (Continuous Strip Opening): This opening is made by cutting a straight slit in the fabric and finishing both edges with a single, continuous strip of bias or straight-grain fabric. It is commonly used on lightweight fabrics, sleeve cuffs, children’s dresses and the side openings of skirts or trousers.
- Faced Opening (Wrap Opening): This opening is finished with a facing, which is a piece of fabric cut to match the shape of the opening. The facing is stitched to the right side of the garment and turned to the inside to create a clean, flat edge. It is frequently used at necklines, front shirt openings and back openings of blouses.
- Bound Opening: This opening is finished with separate bias strips on each edge of the slit. Unlike the continuous bound opening, the edges are bound individually, which often serves a decorative purpose or accommodates button loops.
Observe the diagram below to see how these openings appear on fabric.
Meaning of Garment Fasteners
A garment fastener is a device attached to an opening to close it securely and hold the garment in place on the body.
Fasteners ensure that the opening remains closed during movement, preserving both the modesty of the wearer and the fit of the garment. They can be functional, decorative or both.
Types of Garment Fasteners
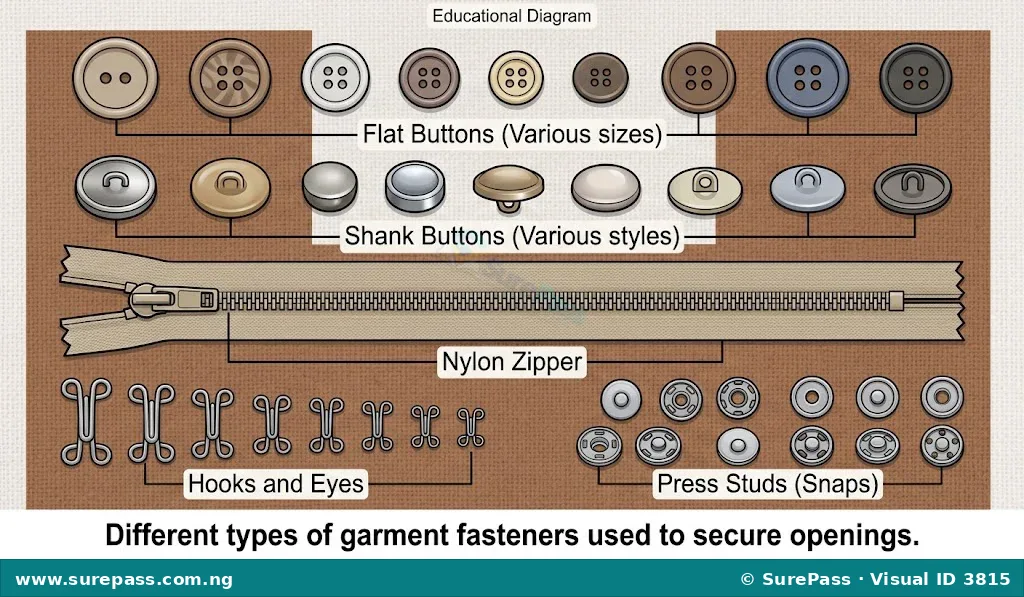
Different fasteners are designed for different fabric weights, garment styles and positions. The primary types of fasteners include:
- Buttons and Buttonholes: This is a classic fastening system where a button (flat or shank) is sewn onto one side of the opening and passes through a stitched slit (buttonhole) or a fabric loop on the opposite side.
- Zippers (Slide Fasteners): These consist of two parallel rows of metal or plastic teeth that are locked or unlocked by a sliding tab. Zippers provide a quick, secure and continuous closure. They are used on skirts, trousers, dresses and jackets.
- Hooks and Eyes: These are small metal fasteners consisting of a curved hook and a small loop (the eye). They are used at points of high tension, such as the waistbands of skirts and trousers, or at the top of zipper openings.
- Press Studs (Snaps): These consist of two interlocking metal or plastic discs (a male part with a stud and a female part with a socket) that click together when pressed. They are used on lightweight fabrics or where a flat, invisible closure is desired.
- Tapes and Ties: These are fabric strips, ribbons or cords attached to opposite sides of an opening and tied together. They are common in traditional Nigerian garments, aprons and children’s wear.
Look at the image below to identify the different types of fasteners.
Functions of Openings and Fasteners
Openings and fasteners work together to serve several essential purposes in garment making.
The main functions of garment openings are:
- To allow easy passage of the head, limbs and torso when dressing and undressing.
- To prevent stretching, distortion or tearing of the garment fabric during wear.
- To contribute to the style, design and aesthetic appeal of the garment.
The main functions of garment fasteners are:
- To close garment openings securely and prevent them from gaping.
- To adjust and maintain the fit of the garment to the body.
- To serve as decorative elements that enhance the overall appearance of the garment.
Guidelines for Choosing Openings and Fasteners
Selecting the correct opening and fastener is critical to the durability, comfort and appearance of a garment. Poor choices can lead to fabric damage or difficulty in wearing the garment.
The guidelines for choosing openings and fasteners include:
- Fabric Weight and Texture: Lightweight fabrics like chiffon or silk require delicate fasteners like small press studs, lightweight zippers or small buttons. Heavy fabrics like denim or wool require sturdy fasteners like metal zippers, large buttons or heavy-duty hooks and eyes.
- Position of the Opening: Openings at points of high tension (such as waistbands) require strong fasteners like hooks and eyes or sturdy buttons. Side openings on skirts usually require concealed zippers, while front openings on shirts are best suited for buttons.
- Style and Design of the Garment: The fastener should complement the garment design. For example, traditional Nigerian garments like a lace blouse may use decorative buttons or loops, while a school uniform requires simple, durable and easily washable buttons.
- Age and Physical Ability of the Wearer: Garments for children and the elderly should have simple, easy-to-use fasteners like Velcro, large buttons or zippers with pull tabs. Small hooks and eyes or tiny buttons should be avoided for these groups.
- Laundering and Care Requirements: Fasteners must withstand the cleaning process of the garment. For instance, plastic buttons may melt under high iron heat, and metal fasteners may rust if left wet, so rust-proof or heat-resistant options should be selected.
- Color and Appearance: Fasteners should either match the fabric color to remain inconspicuous or be chosen in a contrasting color to serve as a decorative feature.
How to Cut and Sew a Continuous Bound Opening
A continuous bound opening is a neat and durable way to finish a slit on a sleeve or neckline. It is constructed using a straight strip of fabric.
The required materials and tools are:
- A fabric sample piece (representing the garment)
- A strip of matching fabric for the binding (about 5 cm wide and twice the length of the opening slit)
- Sewing thread
- Hand sewing needle and sewing machine
- Scissors
- Pins
- Tailor’s chalk
The procedure involves the following steps:
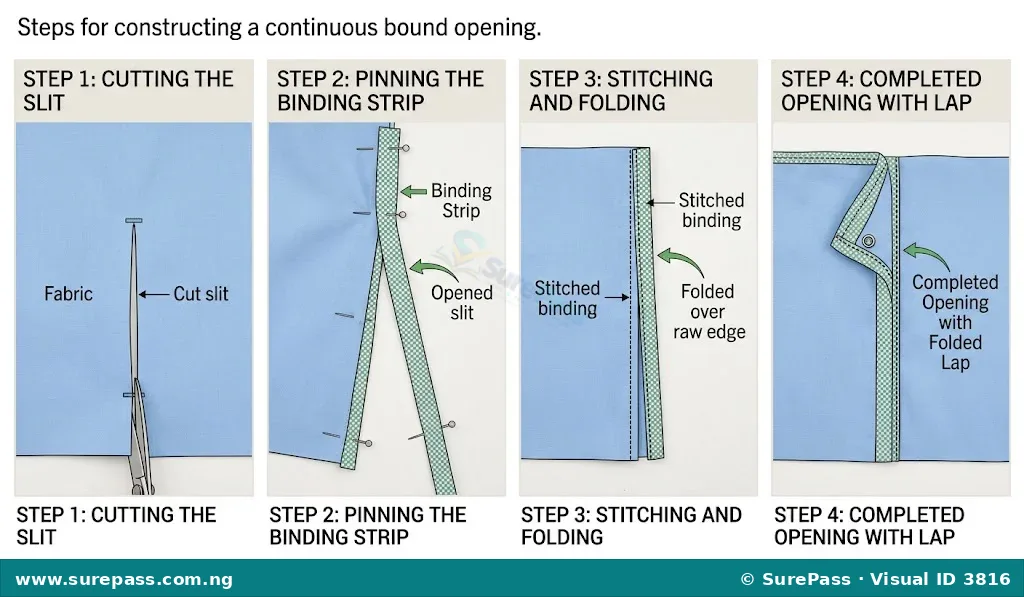
- Mark the position and length of the opening slit on the garment fabric using tailor’s chalk.
- Cut along the marked line to create the slit.
- Cut a strip of fabric on the straight grain or bias, making it 5 cm wide and twice the length of the slit plus 2 cm for safety.
- Open out the slit of the garment in a straight line.
- Place the right side of the binding strip to the wrong side of the garment, matching the edges. Pin them together along the slit.
- Taper the seam allowance on the garment fabric near the apex (the closed end of the slit) so that the stitching line on the garment is very close to the cut edge, while keeping a consistent seam allowance on the binding strip.
- Machine stitch the binding to the garment along the pinned line.
- Press the seam allowance toward the binding strip.
- Fold the free edge of the binding strip over by 6 mm, then fold it over again to the right side of the garment so that it just covers the first row of stitching.
- Pin, baste (tack) and machine stitch or slip-stitch the folded edge in place.
- Press the finished opening. Fold the binding on the front edge of the opening to the inside of the garment to form a lap, leaving the back edge extending to form an underlap.
How to Cut and Sew a Faced Opening
A faced opening provides a flat, clean finish without visible stitching on the right side of the garment. It is ideal for necklines.
The required materials and tools are:
- A fabric sample piece with a neckline curve
- A matching fabric facing piece cut to the shape of the neckline and slit
- Interfacing (optional, for stiffness)
- Sewing thread and needle
- Sewing machine
- Scissors and pins
The procedure involves the following steps:
- Apply fusible interfacing to the wrong side of the facing piece if the fabric is lightweight.
- Neaten the outer curved edge of the facing by turning it under and stitching, or by using a zigzag stitch.
- Place the right side of the facing to the right side of the garment, matching the neckline edges and the center lines of the opening slit. Pin securely.
- Mark the slit line on the facing. Draw a stitching line 6 mm away from the slit line on both sides, tapering to a point at the bottom of the slit.
- Machine stitch along the marked stitching line, pivoting carefully at the bottom point.
- Cut down the center line of the slit, stopping just before the stitching at the bottom point. Be careful not to cut the stitches.
- Clip the curved edges of the neckline to allow the fabric to lie flat when turned.
- Turn the facing to the wrong side of the garment. Roll the seam slightly to the inside so that it is not visible from the right side.
- Press the opening flat and secure the facing to the garment shoulder seams with a few hand stitches (tacking).
How to Attach Fasteners
Once the openings are constructed, suitable fasteners must be attached to make them functional.
Attaching a Flat Button
Buttons must be sewn securely to withstand regular pulling and laundering.
The procedure involves the following steps:
- Mark the exact position of the button on the garment using tailor’s chalk, aligning it with the buttonhole.
- Thread a hand sewing needle with double thread and tie a small knot at the end.
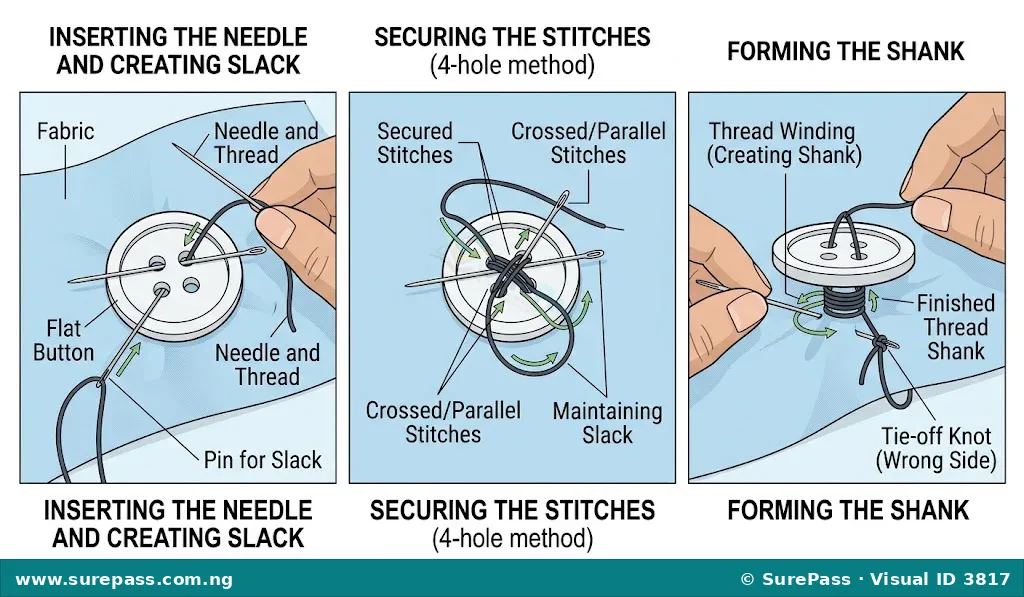
- Bring the needle up from the wrong side of the fabric through the marked button position.
- Pass the needle through one hole of the button from the underside to the top.
- Place a pin or matchstick across the top of the button between the holes to create a “shank” (this leaves space for the buttonhole fabric to sit under the button).
- Pass the needle down through the opposite hole and through the fabric to the wrong side.
- Repeat this process 4 to 5 times to secure the button. If using a four-hole button, sew either in parallel lines or in a cross pattern.
- Remove the pin or matchstick. Pull the button slightly away from the fabric.
- Bring the needle up between the fabric and the button. Wind the thread tightly around the stitches under the button 3 to 4 times to form a sturdy thread shank.
- Pass the needle back to the wrong side of the fabric, make several small backstitches to secure the thread, and cut off the excess thread.
Attaching Hooks and Eyes
Hooks and eyes are placed on the inside of overlapping edges to provide an invisible closure.
The procedure involves the following steps:
- Position the hook on the wrong side of the overlapping edge of the garment, about 2 mm back from the edge so it remains hidden.
- Secure the hook by sewing closely spaced buttonhole stitches or overcasting stitches around the two small circular loops at the base of the hook.
- Pass the needle through the fabric under the hook and make several stitches over the bill (the curved tip) of the hook to hold it flat against the fabric.
- Position the eye on the right side of the underlapping edge so that it aligns perfectly with the hook when the opening is closed.
- Sew around the two circular loops of the eye using buttonhole or overcasting stitches.
- Fasten off the thread securely on the wrong side of the fabric with backstitches.
Summary of Openings and Fasteners
The table below summarizes the relationship between garment openings, suitable fasteners and their typical applications.
| Type of Opening | Suitable Fasteners | Typical Garment Applications |
|---|---|---|
| Continuous Bound Opening | Press studs, small buttons, hooks and eyes | Sleeve cuffs, children’s wear, side skirt openings |
| Faced Opening | Buttons with loops, zippers, hooks and eyes | Necklines, front blouse openings, back of dresses |
| Bound Opening | Buttons with fabric loops, small hooks | Decorative necklines, formal wear, traditional blouses |
Study Questions
Answer the following questions to test your understanding:
- Define a garment opening and state its primary purpose.
- Describe the difference between a continuous bound opening and a faced opening.
- List four types of garment fasteners and give one common application for each.
- State three functions of garment fasteners.
- Explain three guidelines that must be considered when choosing a fastener for a school uniform.
- Describe the purpose of creating a “shank” when sewing a flat button onto a garment.



0 comments
Open the discussion when you need it. Comments stay collapsed until requested so the initial article remains light.