


ARTICLE CONTENTSOn this page 8 sections
Basic Stitches, Seams and Seam/edge Finishing
Performance Objectives
By the end of the lesson, students should be able to:
- explain the terms: stitches, seams, seam finishing;
- identify classes of stitches with their uses: temporary, permanent, neatening, decorative;
- produce different types of stitches under each class;
- describe the different types of seam and methods of finishing seams;
- work and indicate position that each seam can be used on garments;
- enumerate points to consider when choosing seams;
- explain the importance of finishing seams.
Meaning of Key Terms
A stitch is a single turn or loop of thread or yarn made by a hand-sewing needle or a sewing machine through a fabric.
Stitches form the foundation of all sewing processes, whether executed by hand or machine. They are used to join fabric pieces, finish raw edges, or ornament garments.
A seam is a line of stitching that joins two or more pieces of fabric together to form a garment or article.
The strength, appearance, and durability of any garment depend heavily on the quality and type of seams used during construction.
Seam finishing is a treatment or process applied to the raw edges of a seam to prevent them from fraying or raveling.
This process is carried out on the inside of the garment to ensure neatness, comfort, and longevity of the finished article.
Classes and Types of Stitches
Stitches are classified into four main groups based on their function and duration of use in garment construction. These classes are temporary stitches, permanent stitches, neatening stitches, and decorative stitches.
Temporary Stitches
Temporary stitches are stitches used to hold fabric pieces together temporarily during garment construction before permanent stitches are applied.
These stitches are easily removed once the permanent stitching is completed. They are usually worked with a single thread of a contrasting colour to make them easy to see and pull out.
The main types of temporary stitches are:
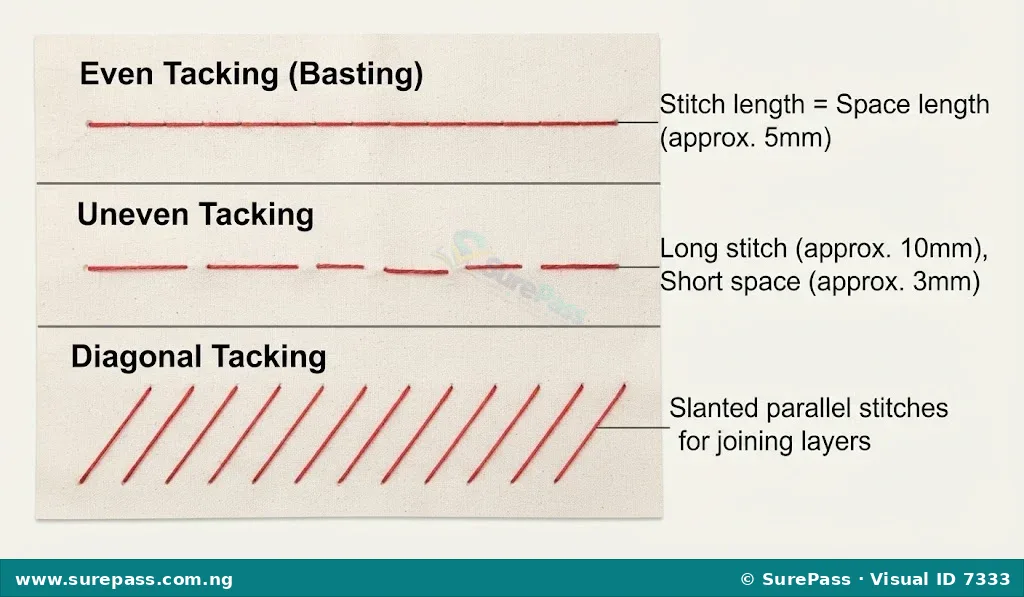
- Even Tacking (Basting): This type consists of stitches and spaces of equal length, usually about 6 millimetres. It is used for holding flat seams together before permanent stitching.
- Uneven Tacking: This type consists of a long stitch followed by a short stitch. It is used for marking straight lines on fabric or holding lightweight fabrics together quickly.
- Diagonal Tacking: This type consists of slanted stitches worked across the fabric. It is used to hold two or more layers of fabric together to prevent slipping, such as when attaching linings or collars.
Permanent Stitches
Permanent stitches are stitches designed to remain in the fabric to join pieces together or form structural details of the garment.
These stitches are worked with matching thread and are made to be strong and durable. The main types of permanent stitches are:
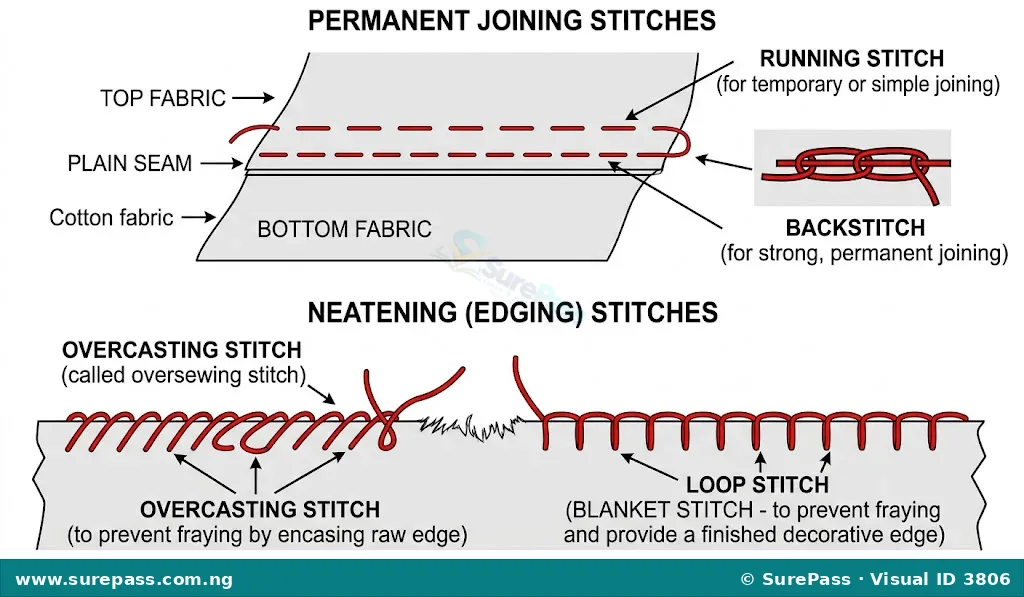
- Running Stitch: This is a simple stitch made by passing the needle in and out of the fabric at regular intervals. It is used for gathering, tucking, and joining lightweight fabrics where there is little strain.
- Backstitch: This is a very strong stitch made by inserting the needle backward into the end of the previous stitch. It resembles machine stitching on the right side and is used to secure seams that require strength.
- Oversewing Stitch: This is a strong, close stitch worked over two folded edges of fabric. It is used to join finished edges together securely, such as on patch pockets or collars.
Neatening Stitches
Neatening stitches are stitches used to secure the raw edges of fabric to prevent them from fraying or unraveling.
These stitches are worked on the raw edges of seams, hems, and facings. The main types of neatening stitches are:
- Overcasting Stitch: This is a slanted stitch worked over the raw edge of a single layer or double layers of fabric. It is used to neaten raw edges of seams on fabrics that fray easily.
- Loop Stitch (Blanket Stitch): This is a stitch that forms a loop along the edge of the fabric. It is used to neaten raw edges of heavy fabrics, blankets, and applique designs.
Decorative Stitches
Decorative stitches are stitches used to ornament, embellish, or add beauty to garments and household articles.
These stitches are often referred to as embroidery stitches and are worked with decorative threads such as embroidery floss. The main types of decorative stitches are:
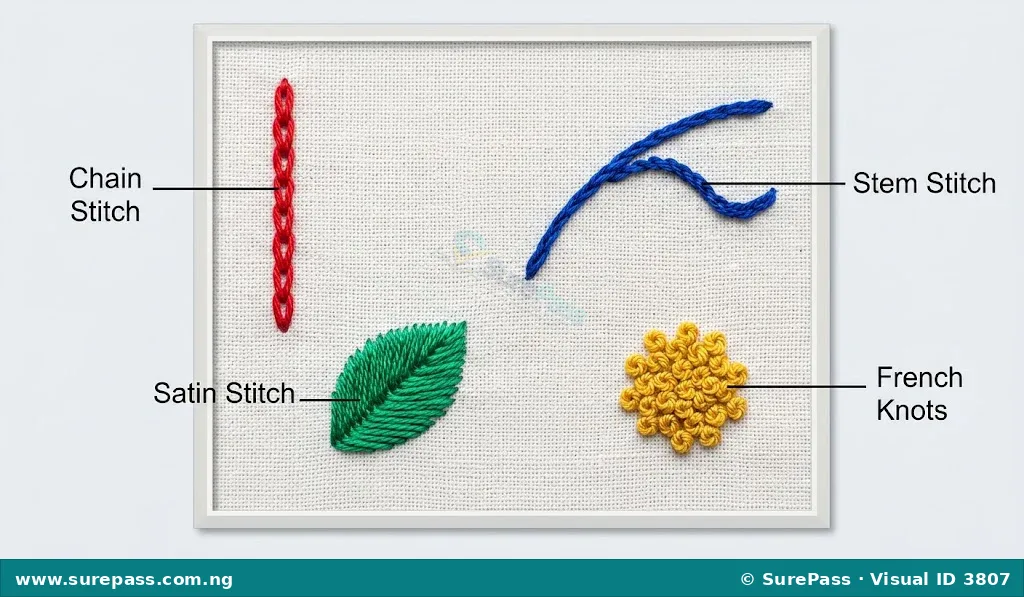
- Chain Stitch: This stitch forms a series of looped links resembling a chain. It is used for outlining designs and filling in shapes.
- Satin Stitch: This consists of close, parallel straight stitches worked across a design. It is used to fill in solid shapes such as leaves and flower petals.
- Stem Stitch: This is a slanted stitch that forms a continuous line resembling a rope. It is used for outlining stems, lines, and borders.
- French Knot: This is a decorative knot formed by wrapping the thread around the needle several times before inserting it back into the fabric. It is used to create textured dots, flower centres, and small decorative details.
Types of Seams and Their Applications
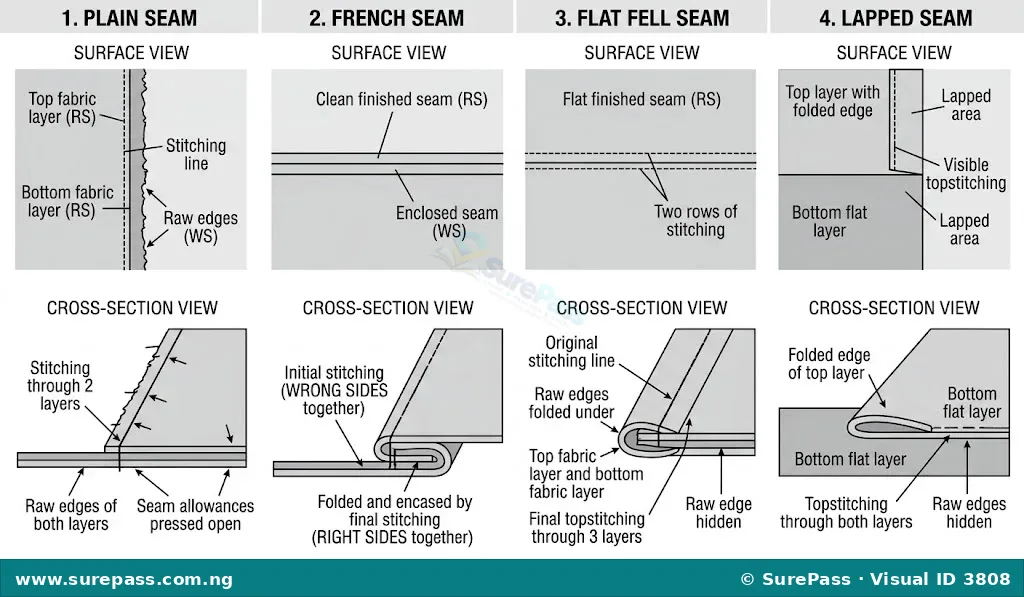
Seams are chosen based on the type of fabric, the style of the garment, and the position of the seam on the garment. The four primary types of seams used in garment making are plain seam, French seam, flat fell seam, and lapped seam.
Plain Seam
The plain seam is the simplest and most common type of seam used in garment construction.
It is made by placing two pieces of fabric with their right sides together, stitching along the seam line, and pressing the seam open. Because the raw edges are left exposed on the inside, a plain seam must always be neatened with a seam finish.
The positions and uses of a plain seam on garments include:
- Side seams of skirts, trousers, and dresses.
- Shoulder seams of blouses and shirts.
- Underarm seams of sleeves.
French Seam
The French seam is a self-enclosed seam that hides the raw edges of the fabric within a double fold of stitching.
It is worked twice: first on the right side of the fabric with a narrow seam allowance, then trimmed, turned to the wrong side, and stitched again to enclose the raw edges completely. It is neat, strong, and does not require any additional seam finishing.
The positions and uses of a French seam on garments include:
- Side seams of delicate, sheer, or lightweight fabrics such as chiffon, silk, and lace.
- Undergarments and nightwear where comfort against the skin is required.
- Children’s wear because of its strength and neatness.
Flat Fell Seam (Run-and-Fell Seam)
The flat fell seam is a strong, flat, self-enclosed seam that lies completely flat against the garment.
It is made by stitching a plain seam, trimming one seam allowance shorter than the other, folding the wider allowance over the narrower one, and stitching it flat to the garment. It shows two rows of stitching on the right side of the garment.
The positions and uses of a flat fell seam on garments include:
- Side seams and inner leg seams of jeans and trousers.
- Side seams of men’s shirts and sportswear.
- Garments made of heavy fabrics that undergo frequent washing and hard wear.
Lapped Seam
The lapped seam is a decorative and functional seam made by folding under the seam allowance of one fabric piece and laying it over the seam allowance of another piece before stitching close to the folded edge.
This seam is used to join pieces where bulk must be reduced or where a decorative topstitching effect is desired.
The positions and uses of a lapped seam on garments include:
- Attaching yokes to shirts, blouses, and skirts.
- Joining curved seams or complex style lines.
- Attaching pockets to garments.
Points to Consider When Choosing Seams
Selecting the correct seam is essential for the durability and appearance of the garment. The main points to consider when choosing a seam include:
- Fabric Weight and Texture: Lightweight and sheer fabrics require delicate, enclosed seams like French seams, while heavy fabrics require flat, strong seams like flat fell seams.
- Garment Style and Design: Tailored garments may require plain seams pressed open, while casual wear or sportswear may require flat fell seams for a sporty appearance.
- Position of the Seam: Seams on curved areas like armholes require plain seams that can be clipped, while straight side seams can accommodate French or flat fell seams.
- Wear and Tear: Garments subjected to heavy strain or frequent laundering require strong, durable seams like flat fell seams.
- Transparency of the Fabric: Sheer fabrics show the inside construction, making neat, enclosed seams like the French seam necessary to maintain a beautiful appearance.
Seam Finishing
Seam finishing is the process of neatening the raw edges of a plain seam. It is a critical step in garment construction that occurs immediately after stitching and pressing a plain seam.
Importance of Finishing Seams
Finishing seams is essential for several reasons. The main reasons for finishing seams include:
- Preventing Fraying: It stops the raw edges of woven fabrics from unraveling during wear and laundering.
- Improving Neatness: It makes the inside of the garment look clean, professional, and well-made.
- Enhancing Durability: It strengthens the seam edges, ensuring the garment lasts longer without falling apart.
- Providing Comfort: It prevents rough, frayed fabric edges from rubbing against the wearer’s skin, which can cause irritation.
Methods of Seam Finishing
The choice of seam finish depends on the fabric type, weight, and the equipment available. The main methods of seam finishing are:
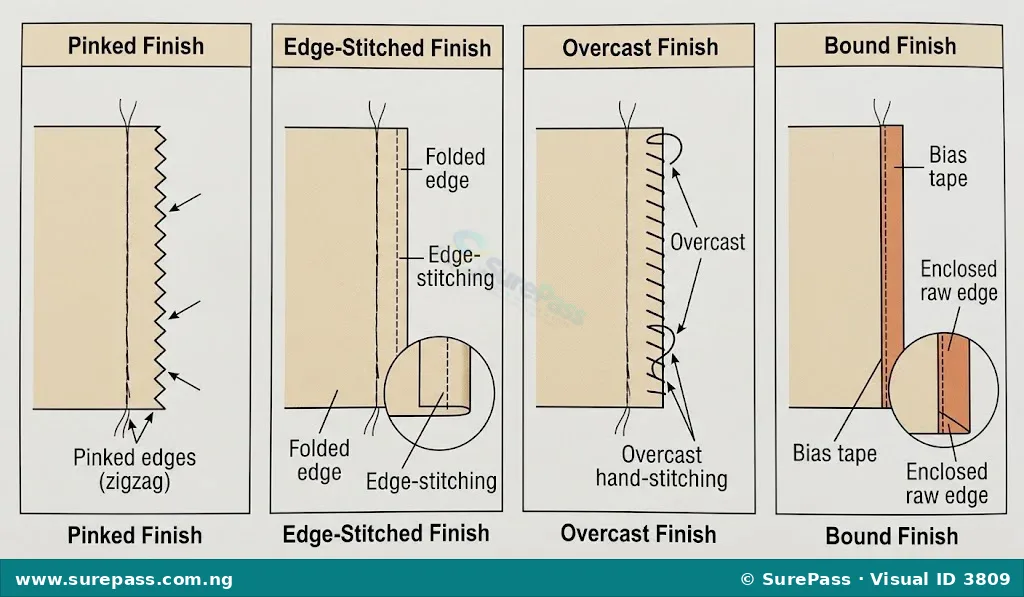
- Pinked Finish: The raw edges of the seam allowances are cut with pinking shears to form a zigzag edge. This is a quick finish suitable for firmly woven fabrics that do not fray easily.
- Edge-Stitched Finish (Clean Finish): The raw edge of each seam allowance is turned under by about 3 millimetres and stitched close to the fold. This is suitable for light to medium-weight fabrics.
- Overcast Finish: The raw edges are neatened using hand overcasting stitches or a machine zig-zag stitch. This is suitable for fabrics that fray easily.
- Bound Finish: The raw edges of the seam allowances are enclosed in bias binding tape and stitched down. This is suitable for heavy fabrics, unlined jackets, and coats where the inside of the garment is visible.
Practical Guide: Working Stitches, Seams, and Finishes
This section provides step-by-step procedures for working different stitches, seams, and finishes on sample fabrics. These specimens should be prepared carefully and mounted in a specimen album for reference.
How to Work Basic Stitches
The required materials are:
- Two pieces of cotton fabric measuring 10 centimetres by 10 centimetres.
- Hand-sewing needle.
- Sewing thread in a contrasting colour.
- Scissors.
The procedure for working even tacking involves the following steps:
- Thread the needle with a single strand of contrasting thread and tie a knot at the end.
- Place the two fabric pieces together.
- Insert the needle from the back to the front of the fabric, 1.5 centimetres from the edge.
- Pass the needle in and out of the fabric, making stitches and spaces of equal length (about 6 millimetres).
- Secure the end of the thread with a small backstitch.
The procedure for working a running stitch involves the following steps:
- Thread the needle with a matching or contrasting thread.
- Insert the needle into the fabric and take several small, even stitches onto the needle before pulling the thread through.
- Keep the stitches and spaces small and equal in size (about 2 millimetres).
- Fasten off securely at the end of the line.
How to Work a Plain Seam
The required materials are:
- Two pieces of cotton fabric measuring 15 centimetres by 10 centimetres.
- Sewing machine or hand-sewing needle with thread.
- Pins.
- Measuring tape or ruler.
- Iron for pressing.
The procedure involves the following steps:
- Place the two pieces of fabric together with their right sides facing each other, aligning the raw edges.
- Pin the fabrics together along the edge to be stitched.
- Mark a seam line 1.5 centimetres from the raw edge.
- Stitch along the marked seam line using a straight machine stitch or hand backstitch.
- Remove the pins as stitching progresses.
- Secure the ends of the stitching by backstitching.
- Press the seam flat to settle the stitches, then press the seam allowances open.
How to Work a French Seam
The required materials are:
- Two pieces of lightweight cotton fabric measuring 15 centimetres by 10 centimetres.
- Sewing machine or hand-sewing needle with thread.
- Pins.
- Scissors.
- Iron for pressing.
The procedure involves the following steps:
- Place the two pieces of fabric together with their wrong sides facing each other.
- Pin and stitch a seam 6 millimetres from the raw edge.
- Trim the seam allowance down to 3 millimetres to remove any loose threads.
- Press the seam flat, then press the seam open.
- Fold the fabric back along the stitched seam line so that the right sides are now facing each other.
- Press the folded edge flat, ensuring the raw edges are completely enclosed inside the fold.
- Stitch a second seam 6 millimetres from the folded edge.
- Press the finished French seam to one side.
How to Work Seam Finishes
The required materials are:
- A prepared plain seam specimen.
- Pinking shears.
- Hand-sewing needle and thread.
- Sewing machine.
The procedure for working a pinked finish involves the following steps:
- Open the plain seam allowances flat.
- Use pinking shears to cut along the raw edge of each seam allowance, creating a zigzag pattern.
- Ensure the cut is clean and close to the edge without cutting into the seam line.
The procedure for working an overcast finish by hand involves the following steps:
- Thread a needle with a single strand of matching thread.
- Secure the thread at one end of the raw seam allowance.
- Bring the needle from the back to the front of the fabric, passing over the raw edge at a slanted angle.
- Repeat the stitches at regular intervals of about 5 millimetres along the entire edge.
- Keep the tension of the stitches loose enough to prevent the fabric edge from puckering.
Creating a Specimen Album
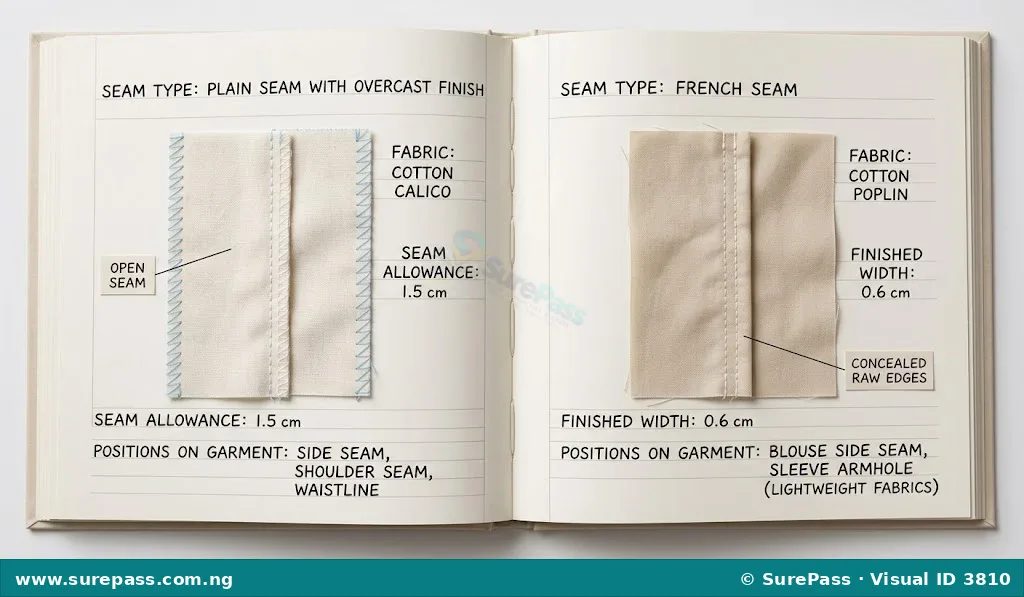
A specimen album is a valuable tool for a fashion designer. It serves as a reference book containing physical samples of sewing techniques.
To create a high-quality specimen album, the following guidelines should be followed:
- Use a clean, sturdy scrapbook or binder with thick pages.
- Mount each completed fabric specimen securely onto a page using glue, double-sided tape, or small stitches.
- Label each specimen clearly with its correct name (e.g., “French Seam”, “Chain Stitch”).
- Write a brief description next to each specimen, including the type of fabric used, the steps taken, and the garment positions where the technique is applied.
- Keep the album clean, dry, and free from wrinkles.
Summary of Seam Types and Applications
The table below provides a quick reference for the characteristics and uses of the four primary seams.
| Seam Type | Description | Best Fabric Types | Common Garment Positions | |
|---|---|---|---|---|
| Plain Seam | Simple seam pressed open; raw edges are exposed and require finishing. | Medium to heavy-weight fabrics (cotton, linen, wool). | Side seams, shoulder seams, sleeve seams. | |
| French Seam | Double-stitched, self-enclosed seam that hides raw edges. | Lightweight, sheer, and delicate fabrics (chiffon, silk, organza). | Side seams of blouses, nightwear, children’s wear. | |
| Flat Fell Seam | Strong, flat, self-enclosed seam showing two rows of stitching on the right side. | Heavy-weight and durable fabrics (denim, drill, canvas). | Side seams of jeans, men’s shirts, sportswear. | |
| Lapped Seam | One folded edge laid over another and topstitched down. | Medium to heavy fabrics where bulk must be reduced. | Yokes, pockets, curved style lines. |


0 comments
Open the discussion when you need it. Comments stay collapsed until requested so the initial article remains light.