



ARTICLE CONTENTSOn this page 8 sections
Sewing machine faults and remedies
Performance Objectives
By the end of the lesson, students should be able to:
- explain care and maintenance of sewing tools and equipment;
- recognize causes of faults common machine faults when using sewing machines;
- correct common machine faults that occur when using sewing machine.
Care and Maintenance of Sewing Tools and Equipment
Maintenance of sewing tools and equipment refers to the regular care, cleaning, and proper storage of fashion design implements to keep them in optimal working condition.
In fashion design and garment making, tools and equipment must be kept in excellent condition to ensure efficiency, accuracy, and safety. Neglecting these tools leads to rapid deterioration, poor garment construction, and unnecessary financial expenses for replacements.
Importance of Caring for Sewing Tools, Equipment and Machines
The reasons why sewing tools, equipment, and machines must be cared for include:
- Prevention of Rust and Corrosion: Metal tools such as shears, needles, and pins can rust when exposed to moisture. Regular cleaning and dry storage prevent rust, which can stain or ruin expensive fabrics.
- Ensuring Accuracy and Quality: Well-maintained tools perform better. For example, sharp shears cut fabric cleanly without fraying the edges, and a well-oiled sewing machine produces even, beautiful stitches.
- Cost Reduction: Regular maintenance extends the lifespan of equipment. This reduces the frequency of buying new tools or paying for expensive professional repairs.
- Safety in the Workshop: Damaged or poorly maintained tools can cause accidents. A blunt needle can break and fly into the operator’s eye, while a stiff machine can cause muscle strain.
- Time Efficiency: Working with functional tools prevents interruptions caused by machine breakdowns, thread snapping, or fabric damage, allowing projects to be completed on schedule.
Care and Maintenance Procedures for Specific Sewing Tools
Different sewing tools require specific care methods to preserve their utility:
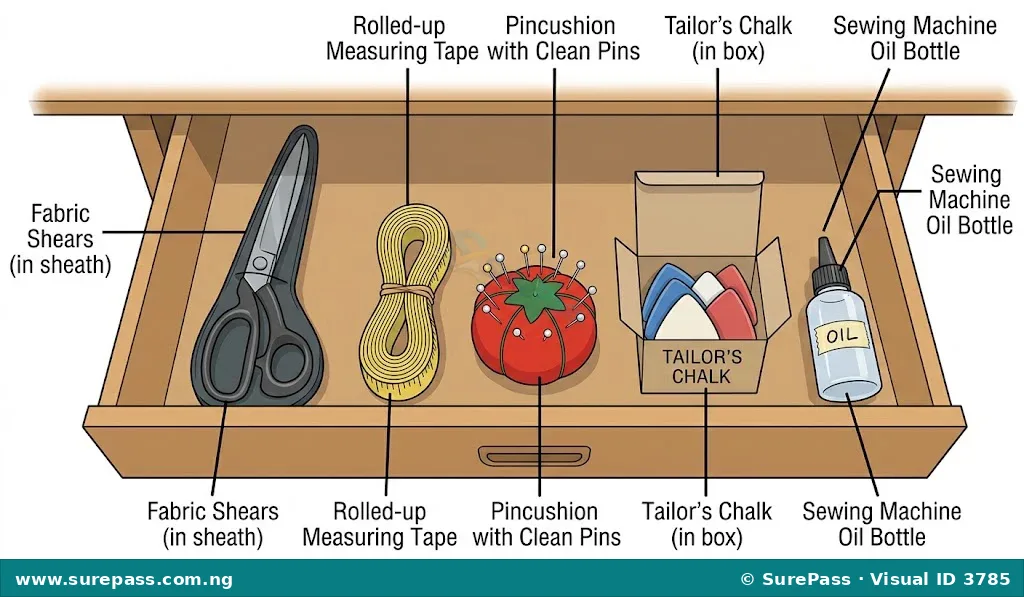
- Cutting Tools (Shears and Scissors): These should be used exclusively for cutting fabric and threads. Cutting paper, cardboard, or plastic dulls the blades quickly. Wipe the blades with a dry, soft cloth after use, and occasionally apply a drop of machine oil to the pivot screw to ensure smooth movement.
- Measuring Tools (Tape Measures and Rulers): Tape measures should be rolled up loosely or hung up after use. Folding them tightly causes creases that distort the markings, leading to inaccurate measurements. Wooden and plastic rulers should be kept flat or hung to prevent warping and cracking.
- Marking Tools (Tailor’s Chalk and Tracing Wheels): Tailor’s chalk should be kept in a dry container to prevent crumbling. Tracing wheels must be kept clean of lint, and the wheel pivot should be oiled occasionally to ensure it rolls smoothly without tearing the pattern paper.
- Small Sewing Notions (Pins and Needles): Pins and hand-sewing needles should be stored in a pincushion or a magnetic pin holder. Emery bags can be used to sharpen and clean pins. Rusted or bent pins and needles must be discarded immediately to avoid snagging fabric.
Maintenance of the Sewing Machine
The sewing machine is the most complex and expensive piece of equipment in the garment making workshop. Regular maintenance is essential to keep it running smoothly and quietly.
Daily and Weekly Maintenance Routines
The routine care of a sewing machine involves cleaning, oiling, and proper storage:
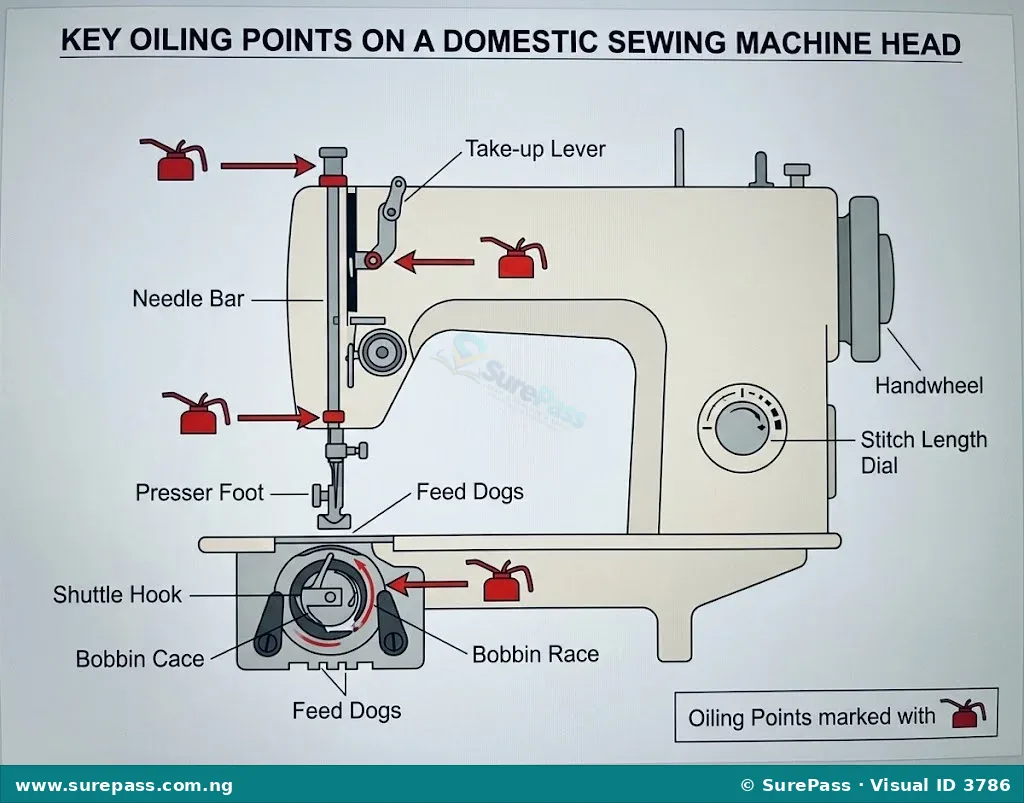
- Dusting and Cleaning: Lint, dust, and loose threads accumulate quickly around the bobbin case, feed dog, and needle bar. This debris must be brushed away daily using a small lint brush.
- Oiling: Moving parts of the sewing machine rub against each other, creating friction. Applying high-quality sewing machine oil reduces friction, prevents wear, and ensures quiet operation. Only oil designated specifically for sewing machines should be used; vegetable oil or motor oil will gum up the mechanism and ruin the machine.
- Proper Storage: When not in use, the sewing machine should be covered with a dust cover or closed into its cabinet. The presser foot should be lowered onto a scrap of fabric with the needle inserted into the fabric to relieve tension on the spring mechanisms.
How to Clean and Oil a Sewing Machine
This procedure should be performed regularly, depending on how often the machine is used.
The required materials for this procedure are:
- A small lint brush or clean toothbrush
- High-quality sewing machine oil
- A soft, lint-free cloth
- A screwdriver (usually provided with the machine)
- Scrap fabric
The cleaning and oiling procedure involves the following steps:
- Disconnect the machine from the power source (if electric) to ensure safety.
- Remove the needle, presser foot, slide plate, and needle plate using the appropriate screwdriver.
- Take out the bobbin and the bobbin case assembly.
- Use the lint brush to gently sweep away all accumulated lint, dust, and thread fragments from the feed dog area, bobbin race, and shuttle mechanism. Do not blow into the machine, as moisture from the breath can cause internal rust.
- Locate the oiling points indicated in the machine’s manual. These are usually small holes or joints where metal parts meet and move against each other.
- Apply one or two drops of sewing machine oil to each oiling point. Do not over-oil, as excess oil can stain sewing threads and fabrics.
- Turn the handwheel slowly by hand several times to distribute the oil evenly through the moving parts.
- Wipe away any excess oil from the machine body and needle bar using the soft cloth.
- Reassemble the bobbin case, needle plate, presser foot, and needle.
- Stitch on a piece of scrap fabric for several minutes to absorb any residual oil before starting work on an actual garment.
Common Sewing Machine Faults, Causes, and Remedies
A sewing machine fault is any operational defect or malfunction that prevents the machine from stitching fabric correctly.
During garment construction, various mechanical issues may arise. Understanding the causes of these faults allows the operator to apply the correct remedies quickly and resume sewing.
Detailed Analysis of Common Faults
The table below outlines the most common sewing machine faults, their potential causes, and how to correct them:
| Machine Fault | Possible Causes | Remedies |
|---|---|---|
| Needle Breaking |
|
|
| Upper Thread Snapping |
|
|
| Lower (Bobbin) Thread Snapping |
|
|
| Skipped Stitches |
|
|
| Puckered or Gathered Seams |
|
|
| Stiff or Heavy Running Machine |
|
|
| Uneven or Loopy Stitches |
|
|
Practical Guide to Simple Repairs
Many common sewing machine faults do not require a professional mechanic. Garment makers can perform simple repairs and adjustments to restore proper function.
How to Replace a Sewing Machine Needle
A damaged needle must be replaced immediately to prevent skipped stitches and fabric damage.
The required materials are:
- A new sewing machine needle of the correct size
- A small screwdriver (if required by the machine model)
The procedure involves the following steps:
- Turn off the power switch (if electric) and raise the needle bar to its highest position by turning the handwheel toward the operator.
- Lower the presser foot to create space.
- Hold the old needle with one hand and loosen the needle clamp screw using the screwdriver or fingers.
- Pull the old needle straight down and out of the needle clamp.
- Examine the new needle to identify the flat side of the shank and the long groove along the needle shaft.
- Insert the new needle into the needle clamp. Ensure the flat side of the shank faces the correct direction (usually to the back for modern machines, or to the right/left for older models, depending on the machine manual).
- Push the needle upward as far as it will go into the needle bar.
- Tighten the needle clamp screw securely using the screwdriver. Do not over-tighten, but ensure it is firm enough to prevent the needle from slipping out during sewing.
How to Adjust Thread Tension
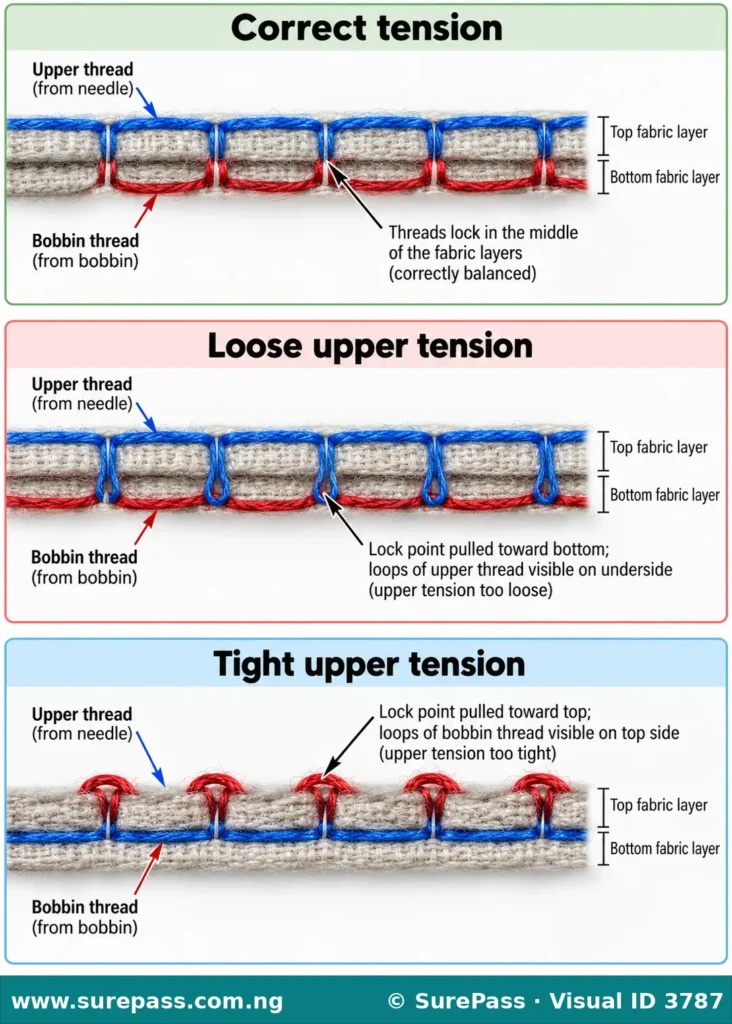
Balanced tension is achieved when the upper and lower threads lock together exactly in the center of the fabric layers, without loops appearing on either side.
The required materials are:
- Two pieces of medium-weight fabric
- Two different colors of thread (one for the upper thread, one for the bobbin) to make tension issues easy to see
The procedure involves the following steps:
- Thread the machine with one color on top and a different color in the bobbin.
- Fold the fabric in half and sew a straight line of stitches.
- Examine the stitches on both the top and bottom surfaces of the fabric.
- If loops of the bobbin thread appear on the top surface of the fabric, the upper tension is too tight. Turn the upper tension dial to a lower number to loosen it.
- If loops of the upper thread appear on the bottom surface of the fabric, the upper tension is too loose. Turn the upper tension dial to a higher number to tighten it.
- If the upper tension adjustments do not resolve the issue, adjust the bobbin tension. Locate the small screw on the bobbin case. Turn it slightly clockwise to tighten the tension, or counter-clockwise to loosen it. Only make very small adjustments (a quarter-turn at a time).
- Test sew again on the scrap fabric and repeat the adjustments until the stitches are perfectly balanced on both sides.
Summary
Proper care and maintenance of sewing tools, equipment, and machines are fundamental to successful garment making. Regular cleaning, oiling, and correct storage prevent rust, reduce repair costs, and ensure high-quality stitching. When operational faults occur, such as needle breakage or thread snapping, understanding the specific causes allows fashion designers to apply simple remedies and maintain a productive workshop environment.
Evaluation Guide
Answer the following questions to assess understanding of the unit:
- Explain three reasons why sewing tools, equipment, and machines should be cared for.
- Describe the step-by-step procedure for cleaning and oiling a domestic sewing machine.
- State two possible causes and corresponding remedies for a sewing machine that is skipping stitches.
- What causes a sewing machine to run heavily or feel stiff, and how can this fault be corrected?
- Explain how to identify and correct unbalanced upper thread tension.
- Describe the correct procedure for replacing a bent sewing machine needle.





0 comments
Open the discussion when you need it. Comments stay collapsed until requested so the initial article remains light.