


ARTICLE CONTENTSOn this page 7 sections
Coding (Programming)
Performance Objectives
By the end of the lesson, students should be able to:
- state the types and examples of programming languages;
- describe the components of a visual programming interface;
- use different block palettes to create a program.
Meaning of Coding and Programming Languages
Coding, also known as programming, is the process of writing instructions for a computer to execute.
Computers do not understand human languages naturally. Therefore, programmers use special languages to communicate with computers and create software, games, and applications.
A programming language is a set of grammatical rules and vocabulary used to write instructions that a computer can understand and execute.
Types and Examples of Programming Languages
Programming languages are broadly classified into two main categories based on how close they are to human language or computer hardware. These categories are low-level languages and high-level languages.
Low-Level Languages
Low-level languages are programming languages that are very close to the raw language of computer hardware.
These languages are difficult for humans to read and write because they use binary code (zeros and ones) or short mnemonic codes. Low-level languages include machine language and assembly language.
High-Level Languages
High-level languages are programming languages designed to be easy for humans to read, write, and understand.
These languages use English-like words and mathematical symbols. High-level languages are further divided into text-based languages and visual programming languages.
Text-based languages require programmers to type out lines of code using strict syntax rules. Visual programming languages allow programmers to build programs by dragging and connecting graphical blocks.
Common examples of programming languages include:
- Python: A text-based high-level language widely used for web development, data analysis, and artificial intelligence.
- Java: A text-based high-level language used for building mobile applications and enterprise software.
- Scratch: A visual high-level programming language designed to teach coding concepts through graphical blocks.
- JavaScript: A text-based high-level language used to make interactive elements on websites.
- C++: A text-based high-level language used for system software, game development, and high-performance applications.
Visual Programming Languages and the Scratch Interface
A visual programming language is a programming language that allows users to create programs by manipulating graphical elements rather than typing text commands.
Scratch is a popular visual programming language developed by the Massachusetts Institute of Technology (MIT). It is designed to help learners understand coding logic without worrying about typing errors or complex syntax rules.
Observe the diagram below to understand the layout of the Scratch interface.
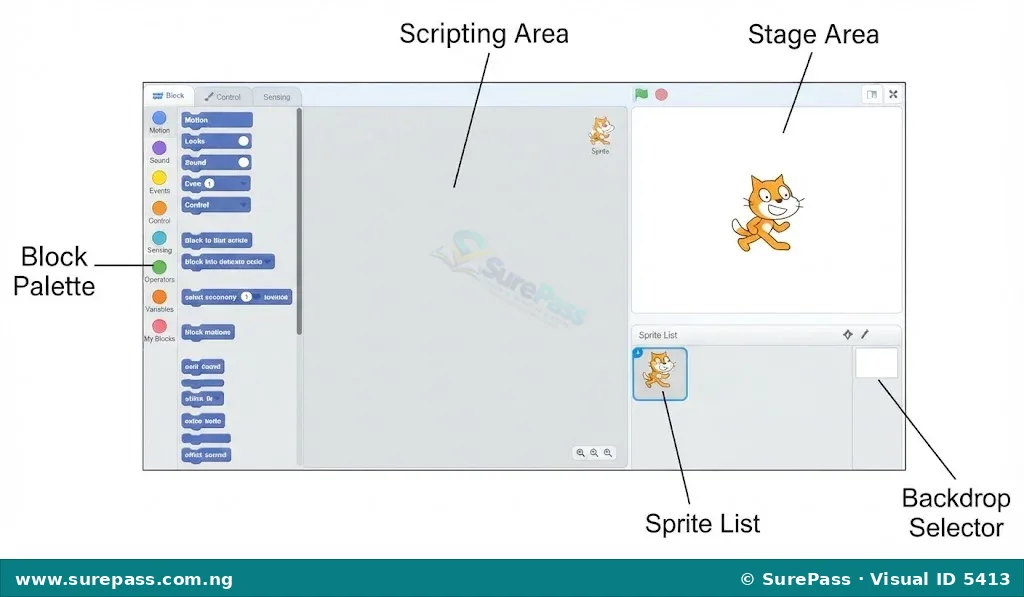
The Scratch interface consists of several key components, each performing a specific role in the creation and execution of a program. The roles of these components include:
- Blocks: These are the individual graphical puzzle pieces containing specific commands used to build programs in Scratch.
- Block Palettes: This is the sidebar containing categories of blocks grouped by their functions, such as motion, looks, or sound.
- Stage: This is the background area where the sprites perform their actions and programs run.
- Script: This is a stack of connected blocks that forms a complete set of instructions for a sprite to follow.
- Scripting Area: This is the workspace where blocks are dragged, dropped, and assembled to create scripts.
- Stage Area: This is the section of the screen that displays the stage, sprites, and the visual output of the running program.
- Backdrops: These are the background images or designs applied to the stage.
- Add Extension: This is a feature that allows users to connect Scratch to external hardware or add extra coding blocks for advanced features like text-to-speech or video sensing.
- Sprite: This is a graphical character or object in Scratch that can be programmed to perform actions.
- Sprite Library: This is a collection of pre-made characters and objects that users can select and add to their projects.
Block Palettes in Scratch
Blocks in Scratch are colour-coded to help programmers quickly identify their functions. The primary block palettes in Scratch include:
- Motion Blocks (Blue): These blocks control the movement, position, and rotation of sprites. Examples include moving forward, turning, or gliding to a specific position.
- Looks Blocks (Purple): These blocks change the appearance of sprites, display speech bubbles, switch costumes, or change backdrops.
- Sound Blocks (Pink): These blocks play audio files, adjust volume, or change sound pitches.
- Events Blocks (Yellow): These blocks trigger scripts to run when specific actions occur, such as clicking the green flag or pressing a keyboard key.
- Control Blocks (Gold): These blocks manage the flow of a program, including loops (repeat blocks) and conditional statements (if-then blocks).
- Sensing Blocks (Light Blue): These blocks detect inputs, such as touching another sprite, touching a colour, or pressing a keyboard key.
- Operators Blocks (Green): These blocks perform mathematical calculations, comparisons, and text combinations.
- Variables Blocks (Orange): These blocks store and update data values during program execution.
How to Create a Walking Animation Program Controlled by Keyboard Keys
This practical activity demonstrates how to use different block palettes to create a walking animation for a sprite. The sprite will move across the stage when specific keyboard keys are pressed.
The required materials are:
- A computer or tablet with Scratch 3.0 installed or accessible online.
- A keyboard connected to the device.
The procedure involves the following steps:
- Open the Scratch 3.0 software on the computer or access it via a web browser.
- Observe the default cat sprite on the stage.
- Click on the Events palette in the block palette area.
- Drag the “when space key pressed” block into the scripting area.
- Click the drop-down arrow on the “when space key pressed” block and select the “right arrow” key.
- Click on the Motion palette and drag the “move 10 steps” block, snapping it directly underneath the “when right arrow key pressed” block.
- Click on the Looks palette and drag the “next costume” block, snapping it underneath the “move 10 steps” block to create a walking effect.
- Press the right arrow key on the keyboard repeatedly to observe the cat sprite walking across the stage.
- Drag another “when space key pressed” block from the Events palette into the scripting area.
- Click the drop-down arrow on this new block and select the “left arrow” key.
- Click on the Motion palette, drag another “move 10 steps” block, and snap it underneath the “when left arrow key pressed” block.
- Click inside the number input of the new “move 10 steps” block and change the value from “10” to “-10” to make the sprite move backward.
- Click on the Looks palette and drag another “next costume” block, snapping it underneath the “-10 steps” block.
- Press the left arrow key on the keyboard to observe the sprite walking backward.
Look at the diagram below to see how the completed scripts should look in the scripting area.


0 comments
Open the discussion when you need it. Comments stay collapsed until requested so the initial article remains light.