


ARTICLE CONTENTSOn this page 11 sections
MS PowerPoint Interface, Slide Design and Presentation Skills for JSS 1
Performance Objectives
By the end of the lesson, students should be able to:
- create PowerPoint document;
- edit PowerPoint document;
- format PowerPoint document;
- insert table into PowerPoint document.
What is Microsoft PowerPoint?
Microsoft PowerPoint is a computer program used to create and deliver presentations. It helps people share information, ideas, and stories using slides that combine text, images, shapes, and other elements.
Presentations are used in many places, such as schools for projects, businesses for meetings, and churches for sermons. PowerPoint makes it easy to organise information visually and present it clearly to an audience.
Starting Microsoft PowerPoint
To begin using Microsoft PowerPoint, the program must first be opened on a computer. The common ways to start PowerPoint include:
- Clicking the Start button (usually at the bottom-left corner of the screen), then finding and clicking “PowerPoint” in the list of programs.
- Clicking on a PowerPoint icon if it is available on the desktop or taskbar.
Once opened, PowerPoint usually presents an option to start a new blank presentation or choose from existing templates.
Understanding the MS PowerPoint User Interface
The user interface is the main screen that appears when Microsoft PowerPoint is opened. It contains different parts that help in creating and managing presentations. Understanding these parts makes it easier to use the program effectively.
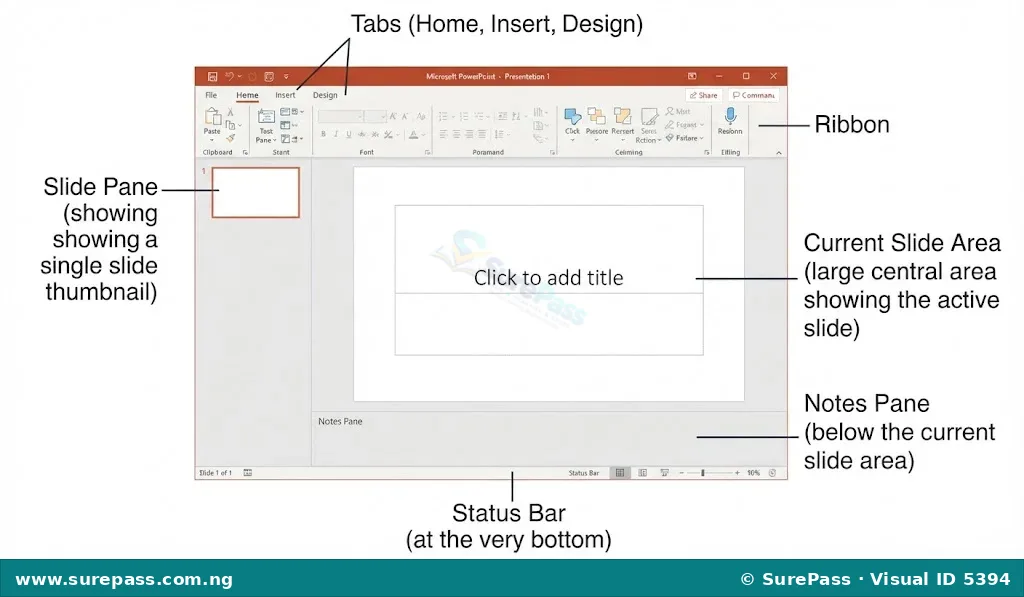
The main parts of the PowerPoint user interface are:
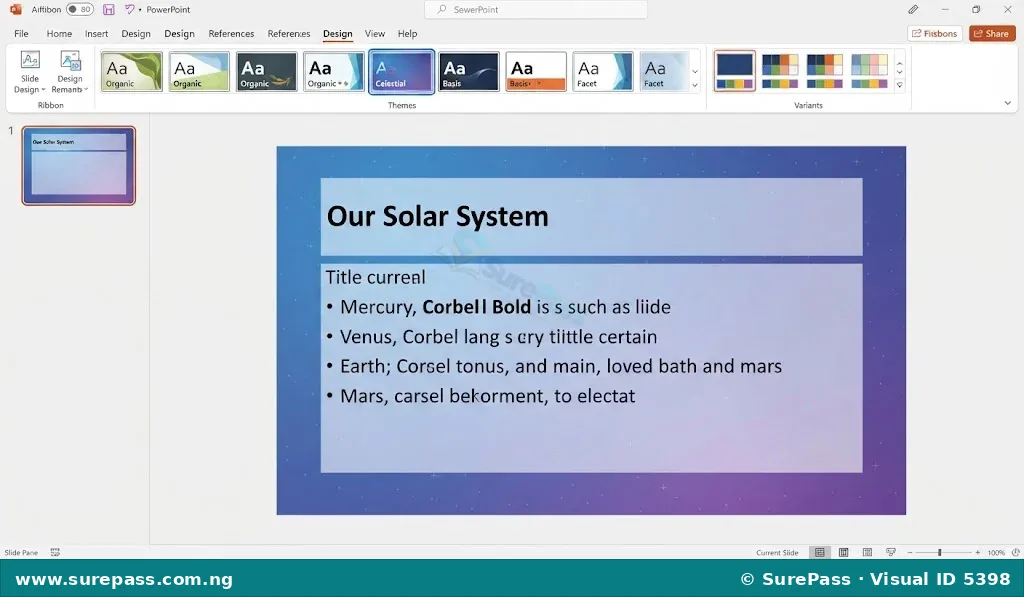
- Ribbon: This is the wide strip at the top of the window that contains many tools and commands. The Ribbon is organised into different tabs.
- Tabs: These are categories on the Ribbon, such as Home, Insert, Design, Transitions, Animations, Slide Show, Review, and View. Clicking on a tab changes the tools displayed on the Ribbon.
- Slide Pane (Thumbnails Pane): Located on the left side of the window, this pane displays small pictures (thumbnails) of all the slides in the presentation. It allows for easy navigation between slides.
- Current Slide Area: This is the large central area where the active slide is displayed. All editing and content creation for the selected slide happen here.
- Notes Pane: Located below the Current Slide Area, this section allows users to add speaker notes for each slide. These notes are visible only to the presenter and not to the audience during a slide show.
- Status Bar: This is a horizontal bar at the very bottom of the window. It displays information about the current presentation, such as the current slide number, the total number of slides, and the zoom level.
Creating a PowerPoint Document
Creating a new PowerPoint document, also known as a presentation, is the first step to sharing information using slides. A new presentation starts with a blank slide where content can be added.
The steps to create a new PowerPoint document are:
- Open Microsoft PowerPoint.
- If PowerPoint opens to a start screen, select “Blank Presentation” or “New”.
- If PowerPoint is already open and a presentation is active, click on the “File” tab on the Ribbon.
- Select “New” from the menu on the left.
- Choose “Blank Presentation” to start with an empty set of slides.
A new presentation will open, usually with one title slide ready for content.
Working with Slides: Design and Layout
Slides are the individual pages of a PowerPoint presentation. Each slide can have a different design and layout to suit the content it holds.
Understanding Slide Layouts
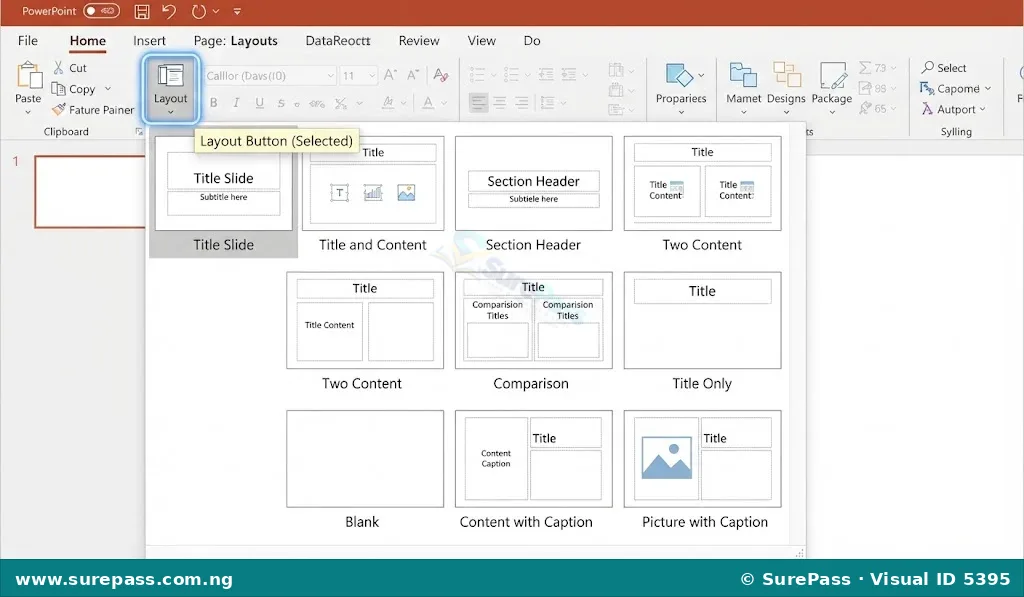
A slide layout arranges the placeholders for text, images, tables, charts, and other objects on a slide. Choosing the right layout helps to organise content clearly and effectively.
Common slide layouts include:
- Title Slide: Used for the very first slide, containing the presentation title and subtitle.
- Title and Content: A common layout with a title at the top and a large area for text, images, or other content below.
- Two Content: Divides the content area into two sections, useful for comparing two items or showing text alongside an image.
- Blank: A completely empty slide, allowing full customisation.
Changing Slide Layout
The layout of a slide can be changed at any time to better fit the content being added.
The steps to change a slide layout are:
- Select the slide whose layout needs to be changed from the Slide Pane on the left.
- Go to the “Home” tab on the Ribbon.
- In the “Slides” group, click on the “Layout” button.
- A gallery of different slide layouts will appear. Click on the desired layout to apply it to the selected slide.
Adding New Slides
Most presentations require more than one slide. New slides can be added easily to expand the presentation.
The steps to add a new slide are:
- Select the slide in the Slide Pane after which the new slide should appear.
- Go to the “Home” tab on the Ribbon.
- In the “Slides” group, click on the “New Slide” button. A new slide with a default layout (usually “Title and Content”) will be added.
- Alternatively, click the small arrow below the “New Slide” button to choose a specific layout for the new slide before adding it.
Adding Content to Slides
PowerPoint allows for various types of content to be added to slides to make them informative and engaging.
Adding Text
Text is essential for conveying information. In PowerPoint, text is usually added inside placeholders or text boxes.
To add text to a slide:
- Click inside a text placeholder (e.g., “Click to add title” or “Click to add text”) on the current slide.
- Type the desired text.
- To add text anywhere else on the slide, go to the “Insert” tab on the Ribbon.
- In the “Text” group, click on “Text Box”.
- Click and drag on the slide to draw a text box, then type the text inside it.
Adding Images
Images can make a presentation more appealing and help explain concepts visually.
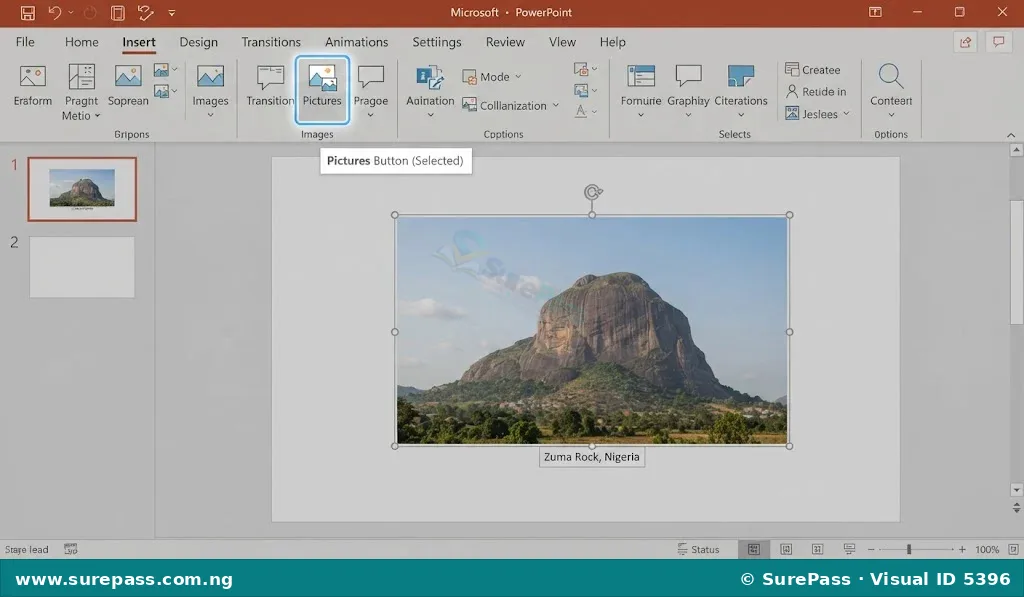
The steps to insert an image are:
- Select the slide where the image should be added.
- Go to the “Insert” tab on the Ribbon.
- In the “Images” group, click on “Pictures”.
- Choose “This Device…” to insert an image saved on the computer.
- Browse to the location of the image file, select it, and click “Insert”.
- The image will appear on the slide and can be resized or moved as needed.
Adding Shapes
Shapes can be used to draw attention to specific parts of a slide, create diagrams, or add decorative elements.
The steps to insert a shape are:
- Select the slide where the shape should be added.
- Go to the “Insert” tab on the Ribbon.
- In the “Illustrations” group, click on “Shapes”.
- A gallery of different shapes (lines, rectangles, circles, arrows, stars, etc.) will appear.
- Click on the desired shape.
- Click and drag on the slide to draw the shape to the preferred size.
- The shape can then be moved, resized, and its colour changed using the “Shape Format” tab that appears.
Inserting Tables into PowerPoint Documents
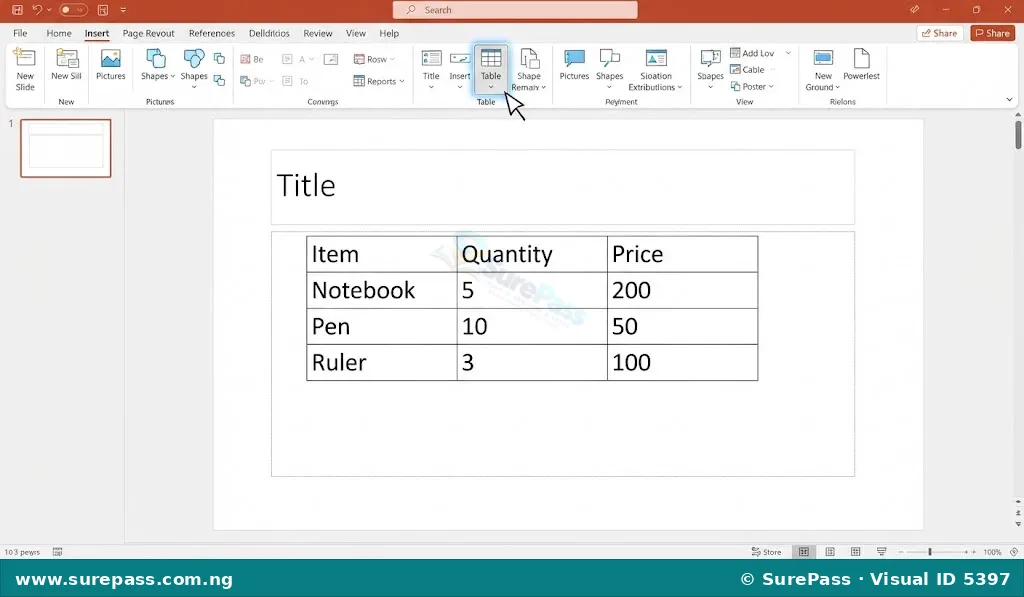
Tables are useful for presenting data in an organised, row-and-column format. This helps to compare information or show numerical data clearly.
The steps to insert a table are:
- Select the slide where the table should be added.
- Go to the “Insert” tab on the Ribbon.
- In the “Tables” group, click on the “Table” button.
- A grid will appear. Drag the mouse over the grid to select the desired number of rows and columns for the table. For example, selecting 3×4 will create a table with 3 columns and 4 rows.
- Alternatively, click “Insert Table…” and type the number of columns and rows in the dialogue box, then click “OK”.
- The table will appear on the slide, and text can be typed into its cells.
Editing a PowerPoint Document
Editing a PowerPoint document involves making changes to the existing content on the slides. This can include correcting mistakes, updating information, or rearranging elements.
Common editing tasks include:
- Changing Text: Click on any text box or placeholder and type to add, delete, or modify words.
- Moving Objects: Click and drag images, shapes, or text boxes to new positions on the slide.
- Resizing Objects: Click on an object (image, shape, table) to select it. Small circles or squares (handles) will appear around its edges. Drag these handles to make the object larger or smaller.
- Deleting Objects: Select an object and press the “Delete” key on the keyboard.
- Rearranging Slides: In the Slide Pane on the left, click and drag a slide thumbnail to a new position in the presentation order.
Formatting a PowerPoint Document
Formatting a PowerPoint document means changing the appearance of text, shapes, and slides to make them look better and easier to read. Good formatting makes a presentation more professional and engaging.
Common formatting tasks include:
- Text Formatting:
- Select the text to be formatted.
- On the “Home” tab, use the “Font” group to change the font type, size, colour, make it bold, italic, or underlined.
- Use the “Paragraph” group to change text alignment (left, centre, right, justify) or add bullet points.
- Shape Formatting:
- Select the shape.
- A “Shape Format” tab will appear on the Ribbon.
- Use the “Shape Styles” group to change the fill colour, outline colour, and add effects to the shape.
- Slide Background and Design:
- Go to the “Design” tab on the Ribbon.
- In the “Themes” group, click on different themes to see how they change the overall look of the slides (background, fonts, colours).
- In the “Variants” group, choose different colour schemes for the selected theme.
- To change only the background, click “Format Background” on the “Design” tab and choose a solid colour, gradient, or picture.
Using PowerPoint to Make Presentations
After creating and designing slides, the final step is to use PowerPoint to deliver a presentation to an audience. PowerPoint helps to display the slides in a full-screen mode, making it easy for everyone to see the content.
To start a slide show:
- Go to the “Slide Show” tab on the Ribbon.
- In the “Start Slide Show” group, click “From Beginning” to start from the first slide, or “From Current Slide” to start from the selected slide.
- The slides will fill the entire screen.
- To move to the next slide, click the mouse, press the right arrow key, or press the spacebar.
- To go back to the previous slide, press the left arrow key.
- To end the slide show, press the “Esc” (Escape) key on the keyboard.
When presenting, it is important to speak clearly, look at the audience, and explain the information on each slide. The slides are there to support the speaker, not to replace them.

0 comments
Open the discussion when you need it. Comments stay collapsed until requested so the initial article remains light.