


ARTICLE CONTENTSOn this page 9 sections
3D Modelling with Paint 3D
Performance Objectives
By the end of the lesson, students should be able to:
- describe 3D modelling and its uses;
- identify the elements of paint 3D user interface;
- create 3D images;
- draw straight lines and multiple lines curves.
Meaning of 3D Modelling
3D modelling is the process of creating a three-dimensional digital representation of an object using specialized computer software.
The term “3D” stands for three-dimensional. Unlike flat drawings, which only have two dimensions (length and width), three-dimensional objects have three distinct dimensions: length, width, and depth. Depth is also referred to as thickness or height. This third dimension makes the digital object look solid and realistic, as if it could be held in the hand.
To understand the difference, a drawing of a square on a sheet of paper is two-dimensional (2D). It is flat and has no thickness. A physical wooden block or a cardboard box is three-dimensional (3D) because it occupies space and has depth. In computer technology, 3D modelling software allows users to build and rotate these solid-looking objects on a flat computer screen.
Observe the comparison diagram below.
Uses of 3D Modelling
3D modelling is used across many industries to design, visualize, and manufacture items. The main uses of 3D modelling include:
- Entertainment and Animation: Animated movies, cartoons, and video games rely heavily on 3D modelling. Characters, environments, and special effects are first built as 3D models before they are animated.
- Architecture and Construction: Architects use 3D models to design houses, schools, bridges, and offices. This allows builders and clients to see exactly how a building will look from all angles before construction begins.
- Product Design and Manufacturing: Companies design everyday items such as plastic bottles, mobile phones, cars, and toys as 3D models. This helps manufacturers test the shape and appearance of a product before mass-producing it.
- Education and Medicine: 3D models are used in schools and hospitals to explain complex ideas. For example, medical students study 3D models of the human heart, while geography students explore 3D models of the solar system.
- 3D Printing: A 3D model can be sent to a 3D printer, which uses materials like plastic or resin to build a physical, touchable version of the digital design.
Tools for 3D Modelling: Paint 3D
Paint 3D is a free computer application developed by Microsoft that allows users to create both two-dimensional drawings and three-dimensional models easily.
It is a beginner-friendly tool that comes pre-installed on computers running the Windows 10 and Windows 11 operating systems. Paint 3D makes it easy to transition from flat 2D sketching to 3D design by providing simple tools, pre-made 3D shapes, and a clean workspace.
Elements of the Paint 3D User Interface
The user interface refers to the screen layout, buttons, and menus that a person uses to interact with the software. Understanding these elements helps users navigate the application quickly.
Look at the diagram of the interface below.
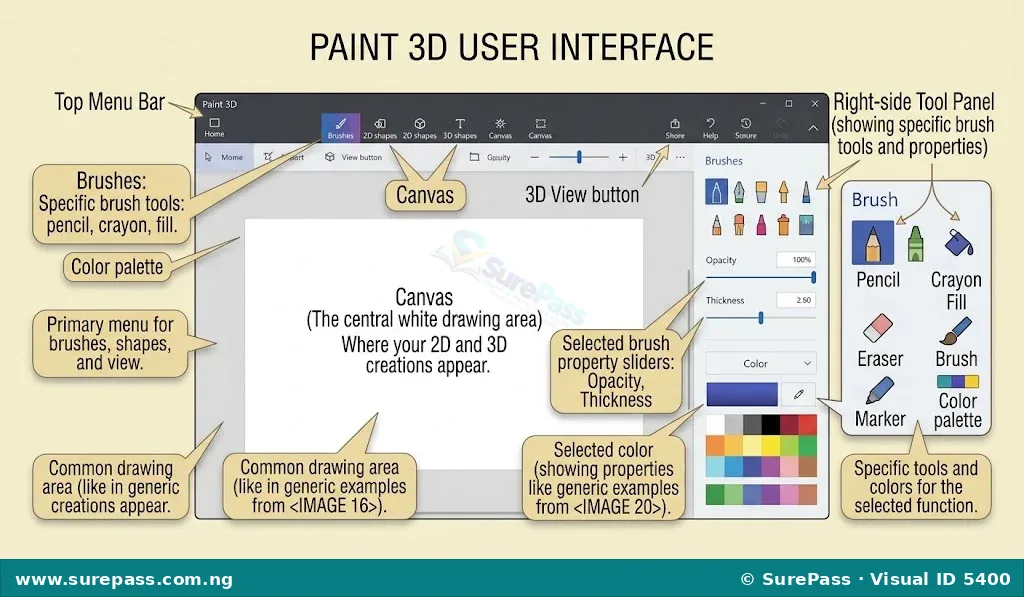
The main elements of the Paint 3D user interface include:
- The Canvas: This is the central white area of the screen where drawings and models are created. It acts as the digital paper.
- The Top Menu Bar: This bar contains the main tool categories, including Brushes, 2D Shapes, 3D Shapes, Stickers, Text, Effects, and Canvas settings.
- The Right-side Tool Panel: When a category is selected from the top menu, this panel changes to show specific tools, thickness sliders, opacity controls, and colour palettes.
- The 3D View Button: Located at the top center of the screen, this button allows the user to switch from a flat view to a three-dimensional perspective. This makes it possible to rotate the workspace and view models from the top, sides, or back.
The Brushes Menu
The Brushes menu contains tools used for freehand drawing, painting, and colouring. The key elements within this menu are:
- Pencil: Draws thin, sharp, freehand lines. It is ideal for sketching initial outlines.
- Eraser: Wipes away mistakes or unwanted parts of a drawing on the canvas.
- Crayon: Creates textured, waxy strokes that mimic physical wax crayons.
- Marker: Draws bold, solid, and thick lines with flat edges.
- Calligraphy Pen: Creates smooth strokes that change thickness depending on the direction of the movement.
- Oil Brush: Mimics thick oil paint, showing texture and brush strokes.
- Watercolor: Creates soft, semi-transparent, and blended strokes.
- Pixel Pen: Draws sharp, single-pixel lines, which are useful for precise pixel art.
- Spray Can: Sprays a scattered pattern of tiny dots, useful for shading and airbrush effects.
- Fill Tool: Fills a closed area or shape with a single solid colour instantly.
How to Draw Straight Lines and Curves
The 2D Shapes tool in Paint 3D is used to draw precise geometric lines and curves. This skill is essential for creating clean outlines and structures.
Drawing a Straight Line
The procedure for drawing a straight line involves the following steps:
- Click on the 2D shapes icon on the top menu bar.
- Select the Line tool from the 2D shapes panel on the right side of the screen.
- Choose the desired line thickness and colour from the options in the right panel.
- Position the mouse cursor on the canvas where the line should start.
- Click and hold the left mouse button, then drag the mouse to the point where the line should end.
- Release the mouse button to place the line.
- Click the checkmark button next to the line or click outside the selection box to finalize it.
Drawing a Multiple-Line Curve
Paint 3D allows users to create curved lines that can bend in multiple directions using control points. The procedure involves the following steps:
- Click on the 2D shapes icon on the top menu bar.
- Select the 3-point curve or 4-point curve tool from the right-side panel.
- Click and drag on the canvas to draw a straight line, then release the mouse button.
- Notice the small circular control points that appear along the line.
- Click and hold one of the control points, then drag it in any direction to bend that part of the line.
- Click and drag the other control points to create a second bend, forming a multiple-line curve.
- Click the checkmark button or click on an empty area of the canvas to lock the curve in place.
Observe the curve creation process below.
How to Create a Simple 3D Image
Creating a 3D image involves using pre-made 3D shapes and assembling them on the canvas. This practical activity demonstrates how to build a simple 3D house using a cube and a pyramid.
The required materials are:
- A computer with Windows 10 or Windows 11 installed.
- The Paint 3D application opened.
The procedure involves the following steps:
- Click on the 3D shapes icon on the top menu bar.
- Look at the right-side panel under the “3D objects” section and select the Cube.
- Click and drag on the canvas to create a cube. This will serve as the base of the house.
- Go back to the right-side panel and select the Pyramid shape.
- Click and drag on the canvas to create a pyramid. This will serve as the roof of the house.
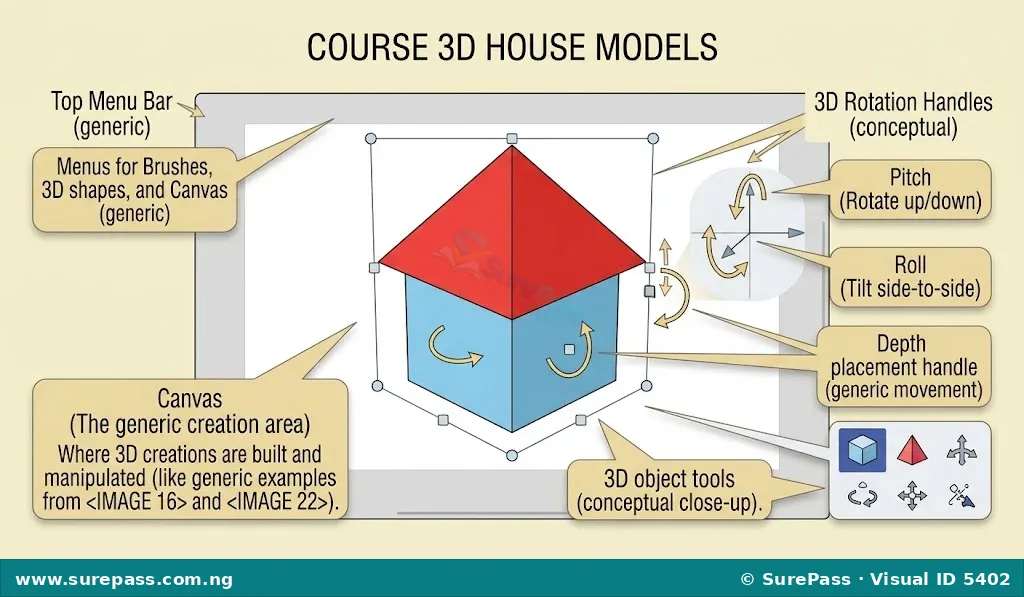
- Click on the pyramid to select it. Use the movement handles (arrows) to drag the pyramid and place it directly on top of the cube.
- Click on the 3D view button on the top menu bar to see the model in three dimensions.
- Use the rotation handles around the pyramid to adjust its position, ensuring it sits perfectly on top of the cube from all sides.
- Click on the Brushes icon on the top menu, select the Marker tool, choose a dark colour, and draw a door and windows on the front face of the cube.
Observe the completed model below.
Review Questions
The following questions help test the understanding of this unit:
- Define 3D modelling and explain how it differs from 2D drawing.
- State three practical uses of 3D modelling in modern industries.
- List five brush tools found in the Paint 3D user interface and describe their functions.
- Explain the purpose of the 3D View button in Paint 3D.
- Outline the steps required to draw a curved line using the 2D shapes tool.


0 comments
Open the discussion when you need it. Comments stay collapsed until requested so the initial article remains light.