



ARTICLE CONTENTSOn this page 9 sections
Game Development with Visual Programming
Performance Objectives
By the end of the lesson, students should be able to:
- explain game development;
- state the important elements of game development;
- decompose the elements of a game;
- create a game that allows:
- a user control a character
- characters follow a path
- debug a game.
What is Game Development?
Game development is the process of creating electronic games. This involves designing the game, writing the computer code, creating the graphics and sounds, and testing the game to make sure it works correctly.
Electronic games can be played on computers, mobile phones, tablets, and gaming consoles. They provide entertainment and can also be used for learning.
Important Elements of Game Design
Every game, whether simple or complex, has certain key parts that make it work and make it fun to play. These parts are called the elements of game design. Understanding these elements helps in creating good games.
The important elements of game design include:
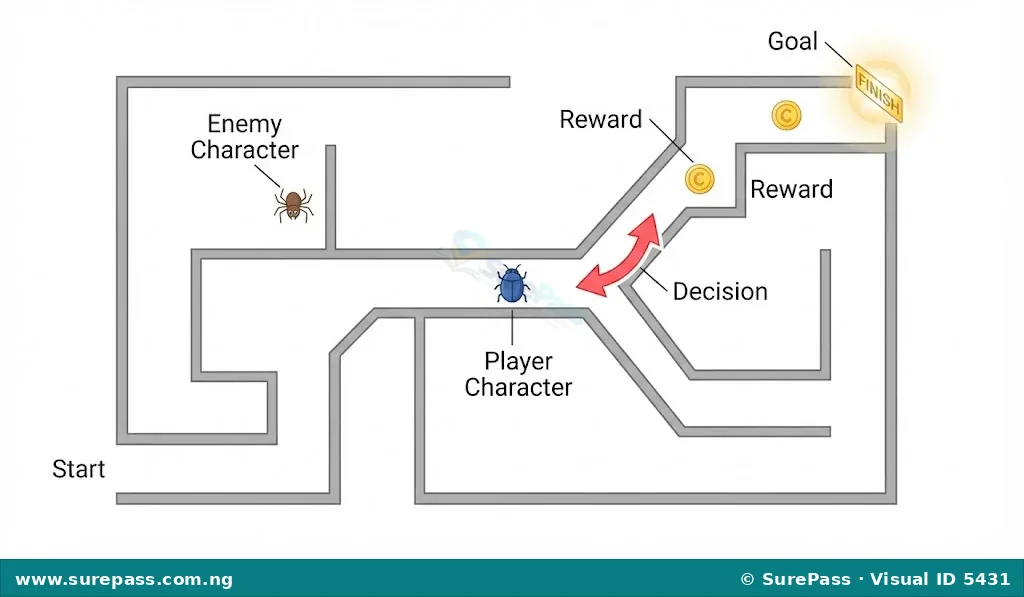
- Goal: This is what the player needs to achieve in the game. It is the main objective or task. For example, the goal might be to collect all coins, reach a finish line, or defeat an enemy.
- Characters: These are the figures or objects that move and interact within the game. They can be controlled by the player (player characters) or by the computer (non-player characters or enemies). Examples include a hero, a villain, or even a moving obstacle.
- Decision: These are the choices the player makes during the game. Decisions affect how the game progresses. For example, a player might decide to turn left or right, jump over an obstacle, or use a special item.
- Reward: This is what the player receives for achieving a goal or performing well in the game. Rewards encourage players to continue playing and improve their skills. Examples of rewards include points, extra lives, new abilities, or access to a new level.
- Progression: This refers to how the game changes and develops as the player continues to play. Games often become more challenging or introduce new features as the player advances. Progression keeps the game interesting over time. For example, levels might get harder, new enemies might appear, or the player might unlock new areas.
Decomposing the Elements of a Game
Decomposing a game means breaking it down into its individual parts or elements. This helps in understanding how the game works and makes it easier to plan and create your own games.
Let us decompose a simple game like “Beetle in a Maze”:
- Goal: The beetle must find its way through the maze and reach the exit.
- Characters:
- The player controls the beetle.
- There might be moving obstacles or other creatures in the maze that the beetle needs to avoid.
- Decision: The player decides which path the beetle takes at each turn in the maze.
- Reward: The beetle might collect leaves or fruits along the way for points. Reaching the exit is the main reward.
- Progression: The maze could become larger and more complex in later levels, or new types of obstacles might appear.
Designing a Game
Designing a game involves planning out all the elements before you start coding. This is like drawing a blueprint for a building. A good design helps you create a clear and fun game.
When designing a game, consider the following:
- What is the main idea of your game? Is it a race, a puzzle, or an adventure?
- What is the player’s goal? What must the player do to win?
- Who are the characters? What does the player control? Are there other characters?
- What decisions will the player make? How will the player interact with the game?
- What rewards will the player get? How will the player know they are doing well?
- How will the game progress? Will there be multiple levels or increasing difficulty?
Creating Assets for the Game
Game assets are the visual and audio components of your game. These include background images, character sprites, sound effects, and music.
For a visual programming game, assets can be:
- Background Images (Backdrops): These set the scene for your game. For example, a maze background for a “Beetle in a Maze” game, or a forest background for an adventure game. You can draw your own backgrounds or choose from existing libraries in visual programming tools.
- Character Sprites: These are the images of your characters. Each character needs a sprite. You can draw your own characters, import images, or use characters provided by the programming tool. Characters often have different costumes or poses to show movement or actions.
Coding the Game using Scratch
Scratch is a visual programming language that makes it easy to create interactive stories, animations, and games. Instead of typing complex code, you drag and drop colourful blocks that represent different commands.
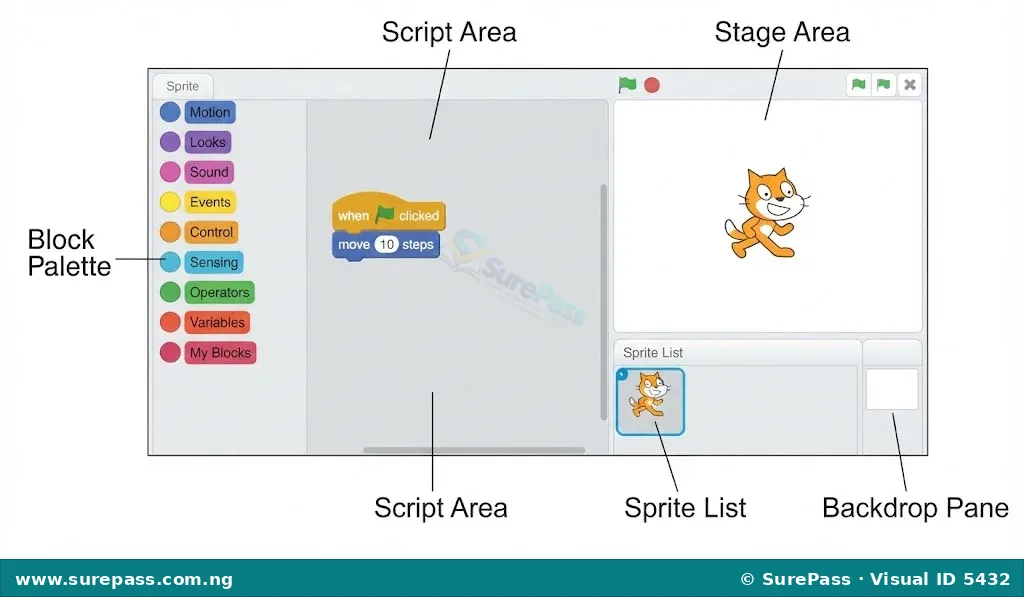
The Scratch interface has several important areas:
- Stage: This is where your game plays out. You see your characters (sprites) and backgrounds (backdrops) here.
- Sprite List: This shows all the sprites in your project. You can select a sprite to program it.
- Backdrop Pane: This allows you to manage and select backdrops for your stage.
- Block Palette: This contains categories of code blocks (e.g., Motion, Looks, Events, Control).
- Script Area: This is where you drag and connect blocks to create scripts (programs) for your sprites.
Creating a Game with User-Controlled Characters
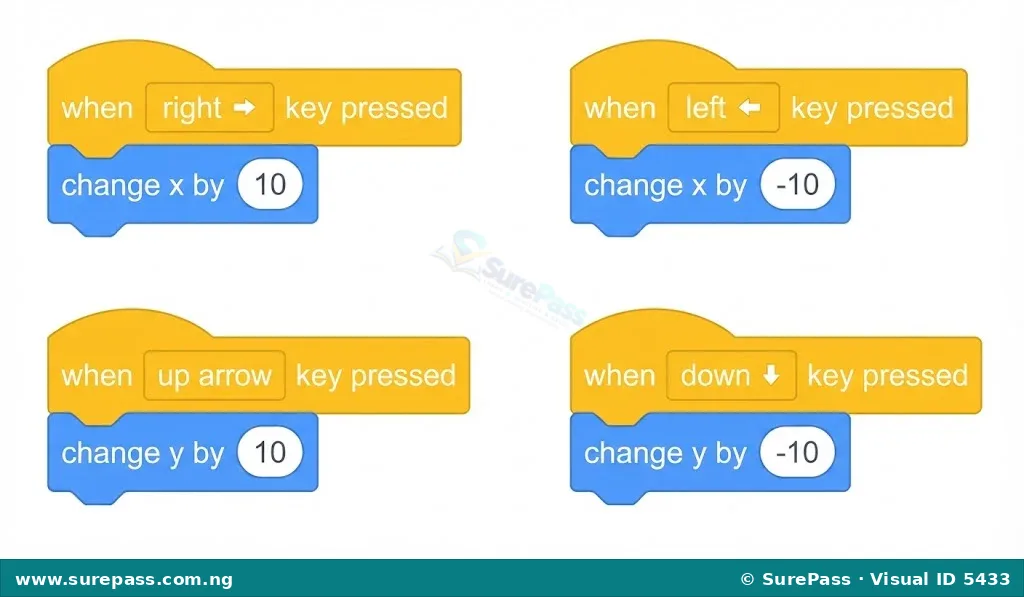
To make a character move with user control, you will use “Event” blocks and “Motion” blocks.
The procedure involves the following steps:
- Choose a Sprite: Select a sprite for your player character from the Scratch library or draw your own.
- Add a Backdrop: Choose a background for your game.
- Program Movement:
- Drag a
when [space] key pressedblock from the “Events” category. - Click on “space” to change it to
right arrow. - Drag a
change x by [10]block from the “Motion” category and attach it below thewhen right arrow key pressedblock. This makes the sprite move right. - Repeat steps 1-3 for
left arrow(usechange x by [-10]),up arrow(usechange y by [10]), anddown arrow(usechange y by [-10]).
- Drag a
- Test the Game: Click the green flag and use the arrow keys to move your character around the stage.
Making Characters Follow a Path
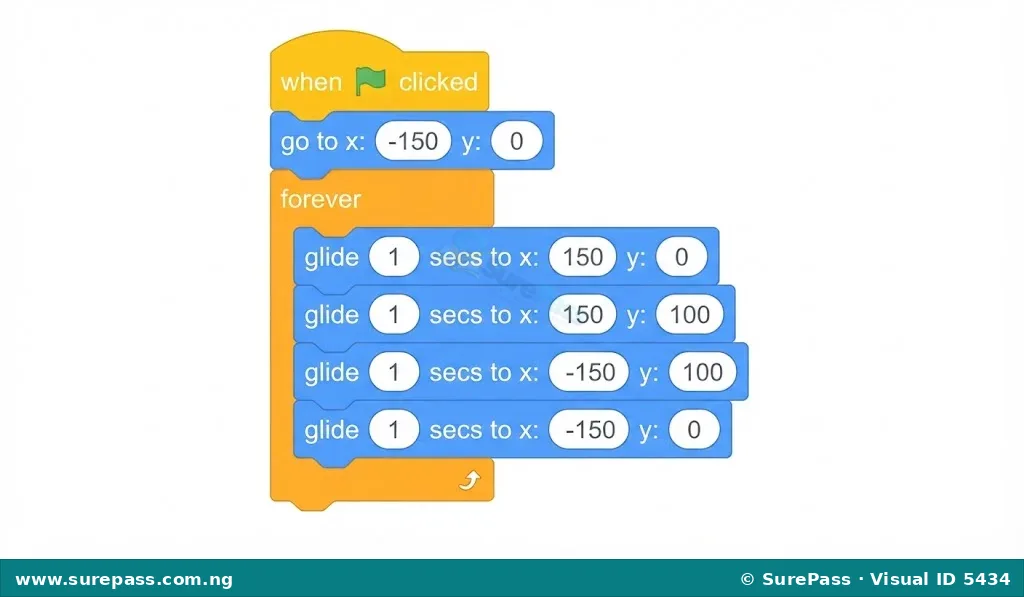
You can make a character move along a specific path using “Motion” blocks and “Control” blocks.
The procedure involves the following steps:
- Choose a Sprite: Select a sprite that will follow a path (e.g., an enemy or a moving platform).
- Set Starting Position:
- Drag a
when green flag clickedblock from “Events”. - Drag a
go to x: [0] y: [0]block from “Motion” and place it below the green flag block. Adjust the x and y values to the desired starting point.
- Drag a
- Define the Path:
- Drag a
glide [1] secs to x: [0] y: [0]block from “Motion”. Place it below thego toblock. Adjust the x and y values to the first point on the path. - Add more
glideblocks to define the rest of the path. Each block will make the sprite move smoothly to the next point.
- Drag a
- Repeat the Path (Optional):
- To make the character follow the path repeatedly, drag a
foreverblock from “Control” and wrap it around all theglideblocks.
- To make the character follow the path repeatedly, drag a
- Test the Game: Click the green flag to see your character follow the programmed path.
Debugging and Improving the Code
Debugging is the process of finding and fixing errors, or “bugs,” in your computer program. Even experienced programmers make mistakes, so debugging is a very important skill.
Common Bugs in Game Development
Some common problems you might encounter when creating games in Scratch include:
- Sprite not moving: Check if the correct “when key pressed” block is used, or if the motion blocks are attached correctly.
- Sprite moving in the wrong direction: Check the numbers in the
change x byorchange y byblocks. Positive numbers move right/up, negative numbers move left/down. - Sprite not following the path correctly: Check the x and y coordinates in the
go toandglideblocks. Make sure they are in the correct order. - Sprite disappearing: Ensure the sprite is not accidentally hidden using a
hideblock, or that it is not moving off the stage.
How to Debug a Game
The procedure involves the following steps:
- Test Regularly: Run your game often as you add new code to see if it works as expected.
- Check One Script at a Time: If a problem occurs, focus on the script that controls the part of the game that is not working.
- Look at the Blocks: Carefully examine the order and values in your code blocks. Are they connected correctly? Are the numbers what you intended?
- Use “Say” Blocks: Temporarily add a
say [Hello!] for [2] secondsblock to your script to make a sprite say the value of a variable or a message. This can help you understand what the program is doing at a certain point. - Step Through the Code: Sometimes, running the code slowly can help you see where the error occurs.
Improving the Game
Once your basic game works, you can improve it by adding more features and making it more engaging:
- Add more levels: Create new backdrops and adjust character paths or goals for each level.
- Add sound effects and music: Use the “Sound” blocks to make your game more lively.
- Include scoring: Use “Variables” to keep track of points collected by the player.
- Add obstacles or enemies: Create new sprites for obstacles and program them to move or interact with the player character.
- Create a win/lose condition: Program what happens when the player achieves the goal or fails (e.g., “You Win!” message, “Game Over” screen).



0 comments
Open the discussion when you need it. Comments stay collapsed until requested so the initial article remains light.