



ARTICLE CONTENTSOn this page 7 sections
Digital Content Creation
Performance Objectives
By the end of the lesson, students should be able to:
- create and edit MS Word.
- create and edit MS PowerPoint.
- create and edit MS Excel.
What is Digital Content Creation?
Digital content is any information or media that exists in a digital form. This includes text, pictures, sounds, and videos that can be stored and used on computers, tablets, or smartphones.
Digital content creation is the process of making these digital materials using computer tools and software.

When you type a story on a computer, draw a picture using a tablet, or record your voice on a phone, you are creating digital content. This content can be shared with others or saved for later use.
Simple Digital Content Creation Tools
Many computer programs help people create digital content. Some of the most common and useful tools for creating simple digital content are:
- Microsoft Word (MS Word)
- Microsoft PowerPoint (MS PowerPoint)
- Microsoft Excel (MS Excel)
These programs are part of a larger collection of tools called Microsoft Office. They help people create different kinds of digital materials for school, work, and personal use.
Microsoft Word (MS Word)
Microsoft Word is a word processing program. It is used to create and edit text-based documents.
People use MS Word to write letters, stories, reports, assignments, and other documents that are mostly made of words.
Creating a New Document in MS Word
To create a new document in MS Word, follow these steps:
- Turn on the computer and open the MS Word program. You can usually find it by clicking on its icon.
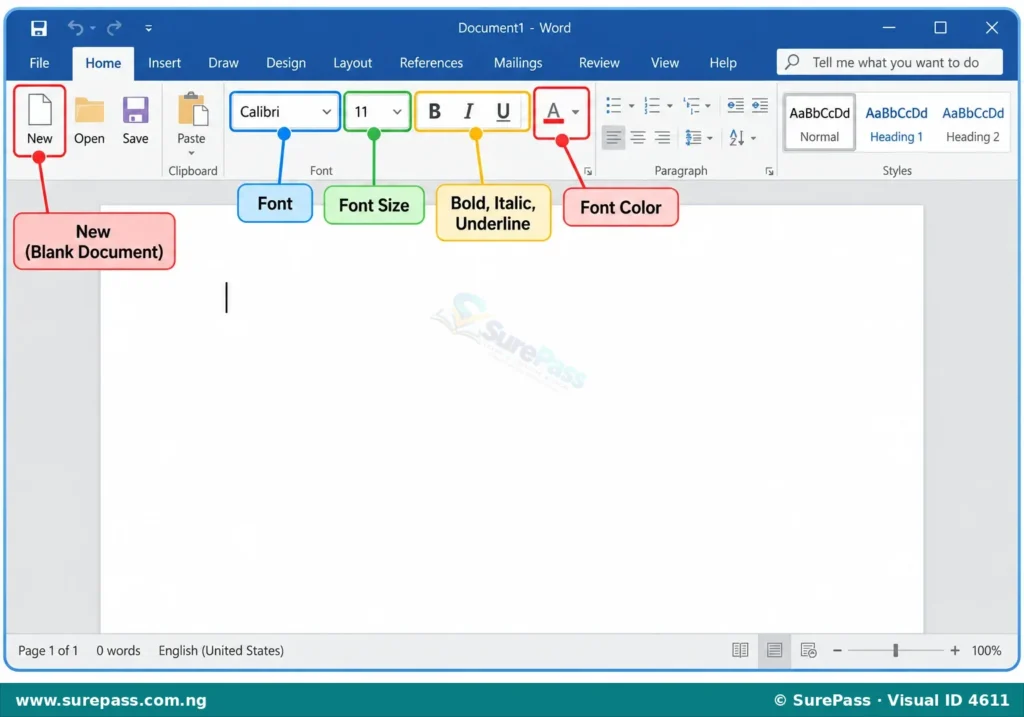
- When Word opens, it often shows a blank document automatically. If not, click on “File” in the top-left corner, then choose “New,” and then “Blank document.”
- A new, empty page will appear on the screen. This is where you will type your text.
Typing and Editing Text in MS Word
After opening a new document, you can start typing your text. The blinking line on the screen is called the cursor, and it shows where your text will appear.
Editing text means making changes to what you have typed. This can include correcting mistakes, adding new words, or changing how the text looks.
The following steps explain how to type and perform basic editing:
- Type Text: Use the keyboard to type your story, letter, or report.
- Delete Text: If you make a mistake, use the “Backspace” key to remove characters to the left of the cursor, or the “Delete” key to remove characters to the right.
- Change Font Size: Select the text you want to change. Look for the number box on the “Home” tab (usually showing “11” or “12”). Click the arrow next to it and choose a bigger or smaller number.
- Change Font Colour: Select the text. On the “Home” tab, find the “A” icon with a colour bar underneath. Click the arrow next to it and choose a new colour.
- Make Text Bold: Select the text. Click the “B” icon on the “Home” tab to make the text thicker and darker.
- Make Text Italic: Select the text. Click the “I” icon on the “Home” tab to make the text slant.
- Underline Text: Select the text. Click the “U” icon on the “Home” tab to draw a line under the text.
Saving an MS Word Document
It is important to save your work regularly so you do not lose it. To save your document:
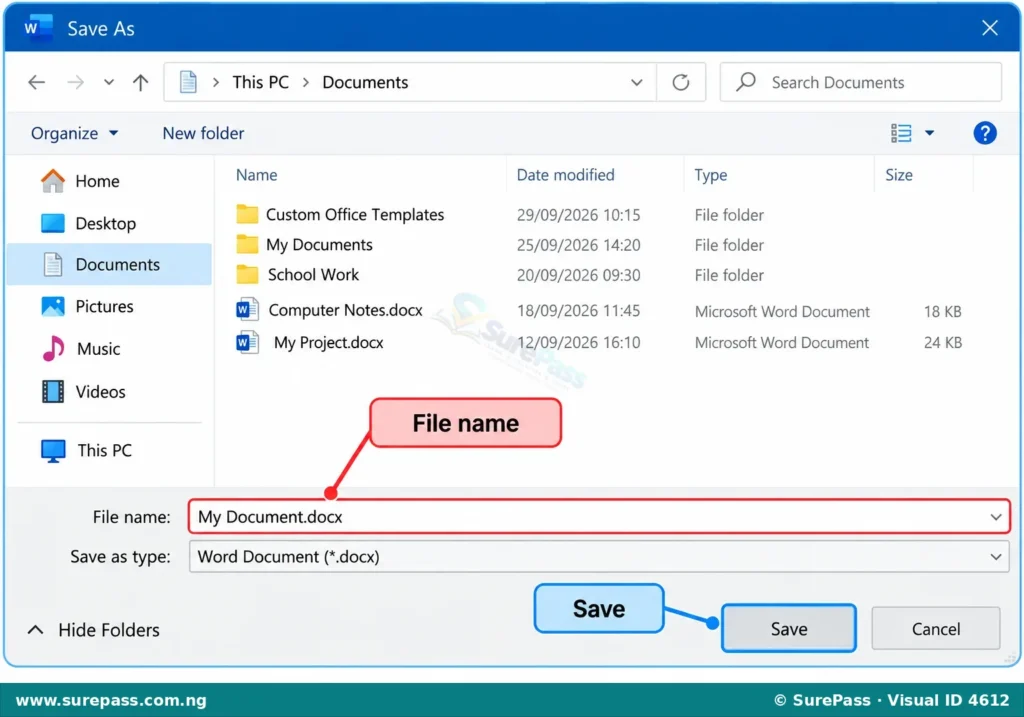
- Click on “File” in the top-left corner of the Word window.
- Choose “Save As.”
- Select a location on your computer where you want to save the file, like “Documents” or a folder you created.
- Type a name for your document in the “File name” box.
- Click the “Save” button.
Microsoft PowerPoint (MS PowerPoint)
Microsoft PowerPoint is a presentation program. It is used to create slideshows for presentations.
People use MS PowerPoint to share information with others using slides that can contain text, pictures, and sometimes sounds or videos. It is often used for school projects or talks.
Creating a New Presentation in MS PowerPoint
To create a new presentation in MS PowerPoint, follow these steps:
- Turn on the computer and open the MS PowerPoint program.
- When PowerPoint opens, it usually shows options for a new presentation. Choose “Blank Presentation.”
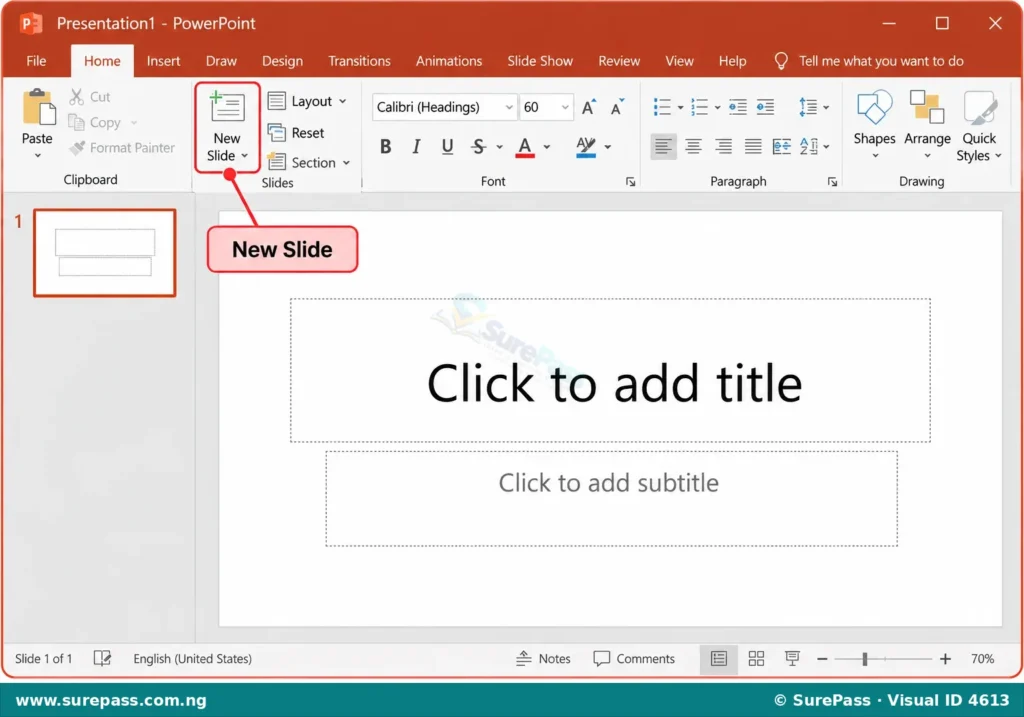
- A new presentation will open with one blank slide. This is your first slide.
Adding and Editing Slides and Text in MS PowerPoint
A presentation is made up of several slides. You can add new slides and type text on them.
The following steps explain how to add and edit slides and text:
- Add a New Slide: On the “Home” tab, click the “New Slide” button. A new blank slide will appear after your current slide.
- Type Text: Each slide has boxes called “placeholders” where you can click and type your title or other information.
- Delete Text: Click inside a text box, select the text you want to remove, and press the “Delete” or “Backspace” key.
- Change Text Colour: Select the text in a placeholder. On the “Home” tab, find the “A” icon with a colour bar underneath. Click the arrow next to it and choose a new colour.
- Change Text Size: Select the text. Look for the number box on the “Home” tab. Click the arrow next to it and choose a different number.
- Delete a Slide: In the left pane, click on the thumbnail of the slide you want to remove. Then press the “Delete” key on your keyboard.
Saving an MS PowerPoint Presentation
Saving your presentation is important to keep your work safe. To save your presentation:
- Click on “File” in the top-left corner of the PowerPoint window.
- Choose “Save As.”
- Select a location on your computer where you want to save the file.
- Type a name for your presentation in the “File name” box.
- Click the “Save” button.
Microsoft Excel (MS Excel)
Microsoft Excel is a spreadsheet program. It is used to organise data, especially numbers, in tables.
People use MS Excel to create lists, budgets, timetables, and to perform simple calculations. It helps to keep information neat and easy to understand.
Creating a New Spreadsheet in MS Excel
To create a new spreadsheet (called a workbook) in MS Excel, follow these steps:
- Turn on the computer and open the MS Excel program.
- When Excel opens, choose “Blank workbook.”
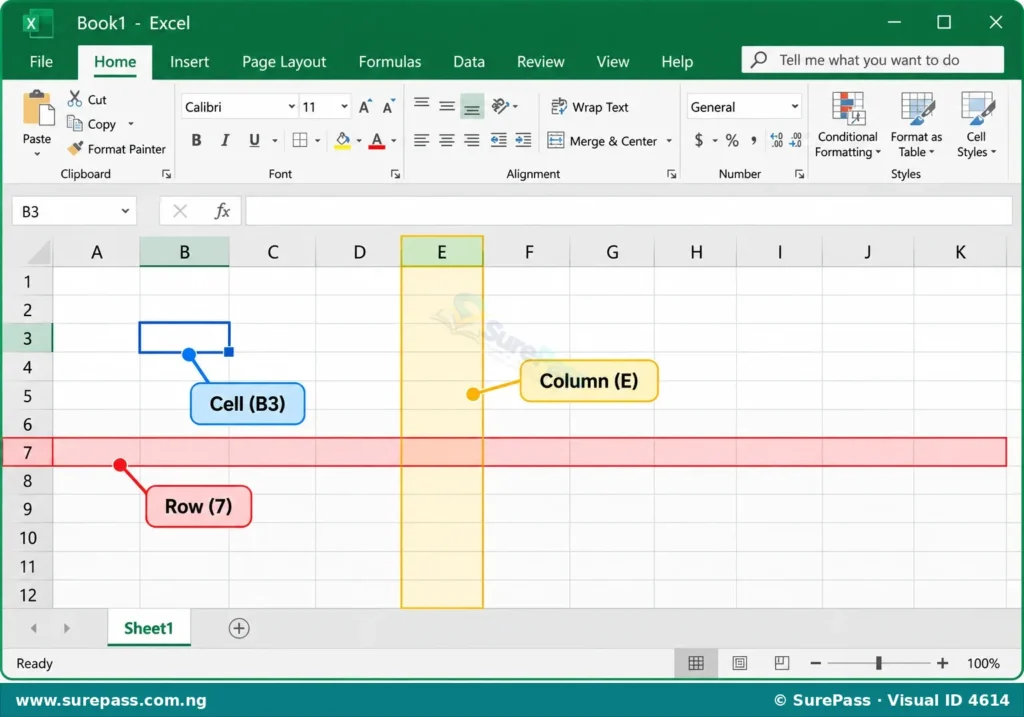
- A new, empty spreadsheet will appear. This sheet is made up of many small boxes called cells.
Understanding Cells, Rows, and Columns
A spreadsheet is organised into rows and columns:
- Columns: These go up and down and are labelled with letters (A, B, C, etc.) at the top.
- Rows: These go across from left to right and are labelled with numbers (1, 2, 3, etc.) on the left side.
- Cells: Each small box where a row and a column meet is called a cell. Each cell has a unique name, like A1 (column A, row 1) or B5 (column B, row 5). You click on a cell to select it and type information into it.
Entering and Editing Data in MS Excel
You can enter different types of data, like text or numbers, into the cells of a spreadsheet. Editing means changing the information or how the cells look.
The following steps explain how to enter and perform basic editing:
- Enter Data: Click on a cell where you want to type. Type your text or numbers and then press the “Enter” key or click on another cell.
- Change Data: Click on the cell that contains the data you want to change. Type the new information directly into the cell or in the formula bar at the top, then press “Enter.”
- Change Cell Background Colour: Select the cell or cells you want to change. On the “Home” tab, find the “Fill Colour” icon (it looks like a paint bucket). Click the arrow next to it and choose a colour.
- Change Text Colour: Select the cell or cells. On the “Home” tab, find the “Font Colour” icon (it looks like an “A” with a colour bar). Click the arrow next to it and choose a colour.
- Change Text Alignment: Select the cell or cells. On the “Home” tab, look for the alignment buttons (left, centre, right). Click the one you want to use to position your text inside the cell.
Saving an MS Excel Spreadsheet
Saving your workbook ensures that all your entered data and changes are kept. To save your spreadsheet:
- Click on “File” in the top-left corner of the Excel window.
- Choose “Save As.”
- Select a location on your computer where you want to save the file.
- Type a name for your workbook in the “File name” box.
- Click the “Save” button.



0 comments
Open the discussion when you need it. Comments stay collapsed until requested so the initial article remains light.