


ARTICLE CONTENTSOn this page 8 sections
Introduction to Database Management System (I)
Performance Objectives
By the end of the lesson, students should be able to:
- explain and state the importance of DBMS;
- describe relational and NoSQL DBMS;
- state the uses of the database components;
- list examples of DBMS;
- create a database with related tables;
- store and retrieve data from a database.
Meaning of Database Management System (DBMS)
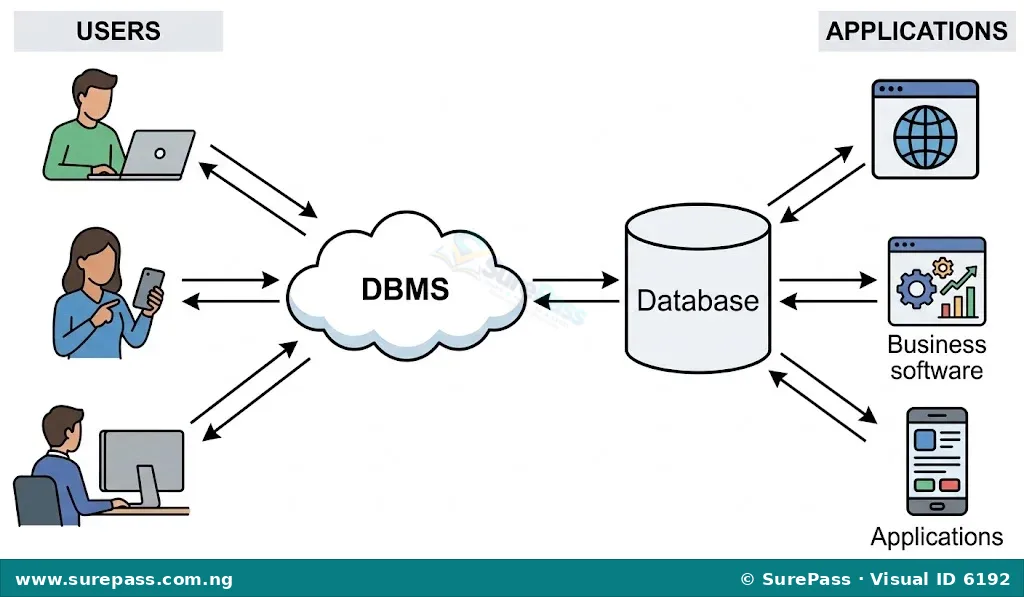
A Database Management System (DBMS) is a software application that allows users to create, store, organise, manage, and retrieve data from a database.
It acts as an interface between the database and the end-users or applications, ensuring that data is consistently organised and easily accessible. Think of it as a digital filing cabinet system that not only stores your files but also helps you find, update, and secure them efficiently.
Examples of DBMS
Many organisations and individuals use different types of DBMS for various purposes. Common examples of DBMS include:
- Microsoft Access (often used for smaller databases and personal use)
- MySQL (a popular open-source database for web applications)
- Oracle Database (used by large enterprises for critical data)
- PostgreSQL (another powerful open-source database)
- Microsoft SQL Server (used in many corporate environments)
- MongoDB (a NoSQL database, often used for large-scale data)
Importance of Database Management Systems
Database Management Systems are crucial in today’s digital world because they help manage large amounts of information effectively. The importance of DBMS can be seen in several ways:
- Data Organisation: DBMS helps to store data in a structured and organised manner, making it easy to locate specific information quickly.
- Data Sharing: It allows multiple users or applications to access and share the same data simultaneously, which is essential for teamwork and collaborative projects.
- Data Security: DBMS provides features to protect data from unauthorised access, ensuring that sensitive information remains confidential.
- Data Integrity: It helps maintain the accuracy and consistency of data by enforcing rules and constraints, preventing errors and ensuring reliability.
- Data Backup and Recovery: DBMS includes tools for backing up data and recovering it in case of system failures or data loss, protecting valuable information.
- Reduced Data Redundancy: It helps to minimise duplicate data entries, saving storage space and preventing inconsistencies.
Types of Database Management Systems
Database Management Systems are categorised based on how they store and manage data. For SS1, we will focus on two main types: Relational DBMS and NoSQL DBMS.
Relational Database Management Systems (RDBMS)
A Relational Database Management System (RDBMS) stores data in tables, which are organised into rows and columns. Each table represents a specific entity, and relationships are established between these tables using common fields.
This type of DBMS is widely used because it provides a clear and structured way to manage data, making it easy to understand and query. Examples include MySQL, Oracle Database, Microsoft SQL Server, and Microsoft Access.
NoSQL Database Management Systems
NoSQL (Not only SQL) Database Management Systems are designed to handle large volumes of unstructured or semi-structured data. Unlike RDBMS, NoSQL databases do not use the traditional table-based relational model.
They offer more flexibility in how data is stored and retrieved, making them suitable for modern applications that deal with diverse data types, such as social media data, sensor data, and real-time web applications. An example is MongoDB.
Database Components
To understand how a database works, it is important to know its basic building blocks. These components work together to store and organise information effectively.
Field
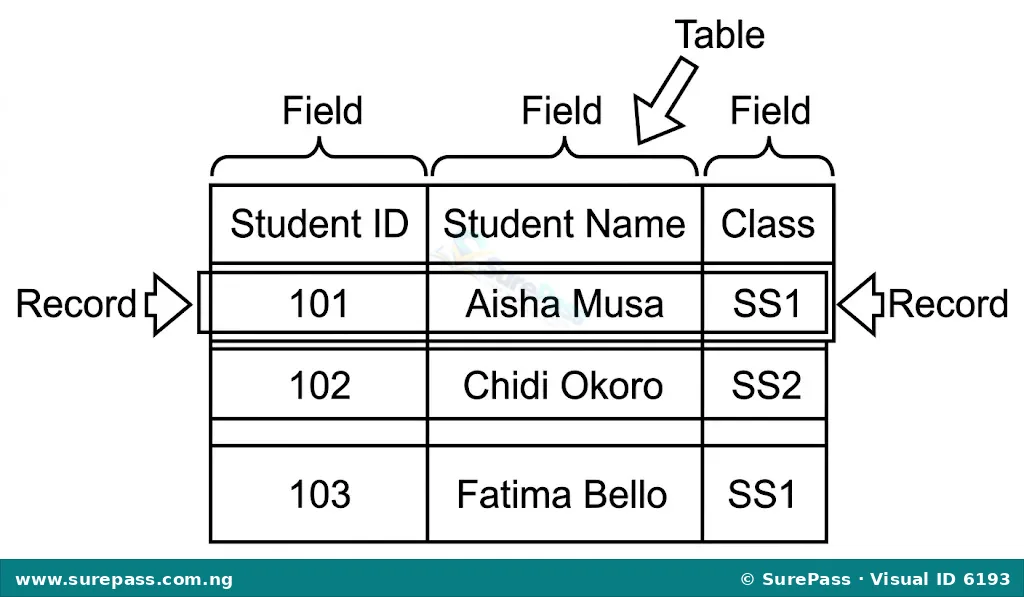
A field is the smallest unit of data in a database, representing a single piece of information about an item. It is a column in a table.
For example, in a student database, ‘Student Name’, ‘Age’, ‘Class’, and ‘Date of Birth’ would each be a field.
Data Types
A data type specifies the kind of data that a field can hold.
Choosing the correct data type helps ensure data integrity and efficient storage. Common data types include:
- Text/Short Text: For names, addresses, or any combination of letters, numbers, and symbols.
- Number: For numerical values like age, quantity, or scores.
- Date/Time: For dates and times, such as ‘Date of Birth’ or ‘Registration Date’.
- Currency: For monetary values.
- Yes/No (Boolean): For fields that can only have two values, like ‘True/False’ or ‘Yes/No’.
Record
A record is a complete set of fields that describes a single item or entry in a table. It is a row in a table.
For instance, in a student database, all the information about one specific student (their name, age, class, and date of birth) forms a single record.
Table
A table is a collection of related data organised into rows (records) and columns (fields).
Tables are the primary storage units in a relational database. For example, a school database might have separate tables for ‘Students’, ‘Teachers’, and ‘Courses’.
Primary Key
A primary key is a field (or a combination of fields) that uniquely identifies each record in a table.
It ensures that every record is distinct and can be easily referenced. For example, a ‘Student ID’ field can serve as a primary key because no two students will have the same ID.
Foreign Key
A foreign key is a field in one table that refers to the primary key in another table.
It is used to create a link or relationship between two tables. For example, in a ‘Courses’ table, a ‘Teacher ID’ field could be a foreign key that links to the ‘Teacher ID’ primary key in the ‘Teachers’ table.
Relationship
A relationship is a logical connection between two or more tables in a database, established through primary and foreign keys.
Relationships allow data from different tables to be combined and queried together, providing a complete view of the information. For example, a relationship between a ‘Students’ table and a ‘Courses’ table allows you to see which students are enrolled in which courses.
Creating a Database with Microsoft Access
Microsoft Access is a popular DBMS that allows users to create and manage databases easily. The following steps outline how to create a basic database with related tables in MS Access.
Step 1: Launch Microsoft Access and Create a Blank Database
This initial step involves opening the Access application and starting a new database project.
- Launch the Access application from your computer. You can usually find it in the Start Menu or by searching for “Access”.
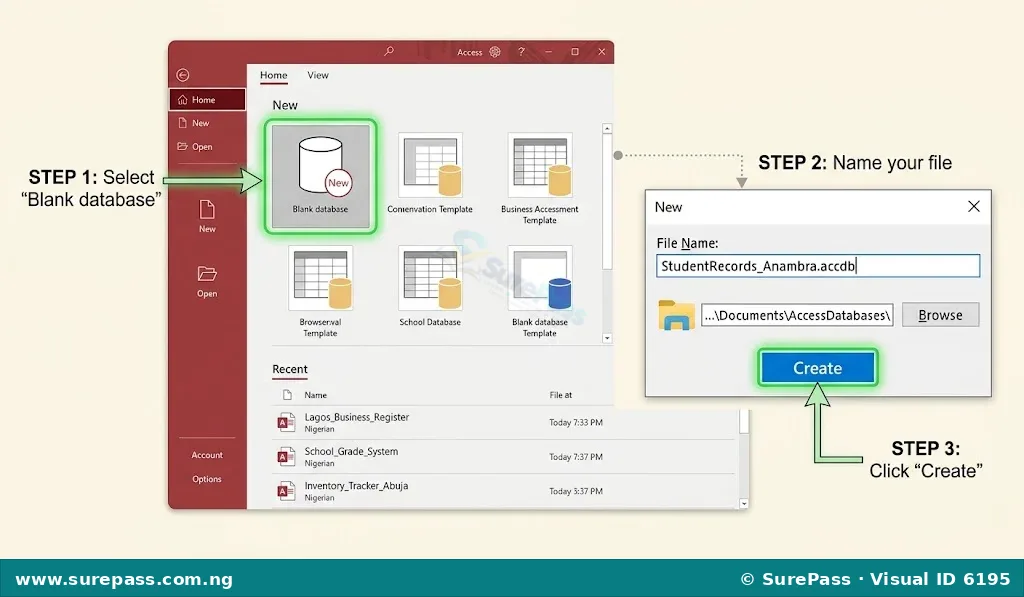
- Once Access opens, click on “Blank Database”.
- A window will appear asking for a file name and location. Choose a suitable location on your computer to save the file, give your database a meaningful name (e.g., “School_Records”), and then click “Create”.
- Access automatically opens a blank table named “Table1” in Datasheet View, ready for data entry.
Step 2: Define Fields in Design View
Defining fields involves naming the columns of your table and assigning appropriate data types to them.
- To define fields in Design View, first ensure “Table1” is selected. Then, click on the “View” button in the “Home” tab (usually on the top-left) and select “Design View” from the dropdown menu.
- Access will prompt you to save the table. Give your table a name (e.g., “Students”) and click “OK”.
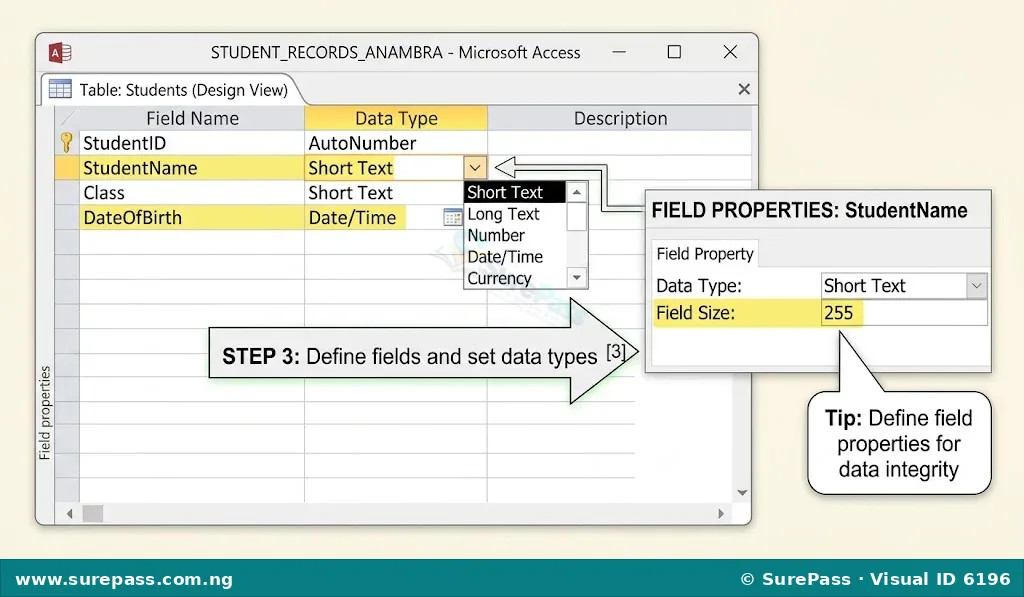
- In Design View, you will see columns for “Field Name”, “Data Type”, and “Description”.
- Enter field names for your table. For example, you might enter “StudentID”, “StudentName”, “Class”, and “DateOfBirth”.
- For each field name, choose the appropriate data type from the dropdown list in the “Data Type” column. For example, “StudentID” could be “AutoNumber” or “Number”, “StudentName” would be “Short Text”, “Class” could be “Short Text”, and “DateOfBirth” would be “Date/Time”.
Step 3: Set a Primary Key
Setting a primary key is essential for uniquely identifying each record in your table.
- In Design View, click on the field that you want to set as the primary key (e.g., “StudentID”).
- Click the “Primary Key” button in the “Tools” group of the “Table Tools Design” tab. A small key icon will appear next to the field name, indicating it is the primary key.
- The primary key field should contain unique values for every record. “AutoNumber” is often a good choice for ID fields as Access automatically assigns a unique number to each new record.
Step 4: Save the Table
After defining your fields and primary key, save your work.
- Click the “Save” icon (a floppy disk symbol) on the Quick Access Toolbar, or go to “File” → “Save”.
- If you haven’t named the table yet, Access will prompt you to do so.
Step 5: Add More Tables
Most databases require multiple tables to store different types of related information.
- To add another table, go to the “Create” tab in the Access ribbon.
- Click on “Table” in the “Tables” group. A new blank table (“Table2”) will appear.
- Repeat Steps 2, 3, and 4 to define fields, data types, set a primary key, and save this new table (e.g., “Courses” with fields like “CourseID”, “CourseName”, “TeacherID”).
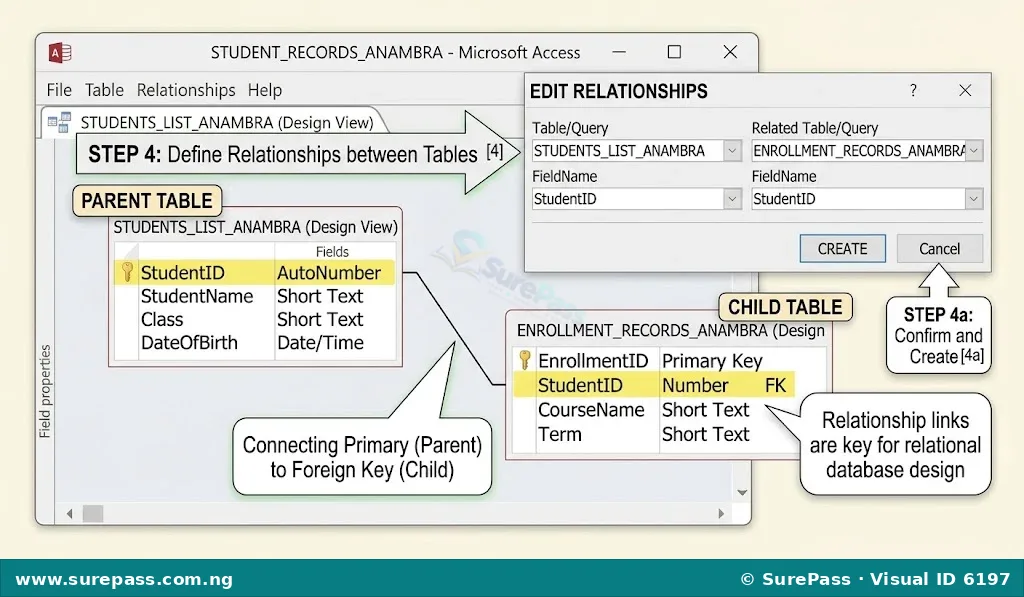
Step 6: Create Relationships Between Tables
Relationships link tables together, allowing you to combine data from different sources.
- Go to the “Database Tools” tab in the Access ribbon.
- Click on “Relationships” in the “Relationships” group. The Relationships window will open.
- If your tables are not already shown, click “Show Table” (or drag tables from the Navigation Pane) and add the tables you want to link (e.g., “Students”, “Courses”, and an “Enrollment” table if you created one).
- To create a relationship, drag the primary key field from one table (e.g., “StudentID” from the “Students” table) and drop it onto the corresponding foreign key field in another table (e.g., “StudentID” in the “Enrollment” table).
- A “Edit Relationships” dialog box will appear. Ensure the correct fields are selected and click “Create”.
- Repeat this process for all necessary relationships (e.g., linking “CourseID” from “Courses” to “CourseID” in “Enrollment”).
Step 7: Build Forms, Queries, and Reports
Once your tables and relationships are set up, you can use other Access objects to interact with your data.
- Go to the “Create” tab.
- You can use the “Forms” group to build user-friendly interfaces for data entry.
- Use the “Queries” group to retrieve specific data based on criteria you define.
- Use the “Reports” group to present your data in a printable and organised format.
Storing and Retrieving Data from a Database
After creating your tables, the next step is to populate them with data and then learn how to view that data.
Storing Data (Data Entry)
Data is typically stored in the tables you have created. There are two main ways to enter data:
- Directly in Table Datasheet View:
- In the Navigation Pane (usually on the left side of Access), double-click the table you want to add data to (e.g., “Students”). This opens the table in Datasheet View.
- Click on the first empty row at the bottom of the table.
- Type the data into each field (column). Press the Tab key to move to the next field.
- When you finish entering data for one record, press Tab again, and Access will automatically save the record and move to a new empty row.
- Using Forms:
If you have created a form for your table, it provides a more user-friendly way to enter data.
- In the Navigation Pane, double-click the form you want to use (e.g., “Student Entry Form”).
- The form will display fields where you can type in the data.
- Use navigation buttons (usually at the bottom of the form) to move between records or to add a new blank record.
Retrieving Data (Accessing Information)
Retrieving data means viewing or extracting information from your database. For SS1, this primarily involves viewing tables or simple queries.
- Viewing Data in Table Datasheet View:
The simplest way to retrieve data is to open the table directly.
- In the Navigation Pane, double-click the table you want to view (e.g., “Students”).
- The table will open in Datasheet View, displaying all the records and fields it contains. You can scroll through the rows and columns to see the data.
- Using Simple Queries:
Queries allow you to ask specific questions about your data and retrieve only the information that matches your criteria.
- Go to the “Create” tab and click “Query Design” in the “Queries” group.
- Add the table(s) you want to query (e.g., “Students”).
- Drag the fields you want to see into the design grid at the bottom (e.g., “StudentName”, “Class”).
- If you want to filter data, enter criteria in the “Criteria” row for a specific field (e.g., type “SS1” under the “Class” field to see only SS1 students).
- Click the “Run” button (red exclamation mark) in the “Design” tab to see the results of your query.




0 comments
Open the discussion when you need it. Comments stay collapsed until requested so the initial article remains light.