



ARTICLE CONTENTSOn this page 7 sections
Micro-organisms Around us
Performance Objectives
By the end of the lesson, students should be able to:
- describe micro-organisms;
- identify micro-organisms around us;
- describe the effects (beneficial and harmful) of microorganisms.
Meaning of Micro-organisms
Micro-organisms are tiny living things that are too small to be seen with the naked eye.
These organisms are found almost everywhere: in the air, water, soil, on and inside living things, and even in extreme environments. To observe them, a special instrument called a microscope is needed to magnify their size.
Types of Micro-organisms Around Us
Micro-organisms are a diverse group of living things. They are classified into different types based on their structure, how they obtain food, and how they reproduce. The main types of micro-organisms commonly found around us include:
- Algae
- Bacteria
- Fungi
- Protozoa
- Viruses
Algae
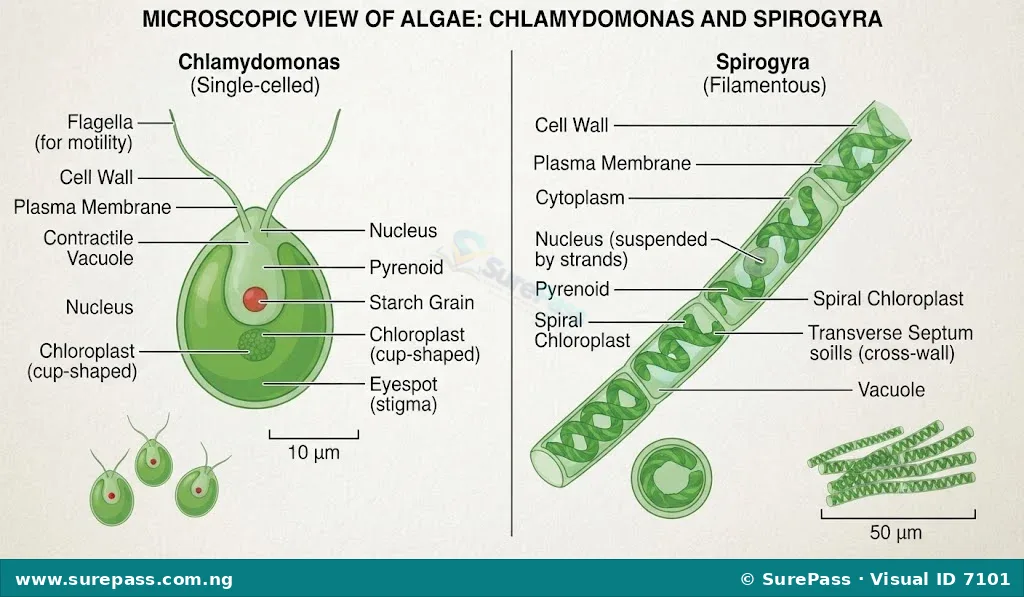
Algae are simple plant-like micro-organisms that can make their own food through photosynthesis, just like plants. They contain chlorophyll, which gives them a green colour, though some can be red, brown, or yellow.
Algae are commonly found in moist environments like ponds, rivers, lakes, and damp soil. They can range from single-celled organisms to large multicellular forms like seaweeds. Examples of microscopic algae include Chlamydomonas and Spirogyra.
Bacteria
Bacteria are single-celled micro-organisms that lack a true nucleus and other membrane-bound organelles. They are among the simplest and most abundant forms of life on Earth.
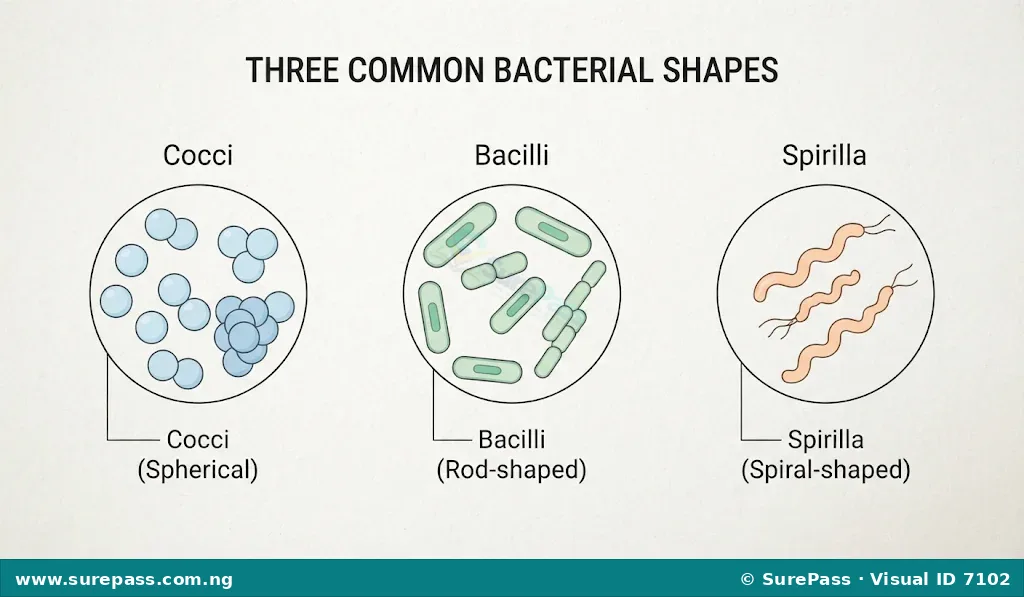
Bacteria come in various shapes, such as spheres (cocci), rods (bacilli), and spirals (spirilla). They can be found in almost every habitat, including soil, water, air, and inside other organisms. Many bacteria are harmless or even beneficial, while some can cause diseases. Examples include Lactobacillus (found in yoghurt) and Escherichia coli (found in the intestines).
Fungi
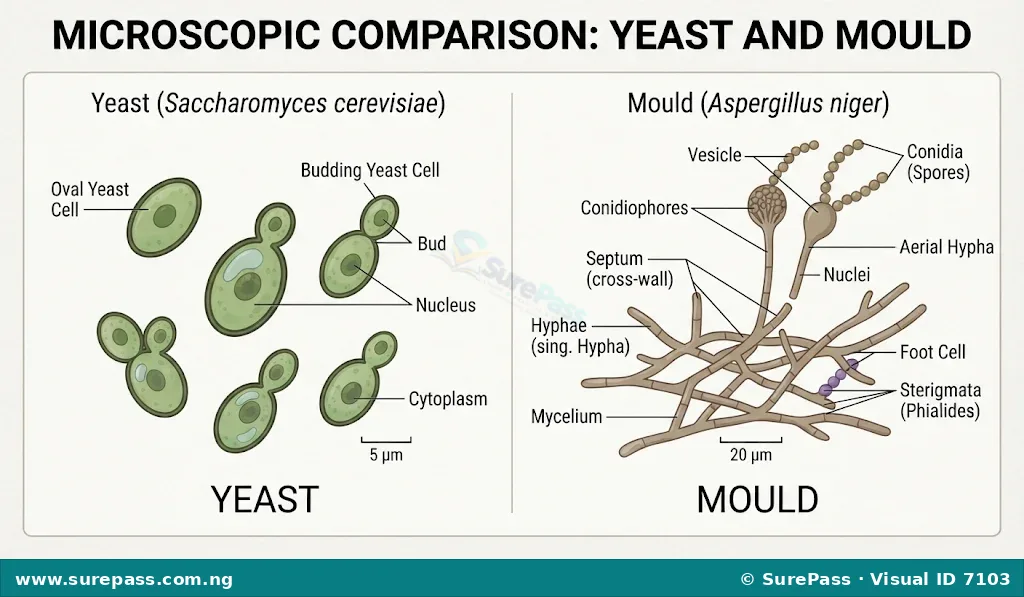
Fungi are a diverse group of micro-organisms that include yeasts, moulds, and mushrooms. Unlike plants, fungi cannot make their own food; they obtain nutrients by absorbing organic matter from their environment.
Many fungi are decomposers, breaking down dead organic material. Some are parasitic, living on or in other organisms. Fungi are found in soil, on plants, in the air, and on food. Examples of microscopic fungi include yeast (used in baking and brewing) and Penicillium (a mould). Ringworm and athlete’s foot are common fungal infections.
Protozoa
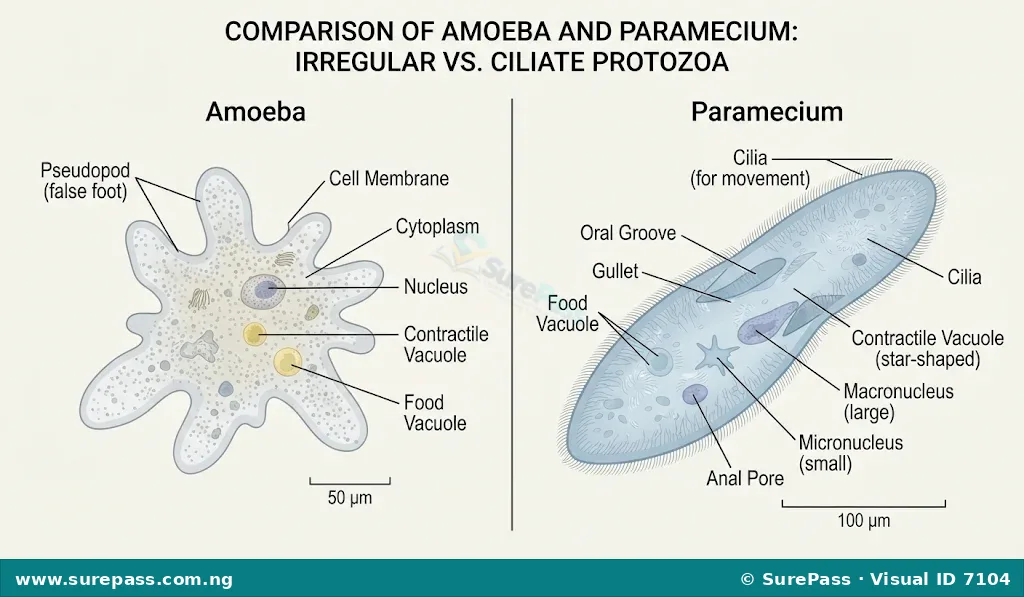
Protozoa are single-celled animal-like micro-organisms. They are heterotrophic, meaning they obtain food by consuming other organisms or organic matter.
Protozoa are typically found in aquatic environments like ponds, lakes, and oceans, as well as in moist soil. Some protozoa are free-living, while others are parasitic and can cause diseases in humans and animals. Examples include Amoeba (which moves using pseudopods) and Paramecium (which moves using cilia). Plasmodium, the parasite that causes malaria, is also a protozoan.
Viruses
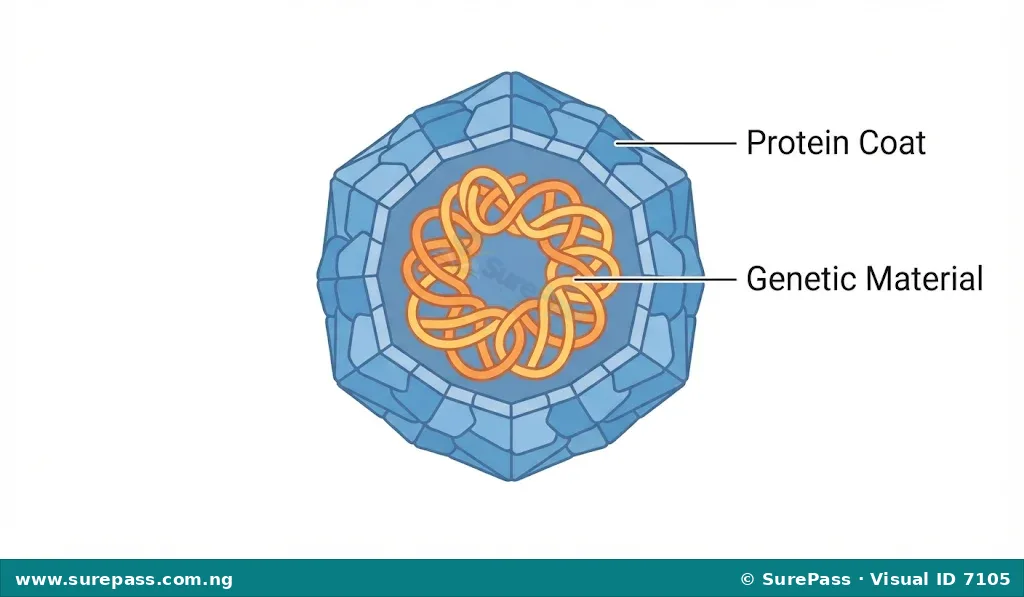
Viruses are unique micro-organisms that are much smaller than bacteria. They are not considered true living organisms because they cannot reproduce or carry out metabolic processes on their own. Instead, they must infect a living host cell to multiply.
Viruses consist of genetic material (DNA or RNA) enclosed in a protein coat. They are obligate intracellular parasites, meaning they can only survive and replicate inside living cells. Viruses cause a wide range of diseases in humans, animals, and plants. Examples include the influenza virus (causes flu), the common cold virus, and the Human Immunodeficiency Virus (HIV).
Effects of Micro-organisms on the Human Body
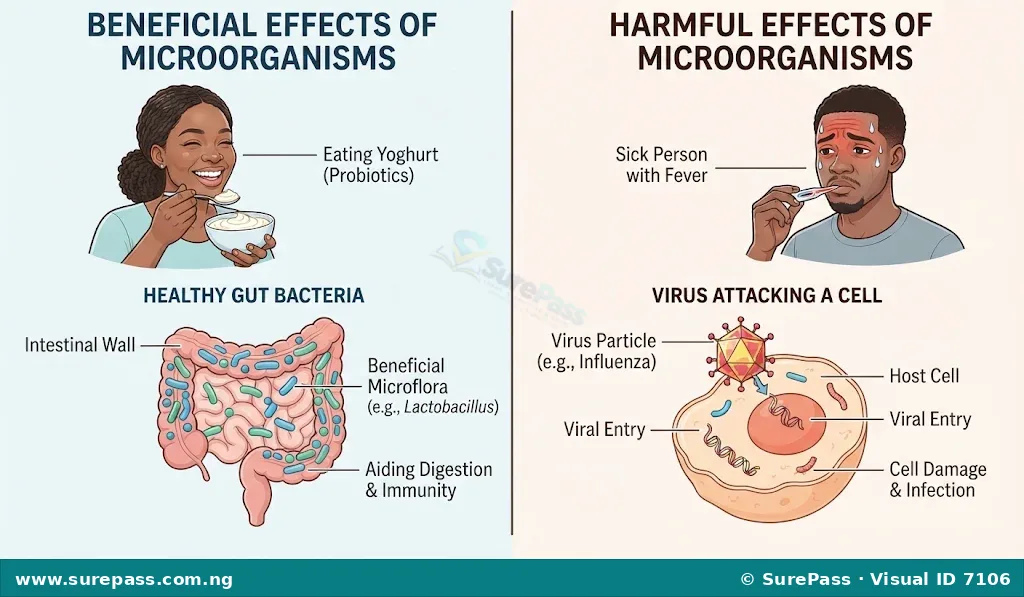
Micro-organisms have both beneficial and harmful effects on the human body. Understanding these effects is important for maintaining health and preventing diseases.
Beneficial Effects of Micro-organisms
Many micro-organisms play crucial roles in maintaining human health and well-being. Some of their beneficial effects include:
- Digestion: Certain bacteria in the human gut (intestines) help in the digestion of food, especially complex carbohydrates that the body cannot break down on its own. They also produce vitamins, such as Vitamin K and some B vitamins, which are essential for the body.
- Immune System Development: Exposure to certain micro-organisms in early life helps to train and strengthen the immune system, making it better equipped to fight off harmful pathogens later.
- Protection Against Harmful Microbes: Beneficial bacteria on the skin and in the gut compete with harmful micro-organisms for space and nutrients, preventing the harmful ones from multiplying and causing infections. This is known as competitive exclusion.
- Food Production: Micro-organisms are used in the production of many foods. For example, yeast is used to make bread rise, and bacteria are used to ferment milk into yoghurt and cheese. While these are not direct effects on the human body, consuming these foods provides nutritional benefits.
Harmful Effects of Micro-organisms
Some micro-organisms are pathogenic, meaning they can cause diseases in humans. These diseases are often referred to as infectious diseases. Harmful effects include:
- Causing Diseases: Pathogenic bacteria, viruses, fungi, and protozoa can invade the body, multiply, and produce toxins or damage cells, leading to various illnesses. Examples include:
- Bacterial diseases: Tuberculosis, cholera, typhoid fever, tetanus.
- Viral diseases: Measles, influenza (flu), common cold, HIV/AIDS, COVID-19.
- Fungal diseases: Ringworm, athlete’s foot, candidiasis (thrush).
- Protozoan diseases: Malaria, amoebiasis (dysentery).
- Food Spoilage: Micro-organisms can grow on food, causing it to spoil and become unsafe for consumption. Consuming spoiled food can lead to food poisoning.
- Allergies and Toxins: Some micro-organisms, particularly certain fungi, can produce allergens that trigger allergic reactions in sensitive individuals. Others produce toxins that can be harmful if ingested or absorbed by the body.
Observing Micro-organisms Using a Microscope
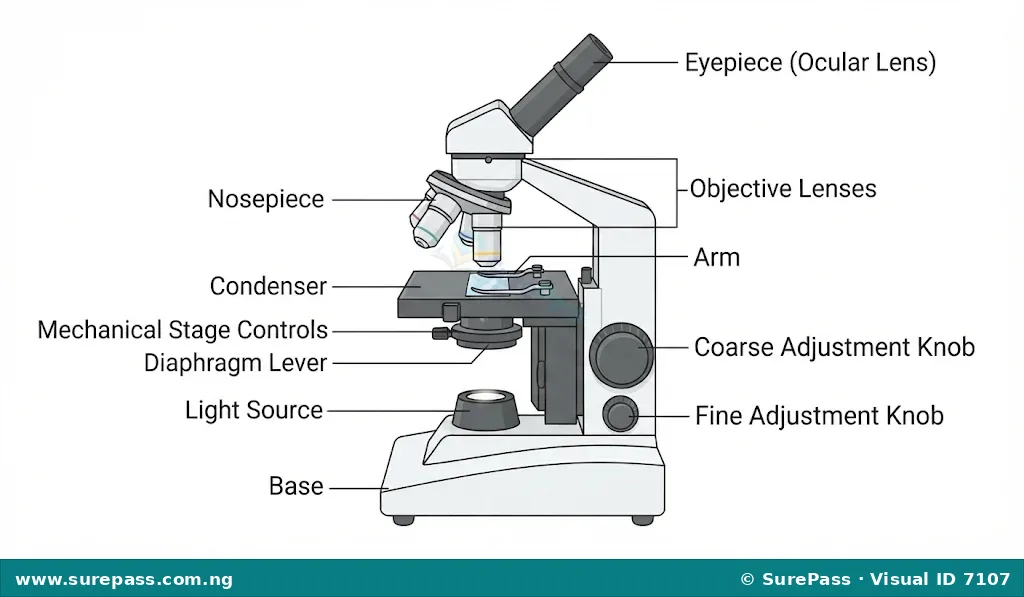
Observing micro-organisms requires the use of a microscope, which magnifies tiny objects to make them visible. This skill allows for the identification and study of different types of micro-organisms.
Materials Required:
- Microscope
- Clean glass slides
- Cover slips
- Dropper or pipette
- Sample (e.g., pond water, yoghurt, hay infusion)
- Distilled water (if needed for dilution)
- Lens paper or cleaning solution
Procedure for Observing Micro-organisms:
The procedure involves the following steps:
- Prepare the Microscope: Place the microscope on a stable surface. Ensure the light source is working and adjust the mirror or illuminator for even lighting. Rotate the revolving nosepiece to the lowest power objective lens (e.g., 4x or 10x).
- Clean the Slide and Cover Slip: Use lens paper to clean a glass slide and a cover slip to remove any dust or smudges.
- Prepare the Sample:
- For liquid samples like pond water or yoghurt, use a dropper to place one small drop of the sample in the centre of the clean glass slide.
- For solid samples, a tiny amount can be mixed with a drop of distilled water on the slide to create a thin smear.
- Apply the Cover Slip: Hold the cover slip at a 45-degree angle to the slide, with one edge touching the slide next to the sample drop. Slowly lower the cover slip over the drop to avoid trapping air bubbles.
- Place the Slide on the Stage: Secure the prepared slide on the microscope stage using the stage clips.
- Focus at Low Power:
- Look through the eyepiece.
- Use the coarse adjustment knob to slowly lower the objective lens until it is close to the cover slip, but not touching it.
- Slowly raise the objective lens using the coarse adjustment knob until the sample comes into rough focus.
- Use the fine adjustment knob to get a clear, sharp image.
- Adjust the diaphragm or iris to control the amount of light for better contrast.
- Focus at Higher Power (Optional): Once a clear image is obtained at low power, rotate the revolving nosepiece to a higher power objective lens (e.g., 40x). Use only the fine adjustment knob to bring the image into sharp focus. Do NOT use the coarse adjustment knob at high power, as it can damage the slide or lens.
- Observe and Identify: Carefully observe the micro-organisms present. Note their shapes, sizes, movements, and any visible structures. Compare observations with charts or diagrams of known micro-organisms.
- Clean Up: After observation, remove the slide. Clean the microscope lenses with lens paper and cleaning solution. Store the microscope properly.
Culturing Micro-organisms
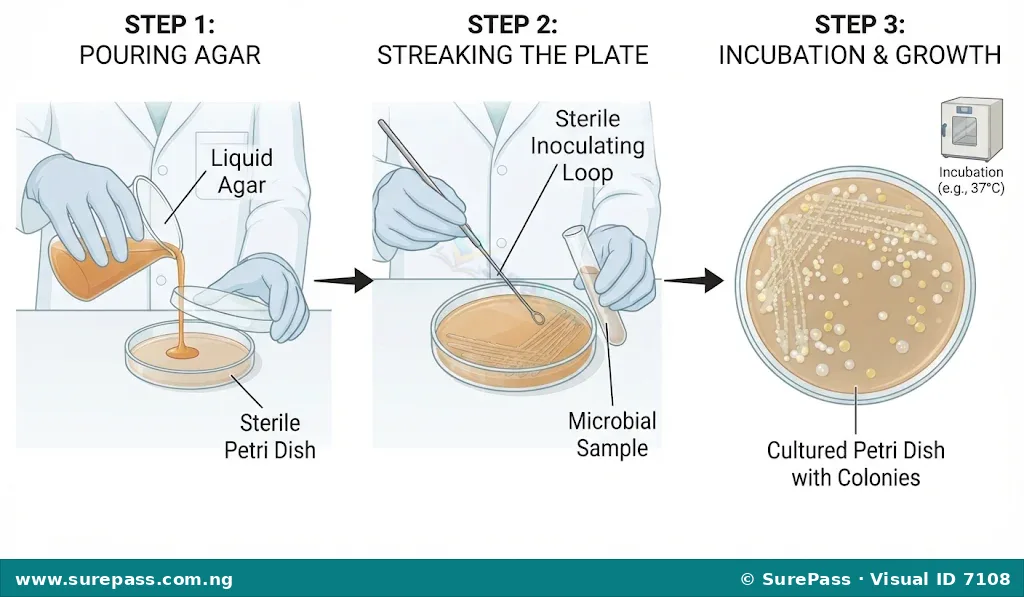
Culturing micro-organisms involves providing them with suitable conditions and nutrients to grow and multiply in a controlled environment, usually in a laboratory. This allows scientists to study them in greater detail.
Materials Required:
- Sterile Petri dishes
- Sterile culture media (e.g., nutrient agar)
- Bunsen burner or spirit lamp (for sterilisation)
- Inoculating loop (sterilised)
- Source of micro-organisms (e.g., air, soil, swab from a surface)
- Incubator (optional, for controlled temperature)
- Marker pen
Procedure for Culturing Micro-organisms:
The procedure involves the following steps:
- Prepare the Culture Medium: If using powdered medium, follow instructions to mix it with distilled water and sterilise it, usually by heating. Pour the sterilised liquid medium into sterile Petri dishes in a clean, sterile environment (e.g., near a flame to create an updraft). Allow the medium to cool and solidify.
- Sterilise the Inoculating Loop: Heat the inoculating loop in the flame of a Bunsen burner until it glows red hot. Allow it to cool for a few seconds. This kills any micro-organisms on the loop.
- Collect the Sample:
- For air sample: Briefly open a Petri dish containing solidified culture medium to the air for about 10-15 minutes, then close it.
- For soil sample: Touch the sterile loop to a small amount of soil, then gently streak it across the surface of the culture medium in a Petri dish.
- For surface swab: Swab a surface (e.g., desk, hand) with a sterile cotton swab, then gently streak the swab across the culture medium.
- Inoculate the Petri Dish: Lift the lid of the Petri dish slightly, just enough to introduce the sample. Gently streak the inoculating loop or swab across the surface of the solidified culture medium in a zig-zag pattern. Close the lid immediately.
- Label the Petri Dish: Write the date, type of sample, and your name on the bottom of the Petri dish using a marker pen.
- Incubate: Invert the Petri dish (lid side down) to prevent condensation from dripping onto the culture. Place it in an incubator at a suitable temperature (e.g., 25-37°C) for 24-48 hours. If an incubator is not available, leave it at room temperature.
- Observe Results: After incubation, observe the Petri dish for the growth of colonies. Each colony represents a group of micro-organisms that grew from a single cell. Note the size, shape, colour, and texture of the colonies.
- Disposal and Safety: After observation, sterilise the Petri dishes and their contents (e.g., by autoclaving or soaking in disinfectant) before disposal to prevent the spread of micro-organisms. Always wear gloves and wash hands thoroughly after handling cultures. Do not open cultured Petri dishes unnecessarily to avoid contamination.




0 comments
Open the discussion when you need it. Comments stay collapsed until requested so the initial article remains light.