



ARTICLE CONTENTSOn this page 7 sections
Laboratory Equipment
Performance Objectives
By the end of the lesson, students should be able to:
- identify basic laboratory equipment;
- describe and state the uses of basic laboratory equipment;
- use a microscope to examine biological specimens;
- demonstrate correct handling techniques and care for delicate and hazardous equipment.
Introduction to Laboratory Equipment
A biology laboratory is a special place where scientists and students conduct experiments, observe specimens, and carry out investigations to understand living organisms and their processes. To perform these tasks effectively and safely, specific tools and apparatus are required. These tools are known as laboratory equipment.
Using the correct equipment for each task is essential for obtaining accurate results and ensuring safety in the laboratory. Proper identification, understanding the function, and knowing how to handle and care for each piece of equipment are fundamental skills for every biology student.
Basic Laboratory Equipment and Their Functions
Biology laboratories contain a variety of equipment, each designed for a specific purpose. Identifying these tools and knowing their functions is the first step towards successful practical work.
Microscope
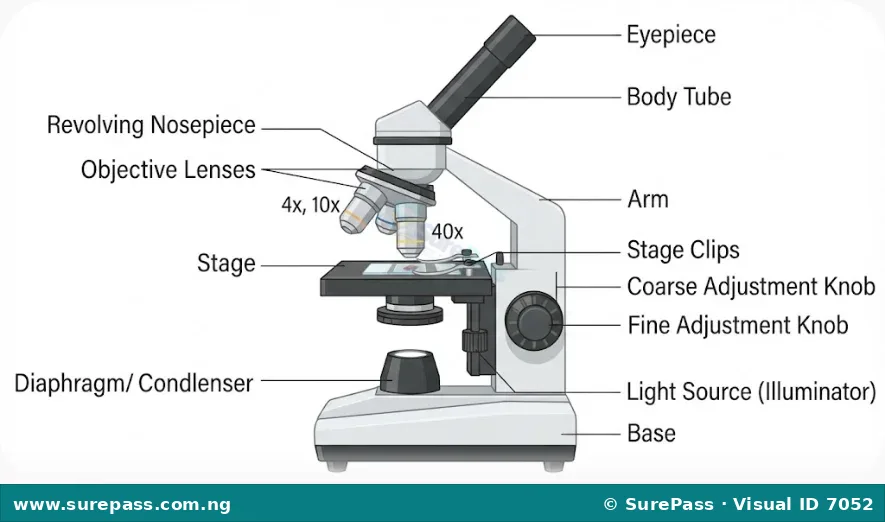
A microscope is an optical instrument used to observe very small objects, such as cells, tissues, and microorganisms, that cannot be seen with the naked eye. It magnifies the image of the specimen, making it visible for detailed study.
Slides and Cover Slips
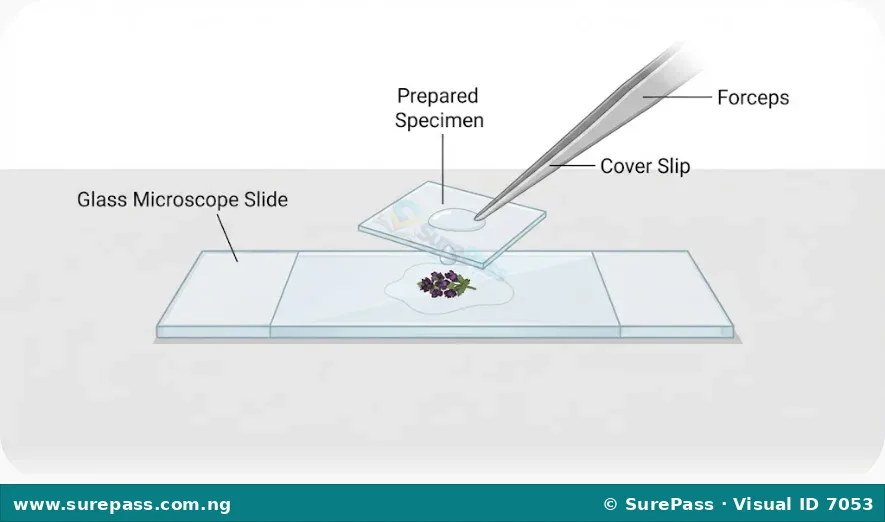
Slides are thin, rectangular pieces of glass used to hold specimens for microscopic examination. Cover slips are smaller, thinner squares of glass or plastic placed over the specimen on the slide to protect it and flatten it for better viewing.
Petri Dishes
A petri dish is a shallow, cylindrical, transparent dish with a lid, typically made of glass or plastic. It is primarily used for culturing microorganisms, such as bacteria and fungi, on a nutrient medium. They can also be used for holding small biological samples or for observing seed germination.

Test Tubes and Boiling Tubes
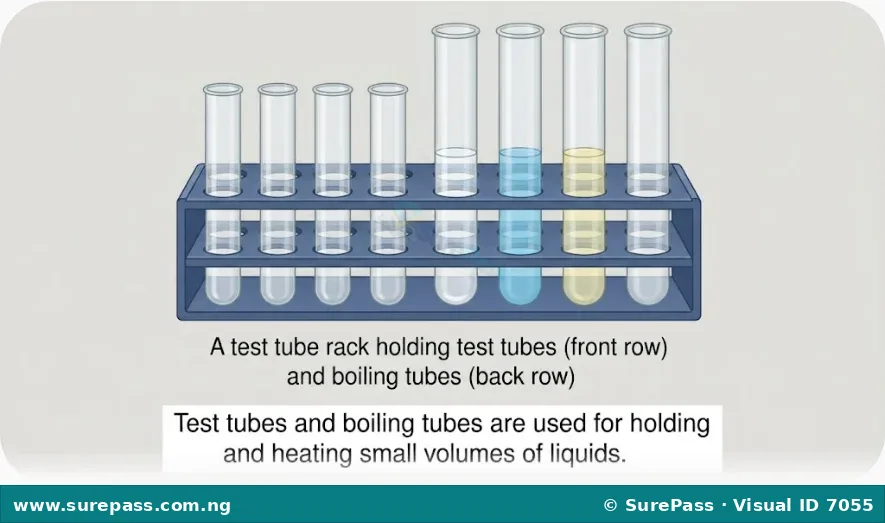
Test tubes are small, cylindrical glass tubes with a rounded bottom, used for holding small amounts of liquids, mixing chemicals, or heating substances in experiments. Boiling tubes are similar to test tubes but are larger and made of thicker glass, designed to withstand higher temperatures for boiling liquids.
Beakers
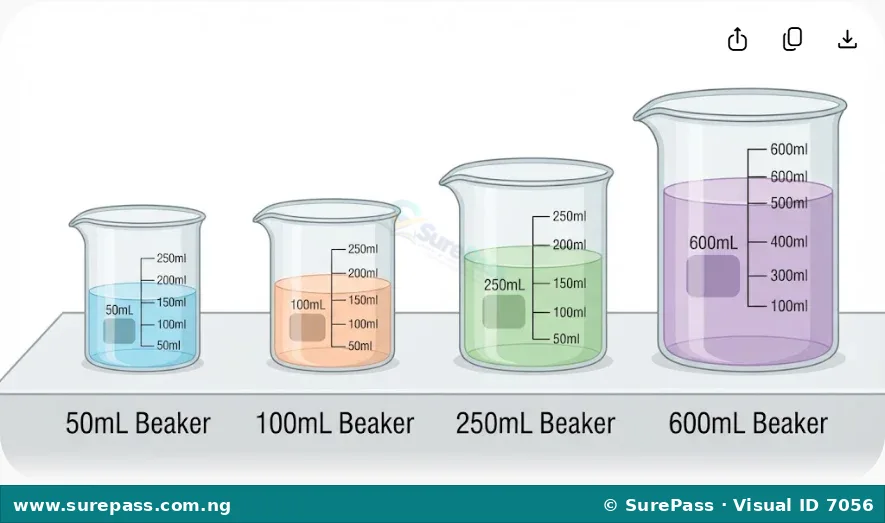
Beakers are cylindrical glass containers with a flat bottom and a spout for pouring. They are used for holding, mixing, and heating larger volumes of liquids. Beakers often have volume markings, but these are approximate and not for precise measurements.
Conical Flasks (Erlenmeyer Flasks)
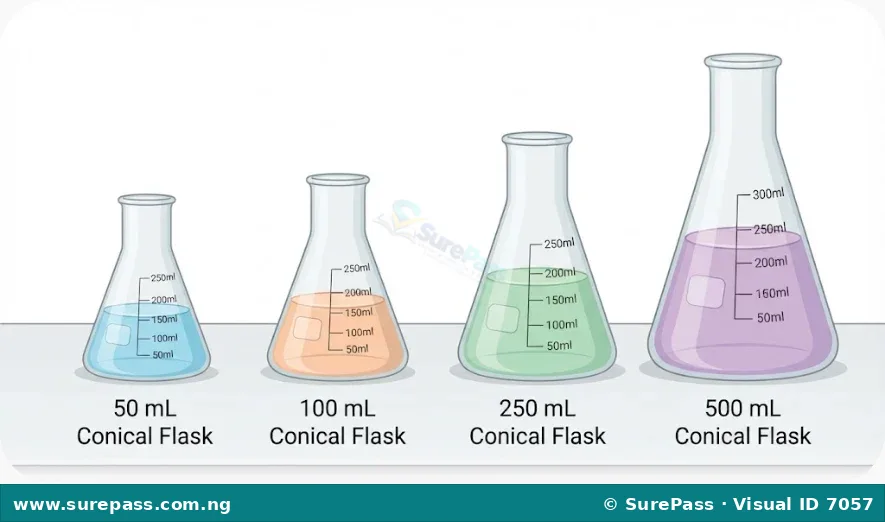
Conical flasks, also known as Erlenmeyer flasks, are cone-shaped glass containers with a flat bottom and a cylindrical neck. Their shape makes them suitable for mixing liquids by swirling without spilling, and they are often used in titrations or for heating liquids where evaporation needs to be minimised.
Pipettes
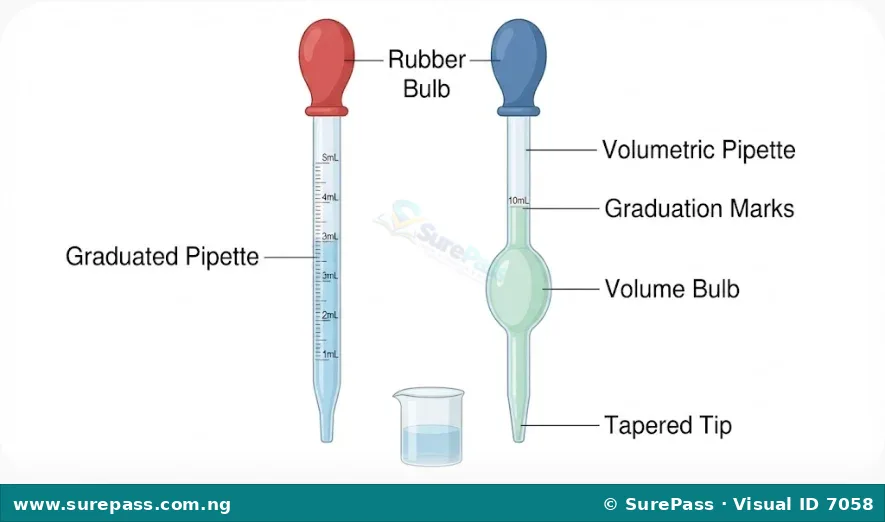
Pipettes are slender glass or plastic tubes used to accurately measure and transfer small, precise volumes of liquid. There are different types, such as graduated pipettes (with markings for various volumes) and volumetric pipettes (designed to deliver a single, fixed volume).
Burettes
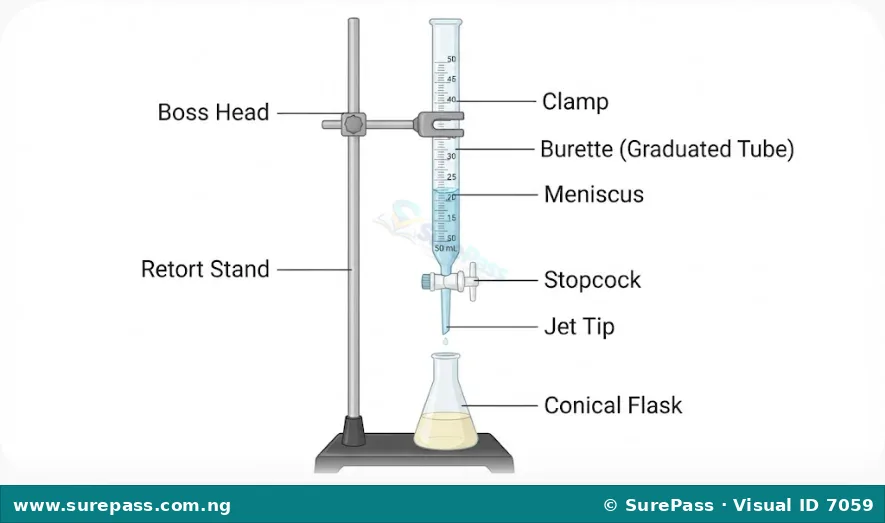
A burette is a long, graduated glass tube with a stopcock at the bottom, used for dispensing variable, precise volumes of liquid, especially in titrations. The stopcock allows for controlled drop-by-drop release of the liquid.
Identification of Biology Specimens using Laboratory Tools
Many biological investigations involve observing specimens to understand their structure and characteristics. Laboratory tools are crucial for this process. For instance, a microscope is the primary tool for identifying and studying microscopic specimens like bacteria, fungi, protozoa, and the cells of plants and animals.
When examining a specimen, a prepared slide is placed on the microscope stage. The microscope then magnifies the specimen, allowing for the identification of its features, such as cell walls, nuclei, chloroplasts, or specific shapes of microorganisms. Other tools like petri dishes can be used to grow and observe colonies of microorganisms, aiding in their identification based on growth patterns and appearance.
Handling and Care of Biological Apparatus
Proper handling and care of laboratory equipment are essential for their longevity, accuracy, and safety in the laboratory. Delicate and hazardous equipment requires particular attention.
General Handling and Care Principles
- Cleanliness: All equipment should be cleaned thoroughly before and after use. Glassware should be washed with detergent and water, then rinsed with distilled water and allowed to dry.
- Storage: Store equipment in designated places to prevent damage. Delicate items like microscopes should be covered to protect them from dust.
- Inspection: Before use, inspect equipment for cracks, chips, or other damage. Do not use damaged equipment, especially glassware, as it can be hazardous.
- Safety: Always follow safety guidelines. For example, when heating test tubes, point the opening away from yourself and others.
Specific Care for Microscopes
Microscopes are delicate and expensive instruments that require careful handling and maintenance:
- Carrying: Always carry a microscope with two hands: one hand holding the arm and the other supporting the base.
- Cleaning Lenses: Use only special lens paper or lens cloth and lens cleaning solution to clean the objective lenses and eyepiece. Never use ordinary tissue paper or cloth, as they can scratch the lenses.
- Oiling: When using the oil immersion objective lens, apply only a small drop of immersion oil directly onto the slide. After use, clean the oil immersion lens immediately with lens paper and cleaning solution to prevent the oil from drying and hardening.
- Storage: After use, rotate the revolving nosepiece to the lowest power objective lens, lower the stage, and cover the microscope with a dust cover before returning it to its storage cabinet.
Care for Glassware (Test Tubes, Beakers, Flasks)
- Washing: Wash glassware immediately after use to prevent residues from drying and becoming difficult to remove. Use appropriate brushes for test tubes and flasks.
- Drying: Allow glassware to air dry on a drying rack or use a drying oven. Ensure they are completely dry before storage or reuse, especially if they will be used with water-sensitive chemicals.
- Handling Hot Glassware: Use test tube holders, tongs, or heat-resistant gloves when handling hot glassware. Hot glass looks the same as cold glass.
- Storage: Store clean, dry glassware in cabinets to prevent breakage and contamination.
Calibration of Equipment
Calibration is the process of checking and adjusting the accuracy of measuring instruments. While complex calibration is usually done by specialists, understanding its importance is key. For SS1, this generally means ensuring that measuring equipment like pipettes and burettes are used correctly and that their markings are clearly visible and not worn off. If an instrument is suspected to be inaccurate, it should be reported to the teacher or laboratory technician.
Repairs and Refurbishments
Minor repairs, such as tightening loose screws on a microscope or replacing a worn rubber bulb on a pipette, may be done by a trained technician. Major repairs or refurbishment of complex equipment should always be handled by qualified professionals. Students should never attempt to repair laboratory equipment themselves, as this can cause further damage or lead to injury.
Skills in the Biology Laboratory
Drawing Biological Specimens Appropriately
Accurate biological drawing is a crucial skill for recording observations. It helps in understanding the structure and details of specimens.
The procedure for drawing biological specimens involves the following steps:
- Observe Carefully: Look closely at the specimen, noting its overall shape, size, and key features.
- Use a Sharp Pencil: Draw clear, continuous, single lines. Avoid fuzzy or sketchy lines.
- Draw Large: Make your drawing large enough to show details clearly, occupying a good portion of the page.
- Proportion: Ensure the different parts of the drawing are in correct proportion to each other, reflecting what is observed.
- Label Clearly: Use straight, uncrossed label lines that point directly to the part being labelled. Write labels horizontally.
- Add Title and Magnification: Give your drawing a clear title that describes the specimen. State the magnification used (e.g., “x100” for a microscope drawing).
- No Shading or Colouring: Biological drawings are typically line drawings without shading or colouring, unless specifically instructed.
Handling and Care of Laboratory Apparatus
This skill involves applying the general and specific care principles discussed earlier. It is a practical skill developed through consistent practice and adherence to laboratory rules.
How to Use a Microscope to Examine Biological Specimens
Using a microscope correctly is fundamental for biological studies.
The procedure involves the following steps:
- Place the Microscope: Carefully place the microscope on a stable workbench, away from the edge.
- Connect Power: Plug in the microscope if it has an electric light source.
- Adjust Eyepiece and Stage: Rotate the revolving nosepiece to the lowest power objective lens (e.g., 4x or 10x). Lower the stage using the coarse adjustment knob.
- Place the Slide: Place the prepared slide on the stage, with the specimen directly over the opening in the stage. Secure the slide with the stage clips.
- Turn on Light: Turn on the light source and adjust its intensity for comfortable viewing.
- Focus at Low Power: Look through the eyepiece. Use the coarse adjustment knob to slowly raise the stage until the specimen comes into rough focus. Then, use the fine adjustment knob to get a sharp image.
- Adjust Diaphragm: Adjust the diaphragm (or iris) to control the amount of light passing through the specimen, improving contrast.
- Move to Higher Power (if needed): Once focused at low power, rotate the revolving nosepiece to a higher power objective lens (e.g., 40x). Use only the fine adjustment knob to refocus. Never use the coarse adjustment knob at high power, as it can damage the slide or lens.
- Observe and Draw: Observe the specimen carefully. If required, make an appropriate biological drawing.
- Clean Up: After observation, rotate back to the lowest power objective, lower the stage, remove the slide, turn off the light, and cover the microscope before returning it to storage. If oil immersion was used, clean the objective lens immediately.




0 comments
Open the discussion when you need it. Comments stay collapsed until requested so the initial article remains light.