



ARTICLE CONTENTSOn this page 7 sections
E-commerce and Digital Marketing Platforms
Performance Objectives
By the end of the lesson, students should be able to:
- create a simple mock e-commerce interface;
- set up a payment page using free templates;
- create a feedback form or customer review section for a mock business;
- create online advertisements to promote e- commerce platform.
Introduction to E-commerce and Digital Marketing
In today’s world, many businesses operate online, reaching customers far beyond their physical locations. This way of doing business involves e-commerce and digital marketing.
What is E-commerce?
E-commerce, short for electronic commerce, is the buying and selling of goods and services over the internet.
It involves transactions where money and data are exchanged electronically. Examples include online shopping websites, mobile shopping apps, and online marketplaces.
What is Digital Marketing?
Digital marketing involves promoting products, services, or brands using digital channels and technologies.
These channels include the internet, mobile phones, social media, search engines, and other digital platforms. The goal is to reach potential customers and encourage them to buy.
Creating a Simple Mock E-commerce Interface
An e-commerce interface is the part of an online store that customers see and interact with. It is like the shop front and aisles of a physical store, but online. Creating a mock interface means designing a basic layout that looks like an online shop, without it being fully functional.
Elements of an E-commerce Interface
A simple e-commerce interface typically includes several key parts that help customers find products and make purchases. These elements guide the customer through the shopping process.
- Product Display: This shows images and descriptions of the products available for sale.
- Product Categories: These help organise products into groups, making it easier for customers to browse.
- Search Bar: Allows customers to quickly find specific products by typing keywords.
- Shopping Cart/Bag: This is where customers collect items they wish to buy before proceeding to payment.
- “Add to Cart” Button: A button next to each product that allows customers to add it to their shopping cart.
- Navigation Menu: Links to different sections of the website, such as “Home,” “About Us,” “Contact,” and various product categories.
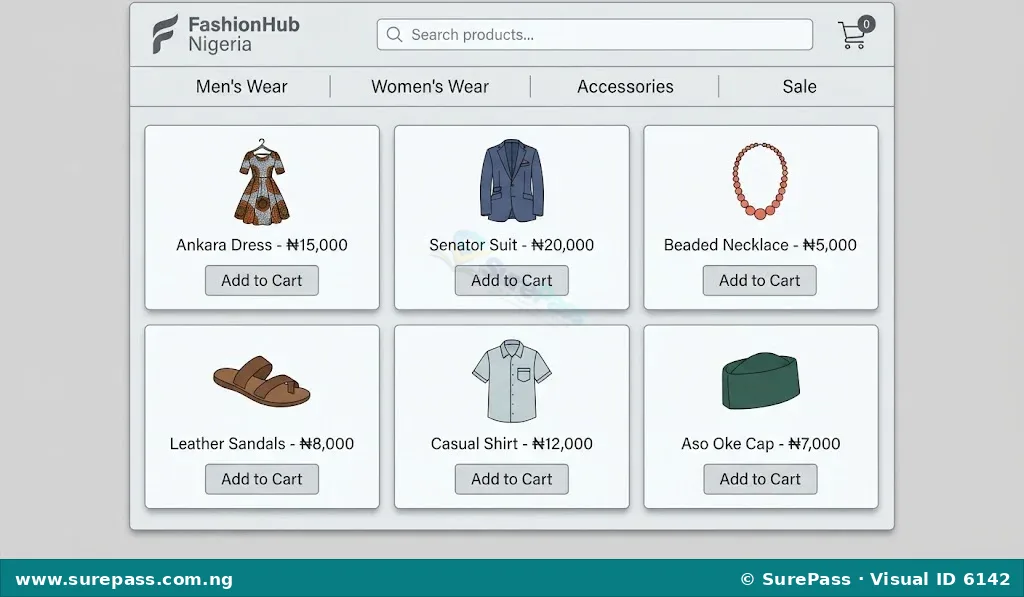
How to Create a Mock E-commerce Interface
You can create a mock e-commerce interface using free website builders or design tools that offer templates. Google Sites is a good example of a free tool that allows you to build simple web pages.
The procedure involves the following steps:
- Choose a Platform: Select a free website builder like Google Sites or a design tool like Canva that offers website templates.
- Select a Template: Look for a template that has a clean layout suitable for displaying products. Many templates are designed for portfolios or small businesses and can be adapted.
- Design the Homepage:
- Add a clear header with a mock business name (e.g., “Mama Nkechi’s Store”).
- Include a simple navigation menu with links for “Home,” “Products,” and “Contact Us.”
- Create Product Pages/Sections:
- For each product, create a section or a separate page.
- Upload mock product images (e.g., pictures of local crafts, food items, or clothing).
- Write short, descriptive text for each product, including a mock price (e.g., “Handmade Ankara Bag – ₦8,500”).
- Add “Add to Cart” Buttons: Place a button or text link that says “Add to Cart” next to each product. For a mock interface, this button does not need to be functional; it just shows where a customer would click.
- Include a Mock Shopping Cart Icon: In the header, add an icon that looks like a shopping cart or bag. This also does not need to be functional for a mock interface.
- Organise with Categories: If you have many products, create simple categories (e.g., “Bags,” “Jewellery,” “Clothing”) and link them from your navigation menu.
- Review and Refine: Check your mock interface to ensure it looks neat, is easy to navigate, and clearly displays the products.
Setting Up a Payment Page Using Free Templates
A payment page is where customers provide their payment details to complete a purchase. For a mock business, you will create a non-functional payment page using free templates to understand its structure and required information.
Key Features of a Payment Page
A well-designed payment page ensures a smooth transaction process. Even in a mock setup, it is important to include the typical elements.
- Order Summary: A brief list of the items being purchased, their quantities, and the total cost.
- Payment Method Selection: Options for how the customer wants to pay (e.g., credit/debit card, bank transfer, mobile money).
- Payment Information Fields: Spaces for customers to enter details like card number, expiry date, and cardholder name.
- Billing Address: Fields for the customer’s billing information.
- “Place Order” or “Pay Now” Button: The final button to complete the transaction.
- Security Indicators: Symbols or messages that assure customers their payment information is secure (e.g., padlock icon, “Secure Payment” text).
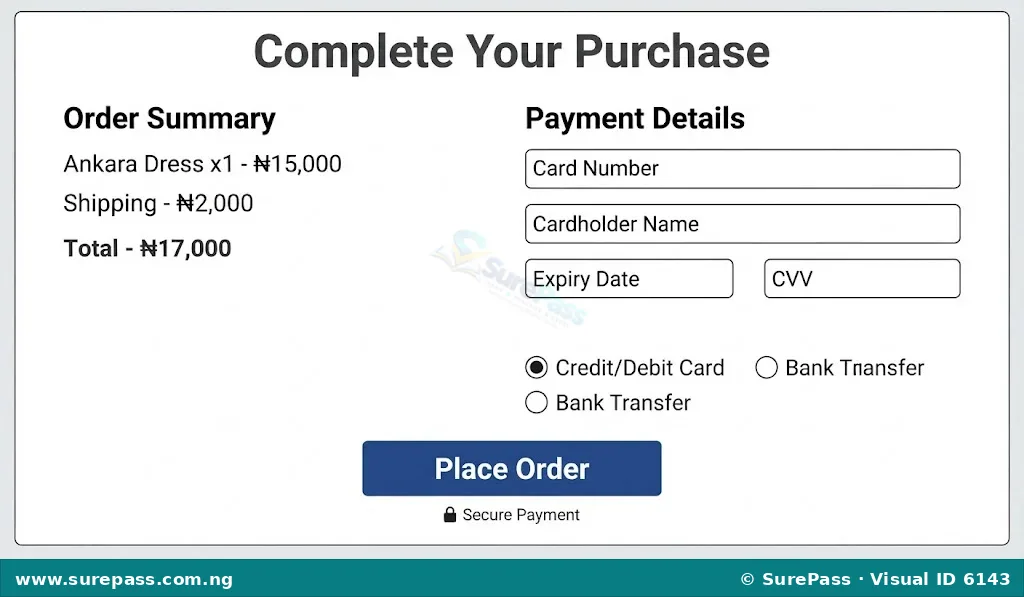
How to Set Up a Mock Payment Page
You can use various free templates available online or within design tools to create a mock payment page. The goal is to lay out the information clearly, not to process actual payments.
The procedure involves the following steps:
- Find a Template: Search for “free payment page template HTML” or use a design tool like Canva that has form templates. You can also use a simple document editor to design the layout.
- Create an Order Summary Section:
- List a few mock products and their prices.
- Add a mock shipping fee and calculate a total amount.
- Design Payment Information Fields:
- Include fields for “Card Number,” “Cardholder Name,” “Expiry Date,” and “CVV” (Card Verification Value). These fields will not be functional.
- Add options for different payment methods, such as “Credit/Debit Card” and “Bank Transfer,” using checkboxes or radio buttons.
- Add Billing Address Fields: Include spaces for “Full Name,” “Address Line 1,” “City,” “State,” and “Postal Code.”
- Include a “Place Order” Button: Design a prominent button that says “Place Order” or “Pay Now.” This button will not process payments in a mock setup.
- Add Security Indicators: Place a small padlock icon or text like “Secure Payment” to show where security assurances would be.
- Review Layout: Ensure all fields are clearly labelled and the page flows logically from top to bottom.
Creating a Feedback Form or Customer Review Section for a Mock Business
Customer feedback is valuable information that businesses collect from their customers. It helps businesses understand what they are doing well and where they can improve. A customer review section allows customers to share their experiences with others.
Importance of Customer Feedback
Collecting feedback is crucial for any business, even a mock one, for several reasons:
- Improvement: Feedback helps businesses identify problems with products or services and make necessary improvements.
- Customer Satisfaction: When customers feel heard, their satisfaction with the business increases.
- Building Trust: Positive reviews from other customers can build trust and encourage new customers to buy.
- Product Development: Feedback can inspire new product ideas or features.
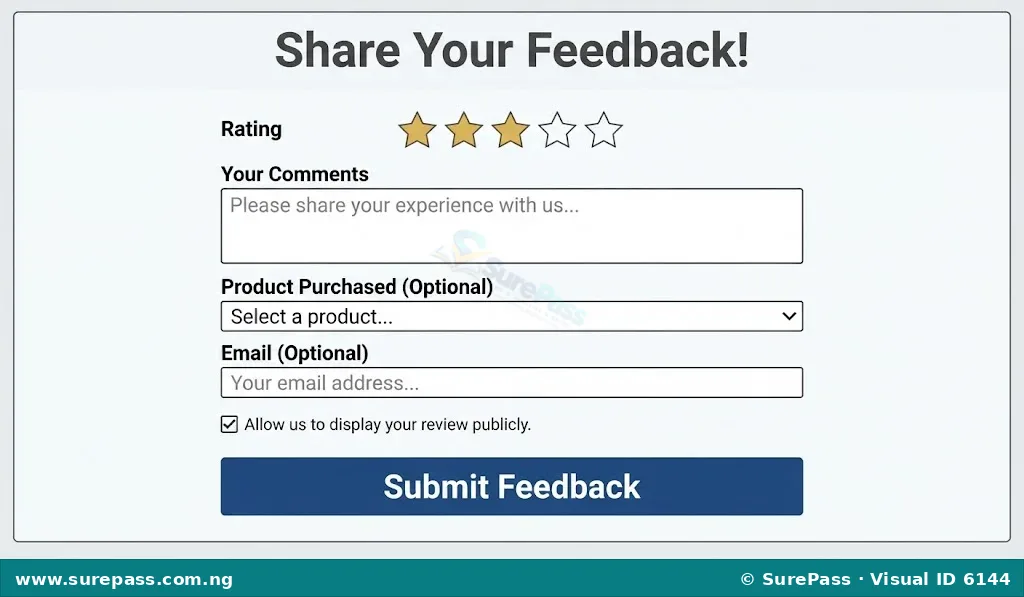
How to Create a Feedback Form
Tools like Google Forms or Microsoft Forms are excellent for creating simple, free feedback forms. You can also design a basic layout on paper or using a document editor.
The procedure involves the following steps:
- Choose a Form Builder: Use Google Forms (requires a Google account) or Microsoft Forms (requires a Microsoft account). These tools allow you to create forms that can be shared online.
- Start a New Form: Open your chosen form builder and select “New Form” or “Blank Quiz.”
- Add a Title and Description: Give your form a clear title, such as “Customer Feedback Form” or “Product Review.” Add a short description explaining its purpose.
- Include Essential Questions:
- Rating Question: Add a question asking customers to rate their experience or a specific product. Use a “Linear Scale” (e.g., 1 to 5 stars) or “Multiple Choice” for satisfaction levels.
- Open-Ended Comments: Include a “Paragraph” or “Long Answer” text box for customers to write detailed comments or suggestions. Label it “Your Comments” or “What can we improve?”
- Add Optional Questions:
- Product Purchased: If applicable, add a “Dropdown” or “Multiple Choice” question for customers to select the product they are reviewing.
- Contact Information: Include an optional “Short Answer” field for “Email Address” or “Phone Number” if the business might need to follow up.
- Add a “Submit” Button: The form builder automatically includes a submit button.
- Customise and Share:
- Change the form’s theme or colours to match your mock business.
- Once complete, the form builder will provide a link that you can share as if it were on your e-commerce platform.
Creating Online Advertisements
Online advertisements are promotional messages displayed on websites, social media, or search engines to attract potential customers. For a mock e-commerce platform, creating simple online ads helps to understand how businesses promote their products digitally.
Purpose of Online Advertisements
Online advertisements serve several purposes for businesses:
- Brand Awareness: They help more people know about the business and its products.
- Driving Traffic: Ads direct potential customers to the e-commerce website.
- Sales Generation: They encourage customers to make a purchase.
- Targeting Specific Audiences: Online ads can be shown to specific groups of people who are most likely to be interested in the products.
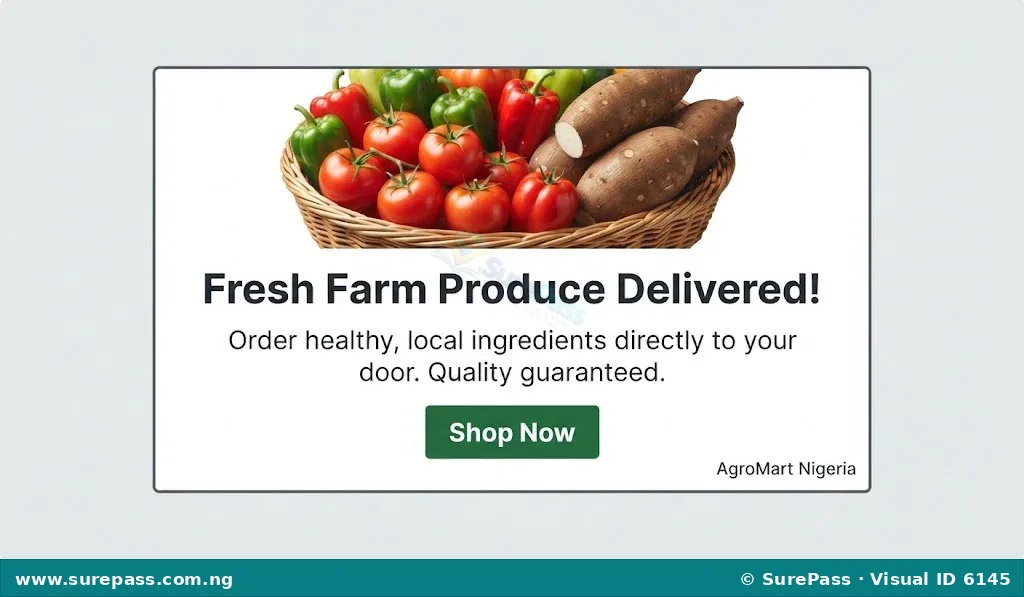
How to Create a Simple Online Advertisement
You can use free design tools like Canva to create visually appealing online advertisements. These tools provide templates that make it easy to design professional-looking ads without needing advanced design skills.
The procedure involves the following steps:
- Choose a Design Tool: Use Canva or a similar free graphic design tool that offers templates for social media posts or web banners.
- Select an Ad Template: Search for “advertisement,” “social media ad,” or “banner ad” templates. Choose a simple, eye-catching layout.
- Add a Product Image:
- Upload a clear, high-quality image of a mock product you want to promote (e.g., a picture of a beautiful dress, a tasty meal, or a unique craft).
- Position the image prominently in the ad.
- Write a Catchy Headline: Create a short, attention-grabbing headline that highlights a benefit or offer (e.g., “Get 20% Off All Shoes!”, “Fresh Food Delivered Daily!”).
- Include a Short Description: Add a brief sentence or two that provides more details about the product or offer (e.g., “Explore our new collection of stylish footwear,” “Enjoy farm-fresh vegetables and fruits at your doorstep.”).
- Add a Call to Action (CTA): This is a button or text that tells customers what to do next. Examples include “Shop Now,” “Learn More,” “Order Here,” or “Visit Store.” Make the CTA stand out.
- Include Your Mock Business Name/Logo: Place your mock business name or logo somewhere on the ad, usually in a corner, to build brand recognition.
- Review and Download: Check your ad for clarity, spelling, and visual appeal. Download it as an image file (e.g., JPG or PNG) ready to be used as a mock online advertisement.


0 comments
Open the discussion when you need it. Comments stay collapsed until requested so the initial article remains light.