



ARTICLE CONTENTSOn this page 11 sections
Nurseries management
Performance Objectives
By the end of the lesson, students should be able to:
- explain the meaning and importance of nursery;
- discuss the advantages and disadvantages of nurseries;
- identify different types of nurseries;
- discuss nursery management practices;
- construct nurseries;
- manage nurseries.
Meaning of Nursery
A nursery is a temporary or permanent place where young, delicate plants are raised under intensive care before they are transplanted to their permanent fields.
Many agricultural and horticultural crops produce extremely small and delicate seeds. If these seeds are sown directly into the main field, they may fail to germinate or be destroyed by harsh weather, pests, weeds, and heavy rainfall. The nursery provides a controlled, protective environment that ensures a high survival rate during the early, vulnerable stages of plant growth.
Importance of Nurseries
The establishment of a nursery is a fundamental practice in modern crop production and horticulture. It serves several critical agronomic purposes.
The main reasons for establishing a nursery include:
- Protection of Delicate Seedlings: Young plants are shielded from extreme environmental hazards such as scorching sun, heavy rainfall, and strong winds.
- Concentrated Care: It allows the farmer to easily perform intensive management practices such as watering, weeding, and pest control within a small, manageable area.
- Selection of Healthy Seedlings: It enables the farmer to select only the most vigorous, disease-free, and uniform seedlings for transplanting, which leads to a highly productive main field.
- Reduction of Seed Wastage: Tiny and expensive seeds (such as hybrid tomato or pepper seeds) are sown precisely, preventing loss to birds, insects, or erosion.
- Better Land Utilization: While the seedlings are growing in the nursery, the main field can be prepared, allowing for efficient crop rotation and land management.
- Improved Crop Establishment: Seedlings raised in a nursery develop a strong root system, which helps them adapt quickly and survive transplanting shock when moved to the field.
Advantages and Disadvantages of Nurseries
While nurseries are highly beneficial, they also present certain challenges that farmers must consider before establishing them.
Advantages of Nurseries
The advantages of using a nursery system include:
- High Germination Rate: The close monitoring of moisture, temperature, and soil conditions leads to a much higher germination percentage compared to direct sowing.
- Efficient Input Use: Water, fertilizers, and crop protection chemicals are applied to a small, concentrated area, which minimizes waste and reduces production costs.
- Easy Pest and Disease Management: Outbreaks of pests or pathogens can be quickly detected and treated before they spread.
- Facilitation of Propagation: It makes the propagation of crops that require vegetative methods (such as budding, grafting, or layering) much easier to execute and monitor.
- Income Generation: Commercial nurseries provide a steady source of income through the production and sale of high-quality seedlings to other farmers.
Disadvantages of Nurseries
The disadvantages of using a nursery system include:
- High Labor Requirement: Daily operations such as watering, weeding, shading, and pest control require constant attention and physical labor.
- High Initial Cost: Constructing nursery structures, purchasing seed trays, poly-bags, and specialized soil media require significant capital.
- Risk of Transplanting Shock: Seedlings can suffer root damage, wilting, or death if they are not transplanted carefully and at the correct growth stage.
- Rapid Disease Spread: The high density of plants and high humidity in a nursery can lead to the rapid spread of fungal diseases, such as damping-off.
- Requirement for Technical Skill: Successful nursery management requires specialized knowledge of seed viability, soil sterilization, grafting, and hardening-off techniques.
Types of Nurseries
Nurseries can be classified based on their duration of use, the types of crops grown, or the containers used to raise the seedlings.
The primary classifications of nurseries are:
- Temporary Nurseries: These are established for a short period, usually for a single planting season. They are located very close to the main field to minimize the distance seedlings must be transported. Once the seedlings are transplanted, the nursery is abandoned. They are commonly used for seasonal vegetable crops like tomatoes, peppers, and onions.
- Permanent Nurseries: These are designed for long-term, continuous use over many years. They feature durable structures, permanent water sources (such as boreholes or irrigation systems), and secure fencing. They are used for raising perennial crops like cocoa, oil palm, citrus, rubber, and ornamental plants.
Within these classifications, seedlings can be raised in different physical forms. Observe the diagram below to see the common methods of raising seedlings.
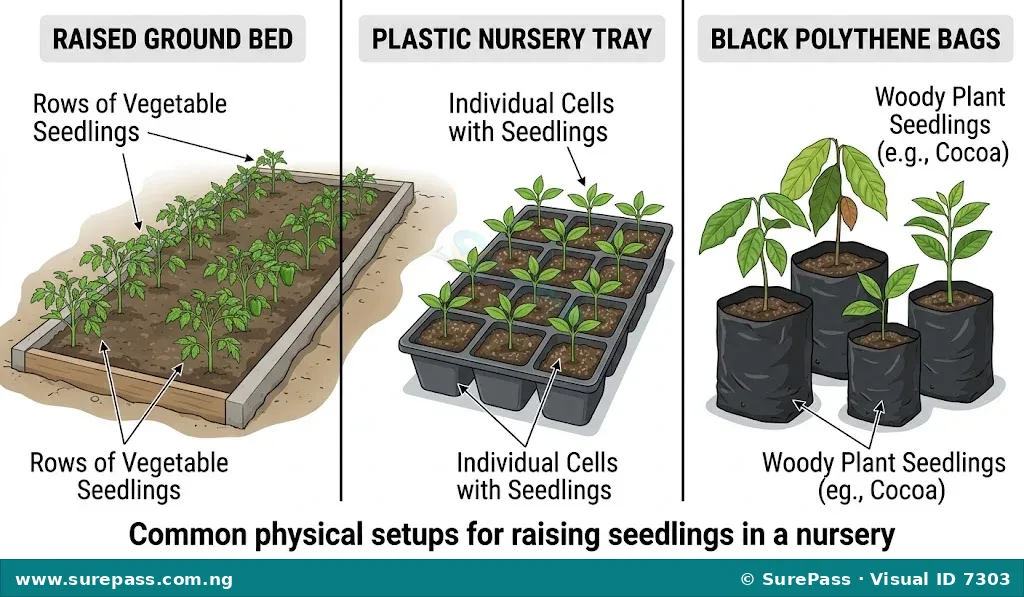
The physical setups shown in the diagram include:
- Ground Beds (Seedbeds): Raised or sunken beds prepared directly on the ground. Raised beds are preferred in wet areas to improve drainage, while sunken beds are used in dry regions to conserve moisture.
- Nursery Boxes and Trays: Portable wooden boxes or plastic trays divided into individual cells. They are filled with sterilized soil or organic media and are highly suitable for raising delicate vegetable seeds.
- Polythene Bags (Poly-bags): Individual plastic bags filled with a rich soil mixture. They are widely used for tree crops and ornamental plants because they allow seedlings to be transported to the field with their root systems completely intact, eliminating transplanting shock.
Nursery Management Practices
Nursery management practices are the routine cultural operations carried out in the nursery to ensure the healthy growth and development of seedlings.
The essential nursery management practices are:
- Watering: This is the regular application of water to the seedlings. It should be done twice daily (early in the morning and late in the evening) using a fine-rose watering can to prevent washing away the seeds or damaging the delicate stems.
- Weeding: This is the manual removal of unwanted plants (weeds) from the nursery bed or containers. Weeds must be removed promptly because they compete with the seedlings for nutrients, water, space, and light.
- Shading: This involves providing a temporary roof over the nursery to protect the young seedlings from direct sunlight and heavy rain. The shade is gradually reduced as the seedlings grow.
- Thinning: This is the removal of weak, diseased, or overcrowded seedlings from a stand. It reduces competition and allows the remaining seedlings to grow stronger and healthier.
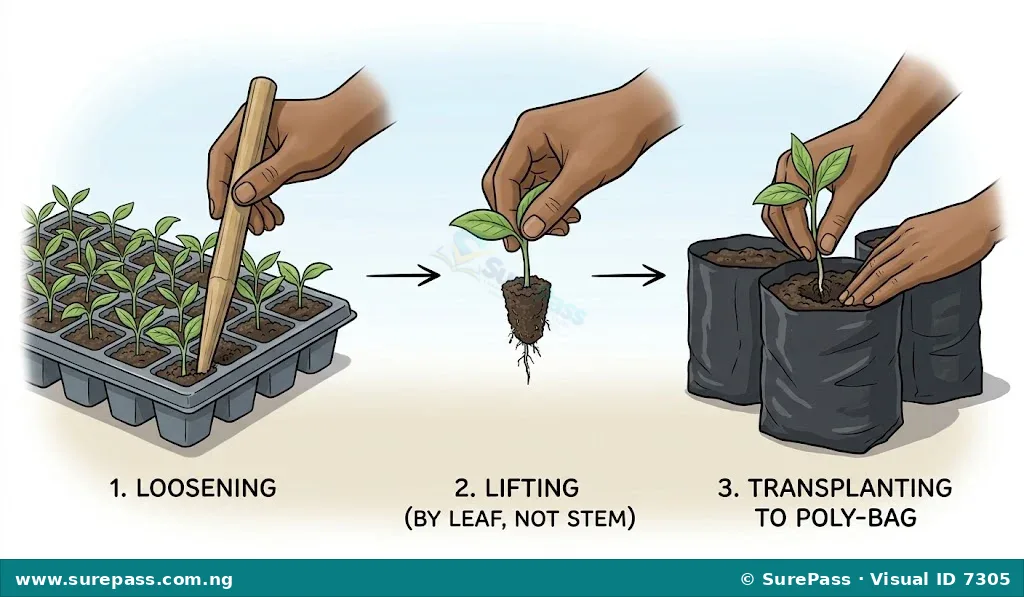
- Pricking-out: This is the transfer of young, delicate seedlings from crowded seedbeds or trays into individual containers, such as poly-bags or larger pots. This is usually done when the seedlings develop their first true leaves.
- Hardening-off: This is the gradual exposure of seedlings to natural field conditions (sunlight and reduced watering) a week or two before transplanting. This process toughens the plant tissues and prepares them to survive the harsher conditions of the main field.
- Pest and Disease Control: This involves monitoring the nursery for pests (like caterpillars and aphids) and diseases (like damping-off). Appropriate insecticides and fungicides are applied carefully when necessary.
- Fertilizer Application: The application of dilute liquid fertilizers or well-decomposed organic manure to provide essential nutrients for rapid seedling growth.
How to Construct a Nursery
Constructing a nursery requires careful planning, site selection, and the assembly of appropriate materials. The site must be close to a reliable water source, have fertile and well-drained soil, be protected from strong winds, and be secure from roaming animals.
The required materials for constructing a basic shaded ground nursery are:
- Bamboo poles or wooden lines
- Palm fronds or agricultural shade net
- Nails and hammer
- Garden fork and spade
- Watering can
- Measuring tape and pegs
- Topsoil, compost, and river sand
The construction procedure involves the following steps:
- Site Clearing: Clear all weeds, stones, and debris from the selected nursery site.
- Measuring and Pegging: Use a measuring tape and pegs to mark out the dimensions of the nursery bed. A standard bed is usually 1 meter wide and of any convenient length.
- Soil Preparation: Dig the soil thoroughly using a garden fork to a depth of about 20 to 30 centimeters. Mix the topsoil with well-decomposed organic manure and river sand to improve fertility and drainage.
- Bed Formation: Raise the soil to a height of 15 centimeters above the ground level to form a raised bed. Smooth the surface of the bed using a garden rake.
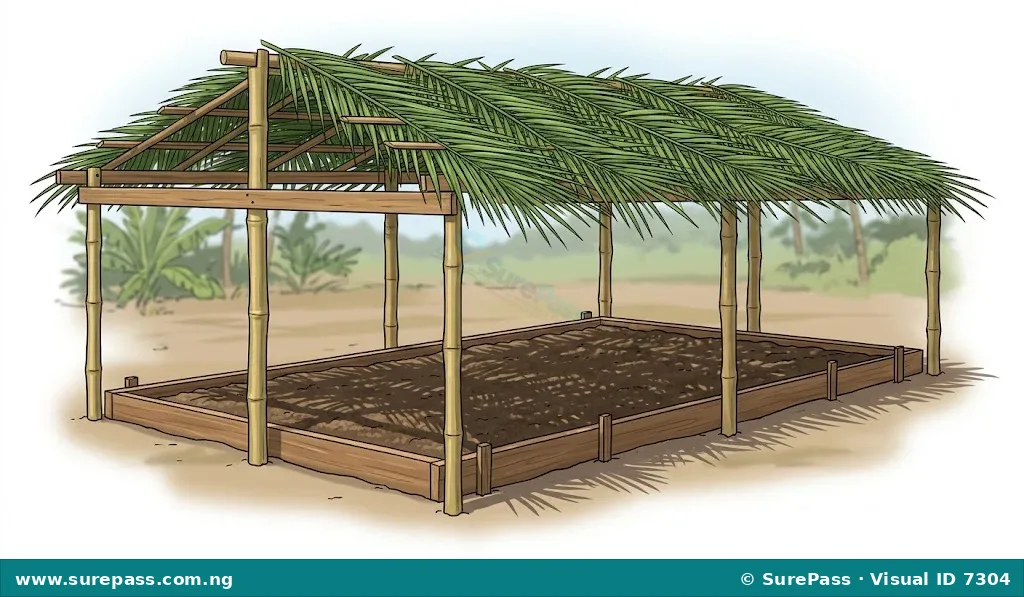
- Erecting the Shade Structure: Drive strong bamboo or wooden poles into the ground at the four corners of the bed. Nail horizontal poles across the top of the vertical posts to create a framework.
- Applying the Shade Material: Lay palm fronds or a shade net across the top framework to provide partial shade, ensuring that some filtered sunlight can still reach the bed.
Look at the diagram below to observe a completed nursery structure.
How to Manage a Nursery
Once the nursery is constructed and seeds are sown, daily management is required to ensure the seedlings grow into healthy plants ready for the field.
The management procedure involves the following steps:
- Daily Watering: Water the nursery bed gently every morning and evening. Ensure the soil is moist but not waterlogged, as excess water can cause the seeds to rot or lead to fungal diseases.
- Shade Adjustment: Monitor the sunlight. As the seedlings grow older and stronger, gradually remove some of the palm fronds from the roof to expose them to more sunlight.
- Hand Weeding: Inspect the bed daily and gently pull out any weeds by hand. Do this carefully to avoid disturbing the roots of the young seedlings.
- Thinning and Pricking-out: When the seedlings emerge and become crowded, carefully pull out the weak ones (thinning). If raising crops like tomatoes or cocoa, gently lift the seedlings with a hand trowel and transfer them into individual poly-bags (pricking-out).
- Pest and Disease Monitoring: Check the leaves and stems daily for signs of insect damage or fungal growth. If damping-off (rotting of the stem at ground level) is observed, reduce watering immediately and apply a mild fungicide.
- Hardening-off: One week before transplanting, completely remove the shade structure and reduce the frequency of watering. This prepares the seedlings for the hot and dry conditions of the main field.
Observe the diagram below to understand the key steps in the pricking-out process during nursery management.
Summary
Nursery management is a vital aspect of crop production and horticulture. By raising seedlings in a protected environment, farmers can ensure high germination rates, healthy plant establishment, and efficient resource use. Understanding the different types of nurseries, constructing them properly using local materials, and carrying out routine management practices like watering, weeding, and hardening-off are essential skills for successful crop production.
Questions for Evaluation
Answer the following questions to review the unit:
- Define the term “nursery” and state four reasons why it is important in crop production.
- List three advantages and three disadvantages of raising seedlings in a nursery.
- Differentiate between a temporary nursery and a permanent nursery, giving one example of a crop grown in each.
- Explain the following nursery management practices:
- Thinning
- Pricking-out
- Hardening-off
- Outline the steps involved in constructing a shaded ground nursery bed.
- Describe the daily routine required to manage a nursery successfully from sowing to transplanting.




0 comments
Open the discussion when you need it. Comments stay collapsed until requested so the initial article remains light.