



ARTICLE CONTENTSOn this page 7 sections
Seeds Management
Performance Objectives
By the end of the lesson, students should be able to:
- explain the meaning of seed and grain;
- identify different types of seeds;
- explain the meaning and types of seed dormancy;
- discuss the meaning and importance of seed viability test;
- conduct Seed viability test.
Meaning of Seed and Grain
A seed is a fertilized, mature ovule of a flowering plant containing an embryo, stored food material and a protective coat, which is capable of germinating under favorable conditions to produce a new plant.
Seeds are the primary means of propagation for most agricultural crops. They are carefully selected, treated and stored to preserve their life and genetic purity for planting in subsequent seasons.
A grain is a mature, dry fruit of a cereal grass where the seed coat is fused with the fruit wall, which is primarily harvested and used for human consumption or animal feed.
Grains are generally processed for food, such as flour or animal feed, and are often treated with preservatives that may destroy the embryo, making them unsuitable for planting.
The differences between a seed and a grain are summarized in the table below:
| Feature | Seed | Grain |
|---|---|---|
| Primary Purpose | Used for propagation and planting to produce new crops. | Used for consumption as food or animal feed. |
| Structure | A mature ovule containing an embryo, endosperm and seed coat. | A mature fruit (caryopsis) where the seed coat is fused with the fruit wall (pericarp). |
| Viability | Must be viable (alive) to allow germination. | Viability is not necessary; the embryo may be dead or damaged. |
| Chemical Treatment | Treated with fungicides and insecticides to protect the embryo during storage and early growth. | Not treated with harmful chemicals, or treated only with food-safe preservatives to prevent poisoning consumers. |
| Selection Criteria | Selected based on genetic purity, viability and germination potential. | Selected based on nutritional value, weight and cleanliness. |
Types of Seeds
Seeds are classified into two main groups based on the number of cotyledons (seed leaves) present in the embryo. These groups are monocotyledonous seeds and dicotyledonous seeds.
Monocotyledonous Seeds
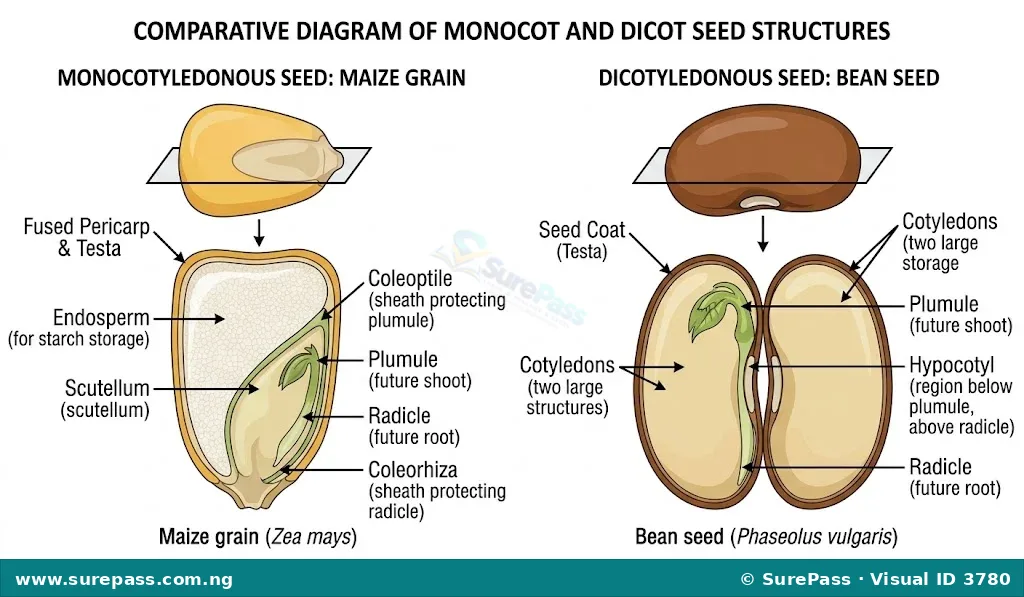
Monocotyledonous seeds are seeds that possess only one cotyledon or seed leaf within the embryo.
These seeds typically store their food reserves in a specialized tissue called the endosperm. During germination, the single cotyledon remains below or at the soil surface and helps transfer nutrients from the endosperm to the growing seedling.
Examples of monocotyledonous seeds include:
- Maize (corn)
- Rice
- Wheat
- Millet
- Sorghum
Dicotyledonous Seeds
Dicotyledonous seeds are seeds that possess two cotyledons or seed leaves within the embryo.
In these seeds, the food reserves are usually stored directly within the two large cotyledons, and the endosperm is often absent or highly reduced in the mature seed. During germination, the cotyledons may emerge above the ground to become the first photosynthetic leaves, or they may remain below the soil surface.
Examples of dicotyledonous seeds include:
- Cowpea (beans)
- Groundnut
- Soybean
- Melon (egusi)
- Cocoa
Observe the diagram below to understand the structural differences between monocotyledonous and dicotyledonous seeds.
Seed Dormancy
Seed dormancy is a temporary state in which a viable seed fails to germinate even when all the necessary environmental conditions for growth are present.
These environmental conditions include adequate moisture, oxygen, suitable temperature and sometimes light. Dormancy is a natural survival mechanism that prevents seeds from germinating during unfavorable seasons when the survival rate of the young seedling would be low.
Types of Seed Dormancy
The main types of seed dormancy are:
- Physical Dormancy (Seed Coat Dormancy): This occurs when the seed coat is extremely hard, tough or impermeable to water and oxygen. Because water and air cannot penetrate the seed coat, the embryo remains inactive. Examples of seeds with physical dormancy include flamboyant seeds, oil palm seeds and some legume seeds.
- Chemical Dormancy: This occurs due to the presence of chemical inhibitors in the seed coat, endosperm or embryo. These chemicals prevent the metabolic processes required for germination. The inhibitors must be washed away by rain or broken down by soil microbes before the seed can germinate. Examples include tomato and desert plant seeds.
- Physiological Dormancy (Embryo Dormancy): This occurs when the embryo inside the seed is physiologically immature or undeveloped at the time of harvest. The seed requires a period of after-ripening or exposure to specific environmental conditions, such as cold temperatures, to allow the embryo to mature fully and become ready for germination.
Seed Viability and Viability Testing
Seed viability is the capacity of a seed to remain alive, healthy and capable of germinating under favorable environmental conditions.
A viable seed contains a living embryo that can resume active growth when planted. Over time, seeds lose their viability due to aging, poor storage conditions, pest attacks or disease infections.
A seed viability test is a practical method used to determine the percentage of living seeds in a given seed lot that are capable of germinating and developing into normal seedlings.
This test is carried out before planting to ensure that farmers do not waste resources on dead or low-quality seeds.
Importance of Seed Viability Test
Conducting a seed viability test is highly beneficial to farmers and horticulturists. The main reasons for carrying out this test include:
- Determining Seed Quality: It helps farmers identify high-quality seed lots with high germination rates, ensuring a uniform crop stand in the field.
- Calculating Seed Rate: It allows farmers to calculate the exact quantity of seeds required per hectare. If the viability percentage is low, the farmer can increase the sowing density to compensate for the non-germinating seeds.
- Preventing Economic Loss: It prevents the waste of labor, time, land and money that would occur if dead seeds were planted.
- Planning Replanting Activities: It helps farmers decide whether to proceed with planting or to source a better batch of seeds before the planting season begins.
How to Carry Out a Seed Viability Test
The most common and simple method used to test seed viability is the germination test. This test involves placing a representative sample of seeds under favorable conditions and observing the percentage that germinates over a specific period.
The required materials for this practical exercise are:
- A representative sample of seeds (e.g., 100 cowpea or maize seeds)
- Petri dishes or shallow bowls
- Tissue paper, cotton wool or a clean piece of cotton cloth
- Water
- A notebook and pen for recording observations
The procedure involves the following steps:
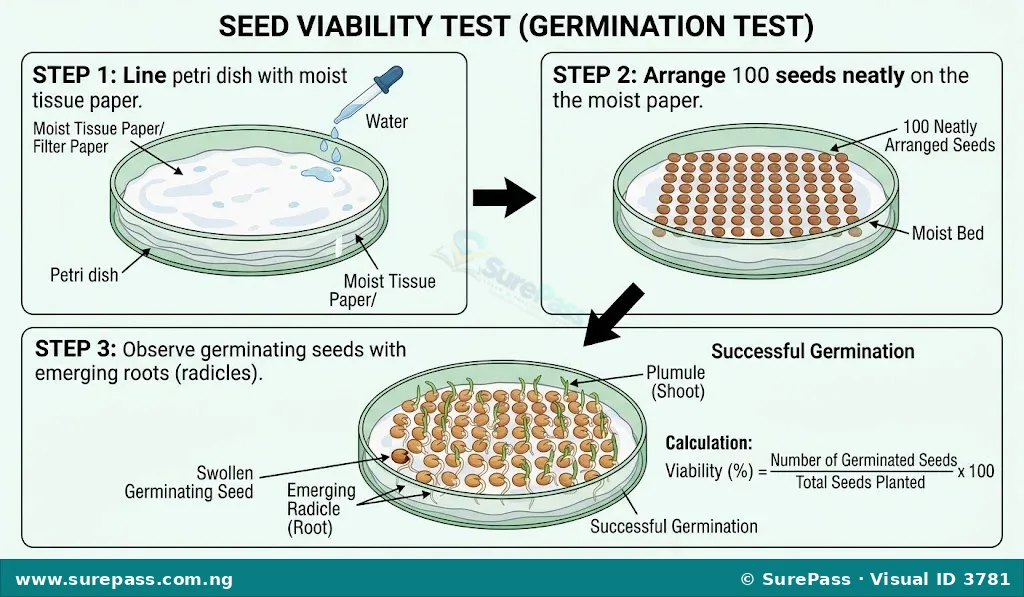
- Line the bottom of the petri dish or bowl with a double layer of tissue paper, cotton wool or clean cloth.
- Moisten the lining material thoroughly with water, ensuring it is damp but not flooded with excess water.
- Count out exactly 100 seeds from the seed lot. Using 100 seeds makes the calculation of the germination percentage straightforward.
- Arrange the seeds carefully on the moist lining, leaving enough space between them to prevent the spread of mold.
- Cover the petri dish or bowl to retain moisture, leaving a small gap to allow air circulation.
- Place the setup in a warm, well-ventilated area away from direct sunlight.
- Inspect the setup daily and add small amounts of water to keep the lining moist. Do not allow the seeds to dry out.
- Observe and count the number of germinated seeds daily from the third day until the seventh or tenth day. A seed is considered germinated when the radicle (young root) emerges.
- Record the final number of germinated seeds at the end of the test period.
Observe the setup for the seed viability test shown below.
Calculating Germination Percentage
The germination percentage, which represents the viability of the seed lot, is calculated using the formula below:
$$\text{Germination Percentage (\%)} = \left( \frac{\text{Number of Germinated Seeds}}{\text{Total Number of Seeds Planted}} \right) \times 100$$
Worked Example
A student planted 100 cowpea seeds in a petri dish lined with moist tissue paper. After 7 days, 85 seeds germinated successfully, while 15 seeds failed to germinate. Calculate the germination percentage of the cowpea seed lot.
Solution:
- Number of germinated seeds = 85
- Total number of seeds planted = 100
- Applying the formula: $$\text{Germination Percentage} = \left( \frac{85}{100} \right) \times 100 = 85\%$$
The germination percentage is 85%. This indicates that the seed lot has high viability and is suitable for field planting.
Interpreting the Results
The viability of a seed lot can be interpreted as follows:
- 80% and above: Excellent viability. The seeds are highly recommended for planting.
- 50% to 79%: Moderate viability. The seeds can be planted, but the seed rate should be increased to ensure a good crop stand.
- Below 50%: Poor viability. The seed lot should be discarded or used for consumption as grain, as it will result in a very poor crop stand.





0 comments
Open the discussion when you need it. Comments stay collapsed until requested so the initial article remains light.